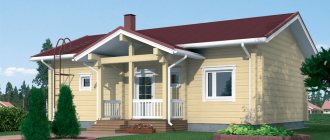
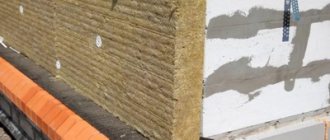
Wood is a traditional building material from which residential buildings are built, in which people feel most comfortable. But no matter what wonderful properties: absorber-regulator of harmful substances and excess moisture - wood may have, it is not a sufficient heat insulator. With a small thickness of enclosing structures, additional thermal insulation increases the coefficient of thermal resistance of the materials from which the walls of the building are constructed, which reduces heat loss, and therefore helps save energy resources. Insulation of the external wall from the facade side from the point of view of maintaining normal temperature and humidity conditions in the premises of the house, it is the best option. In addition, since we are talking about wood - a relatively moisture-intensive material, susceptible to rotting, fungus and other diseases caused by moisture, then from this point of view, the most appropriate scheme is considered to be external insulation with a subsequent protective and decorative screen - facade cladding. When insulating walls from the outside, it is necessary, first of all, to mount the frame. As insulation for wooden houses, it is best to use heat-insulating materials on a non-flammable basis, for example “Rockwool LAIT BATTS”, “URSA P-20” or similar ones. Typically, 600 mm wide slabs are used for insulation, which are placed spaced between the frame posts. In this case, the distance between the posts must correspond to the type of cladding material chosen and be 10-20 mm less than the width of the insulation being fixed. In order not to heat the street and to use energy resources economically, the insulation layer in the Moscow region should be made at least 75 mm thick. Table 1 shows the results of calculating the thickness of the heat-insulating layer in the structure of the outer wall of a residential building made of timber with a cross-section of 150×150 mm when insulated with various materials. Table 1 shows the results of calculating the thickness of the thermal insulation layer in the structure of the outer wall of a residential building when insulated with various materials. Unfortunately, the message does not indicate the interior wall decoration. Therefore, we will assume that the interior decoration is covering the walls with plasterboard sheets. Table 1.
| Item no. | Name of insulation | Unit change | Insulation layer thickness | Thickness of the wall structure, mm | ||
| wood | air gap | GKL | ||||
| 1. | "ROCKWOOL LIGHT BUTTS" | mm | ||||
| 2. | "URSA P-20" | mm | ||||
| 3. | Foam plastic PSB-S 25 | mm | ||||
| 4. | "EXTRAPEN 35" | mm | ||||
| 5. | "PENOPLEX 35" | mm | ||||
| 6. | Cellulose TIM "ECOWOTHER" | mm | ||||
Notes . 1. The calculation was carried out provided that:
- Moscow city;
- estimated indoor air temperature +20ºC.
2. This calculation was performed using an engineering calculation method based on SNiP 23-02-2003, SP 23-101-2004, SNiP 23-01-99* (“energy-saving approach”). The calculated thermal conductivity coefficient of the insulation used in the calculation is taken for normal conditions at a temperature of +25ºC. 3. This calculation is advisory in nature. An official calculation can be made by an organization licensed to design building structures.
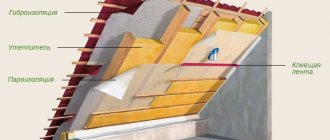
A waterproofing but vapor-permeable membrane is fixed on top of the insulation, which serves to protect the insulation and load-bearing elements of the frame structure from atmospheric moisture and as additional protection from wind.
It should be noted that an air gap of 10-15 mm must be left between the insulation and the waterproofing membrane, otherwise the membrane will not “work” and the moisture that gets into the insulation will not erode out. However, super-diffusion waterproofing membranes are commercially available, for example ISOSPAN-AM, which can be laid directly on top of the insulation.
The pre-waterproofing material can be secured to the frame posts with a construction stapler or galvanized nails of short length, but with a wide head. Then, on top of it, counter battens are also attached to the racks with galvanized nails or self-tapping screws - wooden blocks usually measuring 40x50 mm. The façade cladding is mounted on counter-battens using a material chosen by the developer, for example, Kiriss tiles, siding or some other piece or sheet cladding material, for example, DSP boards. It should be noted that the thickness of the counter-batten will provide the necessary ventilation gap between the waterproofing film and the outer skin.
Insulating the walls of a house from the inside has a number of disadvantages
. Firstly, the effect of a thermos is created with all the ensuing consequences, in the literal and figurative sense of the word. Secondly, the internal usable area of the premises is reduced. Thirdly, the heat-cold interface point in the thickness of the wall shifts inward, while the dew point is higher and closer to the actual air temperature. In addition, fourthly, such a wall accumulates heat to a lesser extent, which is why the house cools down faster after the furnace is fired.
However, if you are going to finish the interior walls, for example, with plasterboard sheets, then, of course, you can place thermal insulation material under such cladding also between the frame posts. At the same time, neither films nor roll materials for various purposes are pre-fixed to the walls.
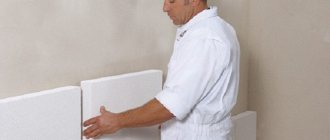
When placing a heat-insulating layer on the inside of the building envelope, it is necessary to approach the choice of insulation material very carefully. First of all, you need to pay attention to the environmental friendliness of the insulation and its flammability. If various polystyrene foam insulation materials are normally harmless to human health, then in force majeure circumstances, for example during combustion, they can release toxic substances. It is best to use non-flammable mineral wool thermal insulation board materials that will last for decades to insulate walls on the inside of residential premises.
To ensure that mineral wool insulation does not lose its thermal insulation properties due to moisture accumulation and does not “deteriorate” over time, it is necessary to ensure its protection against the penetration of moisture vapor from the room. For this purpose, vapor barrier films are used, which are represented in the country’s construction market in a wide range of quality and price.
It should be clarified that when decorating the interior walls of a house with any material without an insulation device, a vapor barrier layer is not needed.
The vapor barrier material on the frame is also pre-fixed using a construction stapler or galvanized nails of short length, but with a wide head. Subsequently, the vapor barrier is nailed down with slats, the thickness of which will provide the necessary air gap of 20-30 mm between the film and the inner lining of the walls. This gap is necessary so that moisture vapor trapped behind the cladding is ventilated outside.
Then the walls are lined along the frame with some kind of sheet building material, for example plasterboard sheets.
When insulating external walls from the inside, as noted above, a thermos effect is created and in order for moist air to escape from the building, it is necessary to equip a ventilation system according to some principle or to ventilate the premises of the house more often by opening window vents or transoms.
It should be noted that before installing the frame and fixing the insulation, all wooden structures must in any case be treated with fire retardant and antiseptic compounds or some combination of wood protection agents. Processing of wooden structures is carried out to obtain fire-resistant wood, in accordance with the requirements of GOST 16363-98 and to protect wooden structures from the effects of various types of biodestroyers: mold, rot, fungus, wood-damaging insects, as well as against the appearance of blue and blackening.
The timber from which it is assembled is also used for the construction of load-bearing structures or fences. In fact, it is a log after edging on 2, 3 or 4 sides. Three-sided processing produces timber with a front side that imitates a log surface.
Types of timber
Beam and whetstone are different concepts. A diameter thickness of less than 100 mm is a block. To assemble a house, the timber must be made of pine (for better air permeability) and have a cross-section of 150x150 or 190x150 mm.
For low-rise housing construction they use:
- solid timber (cheap, but burdened with long-term shrinkage in the future);
- glued (high-tech, with specified useful properties, and therefore expensive material);
- profiled (with a tongue-and-groove connection installed during processing - this removes the internal pressure leading to cracking of the wood).
Profiled timber is made from solid wood or glued from lamella boards. The last option has no disadvantages and belongs to premium-class building materials. This type of lumber also differs according to the method of surface treatment :
- profiled timber (German) - “comb”;
- profiled timber (Finnish) - with two tenons for connection;
- profiled timber with cups - grooves for corner joints;
- timber with a smooth front surface;
- timber with a convex front surface.
What makes timber the preferred material in private housing construction?
- Design-friendly appearance, the ability to play with color and texture.
- Simplicity and waste-free construction.
- Factory surface treatment suitable for applying finishing materials (drying oils, paints).
- Environmentally friendly construction while maintaining a healthy microclimate.
- Superior performance properties over rounded logs.
- Comparative efficiency.
All the shortcomings of a house made of timber that appear later are a consequence of violations of the production technology of this material.
No matter how carefully the walls made of profiled timber are assembled, it is impossible to avoid loose fit and cracks. They make the house ventilated and permeable to low temperatures.
Therefore, an important stage of construction is the correct insulation of a house made of timber - internal and external.
Choosing a heat insulator
To know how to insulate a house made of timber from the outside, you need to decide on the type of insulation. The functional properties of heat insulators, their cost and installation complexity are assessed.
Mineral wool
Insulating a house with mineral wool from the outside has a number of advantages: high thermal insulation and sound insulation properties, non-flammability, environmental safety, simple installation. The material is gas-permeable if used to insulate a house made of timber, complete with membranes - vapor barrier and windproof. This allows the walls to “breathe”.
The disadvantage of mineral wool is its hygroscopicity. When moisture accumulates, the thermal insulation properties decrease sharply. It should be noted that the cost of the material and membranes is quite high. An attempt to reduce the cost of insulating a façade with mineral wool by using conventional film will reduce the service life of the house and worsen the indoor microclimate.
Thermal insulation of the house facade with mineral wool
Styrofoam
The advantages include affordable cost and high thermal insulation qualities (with a density of at least 35 kg/m3), simple installation, low weight, and hydrophobicity.
Disadvantages: flammability, destruction by ultraviolet radiation and damage by rodents. The material is gas-tight and if the cheapest material is installed incorrectly, the walls of a wooden building will not “breathe”.
Thermal insulation of a log house with foam plastic
Extruded polystyrene foam (penoplex)
Insulating the walls from the outside with polystyrene foam will reliably protect structures from freezing. At the same time, the material has a low tendency to fire and is not damaged by rodents.
Thermal insulation from the outside with penoplex will cost more than when using polystyrene foam, but the problems remain the same - impaired air exchange in insulated structures if the material is glued directly to the walls.
Thermal insulation of the facade with penoplex
Foamed polyethylene
Polyethylene, foamed under high or low pressure, may have a foil surface on one or both sides. Thin rolled material is characterized by high thermal insulation properties.
Using it for external insulation, you can save on vapor barrier and wind protection - foamed polyethylene does not need them. The rolled material is mounted as a continuous sheet on top of the sheathing, stuffed to create a ventilation gap. The joints of the strips are taped with aluminum tape. Then a counter-lattice is attached to cover the walls with siding or decorative panels.
Thermal insulation of the external walls of the house with polyethylene
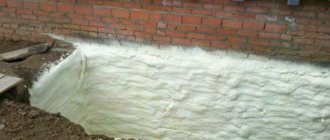
Sprayed polyurethane foam
The main advantage of sprayed polyurethane foam is the ability to create a seamless thermal insulation layer on surfaces of any configuration. The material is durable and environmentally friendly.
But with such external thermal insulation, wooden structures are susceptible to rotting, since the insulation does not allow steam to pass through, and it is impossible to create a ventilation gap.
Thermal insulation of the house facade with polyurethane foam
Ecowool
A good option for insulating the facade. The material is fire resistant, environmentally friendly, and vapor permeable. Such thermal insulation does not disturb the microclimate in a wooden house.
There are only two disadvantages to note: high cost and the need to use professional equipment for proper installation.
Thermal insulation of the walls of a log house with ecowool
Insulation of a house made of profiled timber
Traditional tow has now received effective competitors : jute, linen wool, ecowool, mineral wool slabs, fiberglass, polystyrene foam, thermobasalt. To evenly distribute the insulation between the crowns, tapes made of fibrous materials in the form of a non-woven fabric are used, which are attached to the wood with a stapler or glue.
When choosing insulation, you should be guided not only by its heat-saving properties, but also by its susceptibility to open fire, fungal and mold damage.
Properties of mineral wool
The fibers of the material are made from basalt, a particularly strong rock. The big advantages of mineral wool are its resistance to mold, fungi, insects, and the ability to withstand temperatures above 1000°C.
In addition, mineral wool fibers have good vapor permeability, which allows vapors to evaporate rather than accumulate in the walls. An important quality of mineral wool is the absence of toxic substances in its composition.
The thickness of the applied insulation slabs depends on the width of the walls of the house itself. For example, for a 150 mm beam it would be correct to use only 5 cm of mineral wool. Thinner slabs are mounted in two continuous layers. The joints must be covered to enhance the heat-saving effect.
Types of mineral wool
URSA mineral wool is a mixture of dolomite (mineral) with quartz sand. Its main advantages are high elasticity and flexibility (facilitate installation) and excellent thermal insulation characteristics (the thermal conductivity coefficient of such insulation is 0.032 W/mK).
For the walls of ventilated facades, the Ursa FACADE material is used in the form of semi-rigid fiberglass slabs, covered with black high-density fiberglass. Additionally, the boards are treated with water-repellent agents. Thanks to all these qualities, there is no need to install windproof films.
ROCKWOOL mineral wool is made from basalt rocks impregnated with a hydrophobic mixture - the chaotic arrangement of mineral fibers ensures high strength. Such material contains a minimal amount of binders. ROCKWOOL is not subject to deformation during operation. It is produced in a variety of forms - rolls, slabs, mats of various thicknesses and areas, which also differ in the degree of rigidity.
ISOVER mineral wool is made from glass fiber and is characterized by excellent heat saving properties, dimensional stability and durability. The upper surface of such plates is covered with fiberglass, so they do not require the use of diffuse membranes. When carrying out two-layer insulation, such material acts as the top layer.
What is meant by “insulation of a wooden house”
Insulating a house made of timber can simply mean protection from blowing, or protection from the penetration of cold air. Or we can consider this process as a set of measures to preserve internal heat in winter conditions. Each of the target installations will require different insulating materials, different technologies for implementing this stage of construction, and varying degrees of complexity of the measures taken.
The most simple insulation is caulking the inter-crown cracks. It is carried out in 2 stages: in the first (during the assembly period) pieces of tow are placed between a pair of timber, in the second (after the house has settled) - the tow is tucked into the cracks with a special spatula using a hammer. The process is simple, but labor-intensive and time-consuming.
Common mistakes
The most common mistakes occur when technology is broken. For insulation, it is not recommended to choose soft roll insulation.
List of mistakes:
Use of unsuitable materials. Use of materials from different manufacturers.- Use of materials stored in inappropriate conditions.
- Carrying out insulation measures in case of rain, strong wind or strong sun.
- Failure to comply with deadlines for individual stages of thermal insulation work.
- Insufficient cleaning of the building walls from dirt, dust, and loose plaster. Incorrect caulking of cracks in walls.
- Installation of the system on an unstable basis.
- Errors in fastening the wall base profile.
Technology for proper insulation of a house made of timber from the outside
Work on insulating a timber house from the outside begins with checking the quality of the joints after reaching the natural moisture content of the timber, selecting a heat insulator and calculating its required thickness (up to 7 cm). Now there is a convenient opportunity to make calculations using an online calculator on the Internet.
It is worth considering that insulation work will not greatly affect the dimensions, but can change the appearance of the building beyond recognition, so you must immediately decide on the type of future cladding (plaster, siding, false beams) and the expected finishing work.
External insulation can be carried out in the following way:
- arrange a suspended ventilated façade;
- insulate the outside with polyurethane spraying;
- insulate with polystyrene foam.
Necessary tools for insulation work .
- Tape measure and plumb level.
- Hacksaw.
- Self-tapping screws.
- Ladder or scaffolding.
- Lumber for sheathing.
Tools and materials for thermal insulation of buildings
Having decided on the choice of thermal insulation material, you need to prepare the necessary tools for the work:
- gloves, glasses;
- scaffolding;
- construction knife, hacksaw;
- wide tape;
- screws, dowels, screwdriver;
- tape measure, building level, plumb line;
- construction stapler;
- buckets, spatulas and brushes;
- polyurethane foam;
- fiberglass mesh;
- glue;
- facing material;
- sprayer for antiseptic treatment;
- hydro-vapor barrier membrane.
The set of tools may vary depending on the type of insulation chosen and the method of its installation.
Sequence of work on installing a suspended ventilated facade
If the timber used in construction was dry, then the curtain wall can begin to be made immediately after the construction of the log house.
- First of all, you need to seal the inter-crown cracks (see “caulking”).
- The sheathing begins to be assembled from a frame made of bars (50x70 according to the height of the insulation). They are fastened to the wall vertically with nails, in increments along the width of the insulation.
- Using ventilated facade technology, the lathing is made in two levels to obtain a gap of 3 cm between the insulation and the finishing coating.
- Insulation boards are laid end-to-end between the sheathing structures.
- A special material (diffuse membrane) is stretched, fastened to the sheathing with a construction stapler.
- Strengthen the finishing material of the facade.
This type of insulation makes the façade resistant to any type of weather conditions, prevents rotting and molding, and preserves the ability of wooden walls to “breathe.”
How is insulation installed under siding?
Laying insulation under siding in a house made of timber or logs
During the cold, harsh season, houses need to be heated. To reduce heating costs, the facade of the house must be insulated. There are many ways, but the principle is the same - a load-bearing wall, layers of insulation and further exterior finishing.
To do this, we will need a wooden profiled beam of various sections, a tape measure, insulation, a hacksaw, self-tapping screws, a screwdriver. What is the best way to insulate the facade of a house?
The most important requirement for all insulation materials is environmental safety. If only mineral wool is used as insulation, then it is necessary to protect it from moisture with a diffusion membrane. Using special perforation, such a membrane prevents moisture from penetrating from the outside and allowing steam generated by the temperature outside and in the house to pass through.
Insulation by spraying polyurethane foam
Polyurethane foam - polymer No. 1 fits well on a clean, oil-free surface. Applied in several passes with special equipment under pressure in a layer of 50 mm on a wall made of timber, it forms a moisture-proof film without seams or cracks and closes the pores of the wood. This covering is removed under the curtain wall made of finishing material.
The method is very simple and economical, it is carried out without lifting mechanisms and scaffolding. A significant advantage is resistance to open fire, the duration of preservation of heat-protective qualities, resistance to rotting processes and the effects of bacteria.
However, it is necessary to provide for a ventilation system that effectively solves the problem of vapor permeability of polyurethane film.
Advantages and disadvantages of carrying out thermal protection measures outside
Insulation of a house made of timber is designed to provide a comfortable microclimate in the room and prevent the destruction of load-bearing structures under the influence of cold. Protecting walls and other external surfaces has the following advantages :
- the dew point (the place where condensation occurs) is located on the surface, which does not allow moisture to enter the thickness of the structure;
- protection from cold not only the interior, but also the load-bearing structures of the building;
- there is no reduction in the usable area of the room.
But this scheme also has its drawbacks.:
- the difficulty of doing the work yourself from the street side in bad weather conditions and with a significant building height;
- the need for additional finishing of the facade (siding).
Many people choose timber as a wall material precisely because of its appearance. When insulating from the outside, the siding will cover the logs and the original surface of the walls will be visible only from the inside. External insulation is correct to use from a scientific point of view, but the home owner is not always satisfied with it. If it is necessary to preserve the original facade of the building, it is better to use a scheme for installing thermal protection from the inside.
Foam insulation
Insulation of a log house with polystyrene foam (expanded polystyrene) can be done both inside and outside. This is an inexpensive and effective material to use. For insulation work, 5 cm thick slabs and special glue are used.
- Starting profiles are attached horizontally to clean, dry walls below to prevent the cladding from slipping.
- Glue is applied both to the foam and to the gluing site, lubricating the joints.
- Work is carried out from the bottom up.
- The glue drying time is 3 days.
- After drying, the foam is further strengthened with special dowels.
- Subsequent work is carried out after priming the layer.
A few final tips
- Shrinkage of profile timber up to 3-4% occurs in the first six months to a year.
- When working with insulation, it is important to follow safety measures: eye protection - goggles, hand protection - mittens, respiratory protection - respirator.
- The insulation cannot be stored outdoors: getting wet will reduce its heat-protective properties.
- Insulation boards can be installed by surprise without additional fasteners if the distance between the sheathing elements is reduced by 1.5 cm.
- Spray insulation can be done at temperatures not lower than 10 degrees.
- Organic insulation materials are susceptible to destruction by rodents.
The question “How to properly insulate
wooden house
? - the undisputed weekly leader of the section "
Construction
". Log and
timber houses
, built several decades ago, have already aged and begin to let in the cold during the winter months.
Therefore, it is very important to eliminate possible mistakes that regularly arise when wooden log houses are not insulated with modern materials. Let's look at the most common of them.
Mistake #1. Insulating a log house without inspecting the condition of the wood
As a rule, already “aged” log cabins are insulated. On the one hand, this is technologically convenient: the log house has already completely settled down and the dimensions of the structure remain unchanged. However, the past years could not help but leave traces on biologically living material - wood.
Therefore, before the planned insulation, which implies that there will be no access to the logs for many years, it is necessary to carefully examine all the crowns and reject defective fragments . If there is a wood-eating bug in the logs, I will make a cautious assumption that it is no longer advisable to insulate the house. A radical cure for such a case, other than a week of forty-degree frost, has not yet been invented.
Good wood should be impregnated with a fire-fighting and antiseptic composition and dried thoroughly . Carrying out insulation on damp wood is a mistake.
Mistake #2. Inattention to caulking
Traditional caulking is done, strictly speaking, not to insulate the log house, but to prevent it from blowing out, which ultimately affects the preservation of heat in the house.
When deciding to insulate log facades, pay attention to the condition of the caulking along all the crowns . You should not dismiss this operation. Perhaps it is thanks to 2-3 defects of this natural insulator that your house is cold in winter.
At the beginning of 2021, a reader contacted the editorial office of www.7dach.ru asking for help with modern insulation. Word for word, it turned out that the cunning birds had long been pulling caulking fibers out of her log house for their nests.
It seems that after finding out this fact, our dear reader’s craving for total insulation has weakened somewhat.
Mistake #3. Insulating a log house from the wrong side
From which side should the log house be insulated? This is truly a conceptual question that you need to solve for yourself once and for all. In addition, it would be useful to share the acquired knowledge with friends and neighbors.
Without diving into the basics of building heating technology and without delving into the meaning of the obscure phrase “dew point” (which underlies the choice of location of insulation), take on faith the craft postulate: insulation of structures is carried out from the outside. This installation improves the operation of both the wall load-bearing material (wood crowns) and the insulation itself. Otherwise, both the insulation and the wood of the logs will get wet from moist vapors that are inevitably found in the atmosphere of human habitation. Of course, we are not striving for this at all. You can read more about the features of insulating the external walls of a wooden house in the section of the same name in the article Insulating a country house inside and out.
Mistake #4. Ill-considered choice of thermal insulation material
Construction markets are literally and figuratively inundated with a variety of thermal insulators.
However, if we introduce strict systematization into this abundance, it turns out that only 3 types of materials suitable for wooden log houses . These are insulation materials:
- from mineral wool,
- from glass wool,
- expanded polystyrene - cellular and extruded.
Let's talk about the latter first. This is an excellent thermal insulator, having better thermal insulation qualities than the first and second ones. It practically does not absorb moisture and does not allow water vapor to pass through. It would seem that there is nothing more to dream about. However, the biggest “but” is that upon contact with an open flame, that is, in a fire, polystyrene foam does not really burn, but only melts, but with the release of truly dangerous gaseous chemical compounds. For those readers who take these words lightly, I recommend remembering the tragedy in the Perm “Lame Horse”, which claimed one and a half hundred lives due to the fact that the products of burning insulation entered the lungs of the visitors of this “tavern”.
I'm not against the use of this material, but I vote with both hands for thoughtful use of it. For example, where fire will never reach - in the foundation, in the basement, in the blind area. There is truly no price for him here.
Choosing between glass wool and a mineral analogue is more difficult. Both are perfect for insulating a log house. You will learn about which thermal insulation materials are preferable from a safety point of view in the article Thermal insulation for the budget-conscious in questions and answers.
Mistake #5. Negligent attitude towards transportation and storage of material
Thermal insulation materials must be dry . Only in this case do they “keep” heat. And if the material gets wet, its thermal insulation ability is dramatically reduced.
Remember the common “kitchen” situation: which oven mitt will you use to grab the metal handle of a hot frying pan - a dry cloth one or a damp/wet one? I am sure that after a minute of thought you will choose the dry option. So the insulation should always be dry. During production, in factories it is packaged in packaging (often shrink film) and is fairly well protected from climatic moisture. But once you remove the film... Therefore:
- Unpack the insulation a day before use and always under a canopy , or even better - in an insulated house.
- After fixing the insulation to the wall, immediately proceed to covering it with plaster or safety panels (siding, etc.).
- Do not leave insulation open for a long time, risking getting it wet to the skin with summer slanting rains.
Mistake #6. Choosing flexible mats instead of rigid slabs
On the construction market you can find 2 options for thermal insulation materials - flexible mats and rigid slabs. At first glance, these are exactly the same materials. So what to choose for facade insulation?
If you decide to opt for mats, you will be mistaken, because over the years, the insulation in a vertical position begins to sag in some places, forming cracks into which cold air rushes - those same “cold bridges” that disavow all the consumer charm of modern insulation .
Rigid slabs retain their dimensions unchanged throughout their entire service life. It is quite possible to walk on the slabs laid on the roof structure without losing the quality of thermal insulation.
Why, then, are flexible mats produced? - They are indispensable for insulating horizontal surfaces - underground space and interfloor ceilings. There they fundamentally cannot sag and form gaps for heat consumption.
Mistake #7. Incorrect determination of the thickness of the thermal insulation layer
To the question: “What thickness should the thermal insulation layer be?” you will find a reasoned answer in the recently published article Insulating windows, doors and facades.
Here we can only confirm that when thermally insulating a log house, two layers of material 50 mm thick , placed one on top of the other, will be sufficient. I will make a reservation that two layers are enough for the climatic conditions of central Russia. In the North, three layers of insulation will have to be placed on a wooden wall, while in the southern regions it will be possible to limit it to one.
In conclusion, I would like to provide a photograph of a truly unique structure.
What is its originality? The house was built at the end of the 19th century. The house is made of logs, but the logs, held together by horizontal dowels, are installed vertically. It was insulated in the spring of 2021 with mineral wool insulation (100 mm) and lined with chipboards. And the entrance group is made of monolithic reinforced concrete. Truly, on a tiny spot of development, technologies from three different centuries were combined.
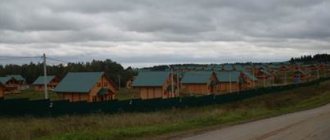
Houses made of timber, due to their environmental friendliness, are a popular option for private construction. But although they heat up quickly enough and have good thermal insulation properties, insulating a log house is an urgent need for most households.
Installation of insulation on the walls of a timber house
Differences between old and new technologies
Wooden construction in Rus' is a centuries-old tradition. For centuries, houses were built exclusively from log houses, from massive round and semicircular logs, the thickness of which was sufficient for good thermal insulation. Just like today, the tree dried out over time, and cracks appeared between the logs. But earlier there were other ideas about the beauty of the facade, so ordinary wood moss was used to caulk cracks. It landed in the cracks between the logs and over time reliably filled the entire space between them.
In modern construction, issues of economy come to the fore and force the use of timber, the thickness of which does not always meet the requirements of the developed standards. If the cross-section is insufficient, complete freezing occurs in winter, which means that the walls of the house are not able to retain heat. In addition, over time, the wood begins to dry out, causing heat loss to increase even more.
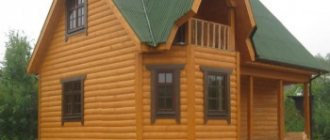
This is what a timber wall looks like after the wood has dried
Advantages and disadvantages of wall insulation in a log house
Thrifty owners are looking for ways to properly insulate a house made of timber so that they can spend less money on heating in winter. This can be done in two main ways: from the inside and from the outside, and external insulation is preferable for a number of reasons.
Features of insulation from the inside
With internal insulation, the positive effect of heat saving is offset by the disadvantages:
- Part of the usable area is inevitably lost due to the installation of a frame under the insulation.
- The thermal insulation layer hides the “living” wooden walls and the rooms lose their unique charm.
- Due to external winter cooling of an unprotected wooden wall, the dew point moves into the internal insulation. Condensation occurs, mold appears, and it is difficult to control the condition of the wood.
What happens to the wall if the insulation is not properly insulated from the inside - in the video:
Insulation of walls from the outside: advantages and disadvantages of the method
Most often they resort to it, keeping in mind the obvious advantages compared to internal insulation:
- The usable area of the internal space is preserved;
- External work does not change the family's daily routine.
- The facade of the house is reliably protected from sudden temperature changes, which extends the life of the building.
- The correct selection of materials does not disturb the microclimate of the rooms (the house “breathes”).
- You can decorate the facade to your liking or improve the appearance if the wood has darkened over time.
- If the technology is followed, the wood will be additionally protected from damage.
- Ease of monitoring the work of the construction team.
The main disadvantage of external insulation is the need to carry it out in good weather; in cold and damp weather there is no point in doing this.
Three main insulation methods
Any insulation of walls involves attaching a layer of insulation and structures holding it to it. Several methods have been developed for this purpose and each of them has its own advantages and implementation features.
The principle of wall insulation is the creation of an additional protective “pie”
Hinged ventilated facade
This technology itself was developed as a decoration for the facade of a house, but since the installation procedure involves attaching a layer of mineral wool or a similar material to the wall, this method can be considered as insulation.
Advantages of using ventilated facades:
- Long service life (up to 50 years), excellent heat and sound insulation.
- Easy to install.
- Wide selection of facing materials in various colors.
- The dew point moves outward.
Installation technology:
- Pre-treatment of lumber is carried out with compounds that prevent rotting and make the tree unattractive to insects.
- A sheathing is attached to the outside of the house, onto which a sheet of hydro- and wind protection is placed. Air circulates freely in the space between the sheathing slats, due to which condensation or moisture that appears in other ways will be removed from the insulation.
- The sheathing is leveled with a plumb level.
- Next, slats are placed on the sheathing, the distance between which should correspond to the width of the heat insulator. The height of the slats is selected accordingly - for central Russia it is recommended to use insulation with a thickness of at least 70 mm.
A feature of the ventilated facade is that a gap is left between the insulation and the cladding
- Insulation mats are placed between the slats, secured with dowels.
- Then bars with a thickness of at least 5 cm are additionally stuffed onto the slats so that there is always a gap between the insulation and the cladding.
- Cladding (siding) is installed.
Laying insulation under siding.
There are practically no fundamental differences from the previous technology - insulation is also used here and a decorative coating is also used on the outside. But if the very name of the ventilated facade indicates the place of its use, then in any case the entire house is covered with siding.
Installation nuances taking into account the selected material:
- The distance between the slats is set equal to the width of the mat if foam or sheet extruded polystyrene foam is selected.
- The distance between the slats is set to 10–15 mm less than the width of the mat if mineral wool is used. This must be taken into account when calculating the amount of mineral wool.
- According to the technology, wool slabs are mounted by surprise; polymer slabs are placed in cells, the joints are treated with polyurethane foam.
- When using mineral wool, a waterproofing layer (diffuse membrane) is additionally installed on top. It is not needed when using fiberglass or polystyrene.
Covering a log house with siding
Polyurethane foam spraying method
The principle of this technology is clear to anyone who has seen how they work with polyurethane foam. The difference here is that the volumes of material required to create a thermal insulation cushion are much larger, so a spray gun using compressed air from a compressor is used to process polyurethane foam. Advantages of the technology:
- Easy to use and high speed application of thermal insulation mixture on large surfaces.
- Excellent adhesion (cohesion) with most building materials, long-term preservation of properties.
- Environmental friendliness, fire resistance and protection against rotting of the treated surface.
Spraying of insulation can be done on any prepared surface
Types of insulation
The choice of insulation for outdoor work is quite wide and each of them has distinctive features that must be taken into account when choosing:
Mineral wool
Available in three varieties - stone (basalt), glass and slag. All have similar properties: fire-resistant, non-flammable, chemical and biological resistance. Other advantages of the material include vapor permeability, environmental friendliness and high sound insulation.
The downside is that cotton wool attracts rodents and does not dry completely when wet.
It all depends on the skills of the builders, but usually insulating the outside of a house with mineral wool is easier to do using mats than rolls - the latter are not always convenient to deploy on vertical walls.
Laying mineral wool slabs in lathing
Slab styrenes (foam plastic, polyurethane foam)
Polystyrene foam is the cheapest option, lightweight and porous, with low hygroscopicity and excellent thermal insulation. The main disadvantages are considered to be flammability (releases toxins when burned), fragility and instability when exposed to ultraviolet radiation.
Extruded polystyrene foam
It has a special porous structure, tolerates low temperatures well and is unsuitable for microorganisms. The material is durable, easy to install (slabs), and does not absorb water. Disadvantages: Highly flammable and releases harmful toxins.
Polystyrene foam and polystyrene foam are similar in appearance
Ecological sprayed styrene (ecowool and polyurethane foam)
Such insulation materials are expensive due to the method of application; To process large surfaces, special installation and operational experience are required. For small areas of complex shape (cracks near pipes, windows, between slabs), polyurethane insulation in cylinders is offered.
"Warm" plaster
A mixture of light granules of complex composition (glass, cement and hydrophobic additives), which is not flammable, is not afraid of ultraviolet radiation, protects the facade well from moisture and is easy to repair.
Preparing a wooden structure for plastering in the video:
Subtleties of insulating timber walls
Insulating a log house from the outside under siding cannot be started whenever you want - before this, the following conditions must be met:
- Work on installing insulation can begin only after the log frame has completely shrunk - often this period can be one and a half to two years.
- It is prohibited to carry out work if the façade has not been treated with an antiseptic. Ignoring this rule will lead to the appearance of fungus and rot.
- Before insulating a house made of timber from the outside, it is necessary to prepare the facade: seal not only wide cracks, but also small cracks. To do this, you can use putty, polyurethane foam or similar materials.
- Good thermal insulation of a log house requires careful selection of material and calculation of its quantity. It is necessary to consider how the thermal insulation material will be combined with the wood of the timber itself.
- To choose the right insulation, you need to take into account the size of the building, the quality of the frame and seams.
Some insulation is installed without sheathing
Tools and materials for thermal insulation of buildings
To insulate a house without being distracted by searching for tools and materials, builders need to prepare the following:
- bubble or laser building level, you can also use a plumb line;
- tape measure, square or metal ruler;
- hammer, construction knife or hacksaw, screwdriver;
- facade dowels, tape, chalk, polyurethane foam, antiseptic;
- dry slats, insulation;
- vapor and waterproofing film;
- material for final cladding.
- sprayer for treating wood with protective compounds
Treating a wooden wall with an antiseptic
General progress of thermal insulation installation
All steps for insulating a house made of timber using any of the described methods are always schematically the same and are performed in the following sequence:
- to ventilate the first layer of insulation, a sheathing of wooden planks is mounted on the wall;
- a frame is placed on the sheathing to fix the insulating material
- installation of insulation;
- installation of additional sheathing and frame (if double insulation is used);
- laying an additional layer of heat insulation;
- fastening a diffusion membrane, which will provide water and wind protection.
- installation of facade finishing (lining, siding) with an air gap.
Of course, in the end, insulation will hide the beauty of the natural material, but finishing the house with a block house can be a solution.
In general, the insulation of a house made of timber, carried out according to the rules, will make it possible to save on heating in the future. Despite the apparent simplicity of the entire process, there are quite a large number of pitfalls that will definitely come out during installation. As a result, if you do not have the proper qualifications, then it is better to order the work to be carried out by professionals, because supervising the construction site is much more pleasant than climbing the walls yourself.
Rate the article, we tried our best for you
Design options
Let's look at various ways to insulate a house from the outside.
Ventilated facade
Solves two problems at the same time: finishing and insulation. The main feature is the ventilation function.
The structure consists of a metal frame and cladding. Install at a short distance from the wall surface. To make the structure look attractive, the outer layer of cladding can be made of wood.
Positive aspects of the method:
- Possibility of installing additional thermal insulation.
- The air gap helps quickly remove moisture from building structures, thereby significantly reducing the likelihood of mold and generally increasing the overall service life of the installation.
Problems that may arise:
- Difficult installation. Improper work can cause wood to rot. Ventilation is impaired and the service life of materials is reduced.
- To complete the work, a lot of money will be required. And if there were errors in the installation initially, everything will have to be redone. Again, pay and attract craftsmen.
Wet method
Many people use wet facades to decorate their homes. Wet facade - plastering.
The wet façade has three main layers: thermal insulation, reinforcing mesh, and plaster.
Positive traits:
- High-quality adhesion to the load-bearing surface and any insulation. Plaster can be used as insulation.
- The hard layer protects the thermal insulation from external influences.
- Beautiful decorative coating.
- Cost and a fairly wide range of colors.
- Low likelihood of mold formation.
The most important thing is that the method allows you to carry out the work yourself.
Disadvantages of “wet” technology:
- Work can only be carried out in dry weather.
- Bad weather may affect the continuation of work, which may delay the completion of the process. If this requirement is not met, then there will be dirty spots on the surface of the facade.
- The service life of a wet façade is up to 30 years.
- Over time, the original appearance of the walls may deteriorate; this may be affected by temperature changes and precipitation.
Reference. According to building codes, the wet method can only be used in dry weather at positive temperatures, up to + 5 degrees C.
Laying on walls under cladding
Insulation and finishing of facades implies the presence of facing material.
Siding, sheathing, and composite panels are often used. It will be necessary to install a frame to accommodate the cladding.
External work of this type must be carried out in several stages:
- Select and calculate the amount of insulation.
- Apply an insulating layer.
- Finish the facade.
Suitable materials for external work are: expanded polystyrene, sheet polystyrene, mineral wool.
For finishing - plastic or wooden lining. The cladding performs mainly a decorative function. Which material is better is a matter of style.
Attention. Increasing the thickness of the walls with insulation by 10-20 cm will lead to the deepening of doors and windows. Therefore, you need to think about how to close the insulation system on the side of the openings.
Spraying polyurethane foam
One of the newest methods. Aerosol thermal insulation is applied by spraying the mixture from a special gun attached to the compressor.
Advantages of the method: you can choose insulation and facade design according to your taste and financial capabilities. Decorative and durable materials are used as finishing.
Disadvantages and difficulties: difficult to work in bad weather; additional structures will have to be built when working at height.
| The most important advantages | Some disadvantages |
| Low thermal conductivity, almost zero water absorption coefficient | It ignites easily, but contributes to the self-extinguishing of the flame due to the release of carbon dioxide from the cells |
| Serves as an excellent barrier from the cold and additionally serves as insulation. | High price |
| The result is a seamless, homogeneous layer that easily adheres to a wooden surface. | Required equipment and protective equipment when working |
| Long service life | Does not tolerate ultraviolet rays well |
| Easy to install, after hardening the material becomes highly durable | A protective layer is required on the outside: decorative materials, cement mortar, panels |