Choosing ondulin as a roofing material is a good solution if you have a limited financial budget. But in order for the coating to turn out beautiful and reliable, it is important to correctly install ondulin in compliance with all stages and technology. You can do this on your own. The main thing is a responsible approach and attention to detail.
Recommended Material:
- How to make a roof
- Correct installation of the drainage system
Features of the correct technology for laying a roof with ondulin
Before you start laying ondulin sheets, it is important to consider several points:
- Attaching the sheets should begin on the leeward side. In this case, the overlying wave of the first sheets will be less exposed to the wind.
- Do not neglect the manufacturer’s recommendations regarding the operating temperature of ondulin installation. Range from 0 to +30 degrees. At negative temperatures, the material becomes too brittle - cracks and chips may form under load. In hot weather, bitumen sheets become too soft and can become deformed and stretched.
- It’s better not to take risks, not to skimp on material, and to use tensioned fasteners in hot weather. When the temperature drops, the ondulin coating will begin to deform, which will cause damage to individual sheets or the entire floor. Such saving of time and money will only lead to unnecessary costs.
- Left → right. 1) - angle 5-10° (from 1/11 to 1/6) - solid base (board, FSF plywood, OSB 3, DSP, fiberboard, etc.); — end overlap – 300 mm; - side overlap - 2 waves. 2) – angle 10-15° (from 1/6 to 1/4) – sheathing pitch in axes 450 mm (board, timber); – end overlap – 200 mm; – side overlap – 1 wave. 3) – angle from 15° (from 1/4) – sheathing pitch in axes 610 (board, timber); – end overlap – 170 mm; – side overlap – 1 wave.
- It is important to accurately align the first sheet with the level of the end, the eaves of the roof. In this case, the cornice projection should be no more than 50 mm. It is not worth making it large, since water will overflow through the gutter and fall on the walls. There is a risk of roof sagging.
- The fasteners of each element must be checked to ensure they are level with the building level.
- The second row should be mounted from half the sheet. Then you need to go in a checkerboard pattern, making sure that the horizontal and vertical overlap is observed.
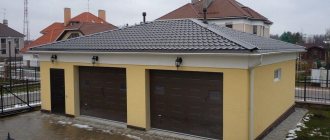
To correctly install ondulin on the roof of a residential building, garage or other buildings, you need to know the pattern of the influence of the slope angle on the size of the overlap.
It is worth considering the following tips:
- With a slope angle of up to 10 degrees, the transverse overlap should be at least 200 mm, and the longitudinal overlap should be 2 waves.
- When the slope angle is in the range from 10 to 15 degrees, the sheets must be laid with a transverse overlap of 160 mm, the longitudinal overlap is in one wave.
- When the slope angle is more than 15 degrees, Euro slate must be mounted with a transverse overlap of 140 mm. Longitudinal overlap - one wave.
If you follow these recommendations, you will be able to cover even complex types of roofs with high quality - mansard, sloping, with several valleys.
Alternative roofing material: “Rules for installing metal tiles.”
Briefly about the main thing
If we briefly consider what ondulin for a roof is, then it is a reliable composite material consisting of a base impregnated with bitumen resins. It is made of canvas made of several layers of cellulose fibers. For strength, the fibers of adjacent layers are directed perpendicular to each other.
Ondulin, with proper installation and simple maintenance, can last up to 50 years, which is proven by the long-term operation of houses with a similar roof.
The main advantages of the material are lightness, flexibility, water resistance, bioinertness. At the same time, Euro slate is a flammable material; the paint fades over time.
Ondulin is sensitive to the quality of installation and requires special care in the preparation of rafter structures and sheathing. It is better to entrust the installation work to experienced specialists. To ensure that ondulin does not fail during service and is durable, installation must be carried out strictly according to the instructions.
Requirements SP, SNiP, GESN
Carrying out roofing work involves calculating all costs of materials, fasteners, equipment involved (if required), drawing up an estimate for the list of work performed.
All these points are regulated by GESN (State Elementary Estimate Norms). According to GESN, when installing the roof, the following must be documented:
- type, complexity, features of roofing;
- indicators of coefficients of various calculations (temporary, permanent load, strength);
- number of works performed;
- nuances of installation of valleys, ridge, gables (depending on the type of roof).
Strict compliance with GESN is necessary when constructing a capital facility of national importance or if the work is financed from the state budget. If this is private construction on a summer cottage, in the private sector with independent financing, then compliance with the GESN is recommended, but not mandatory.
According to current standards, installation work on ondulin flooring has its limitations:
- It is prohibited to use bitumen sheets to cover a roof that is in use, where residents will move or where lawns and flower beds are to be arranged.
- It cannot be done if the slope angle of the slopes is less than 5 degrees.
- Laying ondulin is prohibited if the sheathing does not meet the standards.
- It is also prohibited if equipment whose weight exceeds the maximum permissible load is placed on the roof.
- It is prohibited when communications are located near the roof, causing icing in winter.
- It is unacceptable to cover the roof with ondulin on a surface with a radius of curvature of up to 5 m.
- The use of the material is prohibited in the regions of the Far North, where the temperature in winter drops to -60 degrees.
- It is prohibited to cover an area exceeding 400 square meters. m in the absence of dividing fire zones.
You can familiarize yourself in detail with these and other standards governing the fastening and use of ondulin on the roof in SP 17.13330.2011 (updated edition) and SNiP II-26-76 “Roofs” (updated edition).
How to attach Euro slate. Production and composition of Euro slate
Euroslate contains modified bitumen, plasticizers, dyes, plant or synthetic fibers. The purpose of these materials is quite obvious. Bitumen gives ondulin water-repellent properties, plant or synthetic fibers strengthen euro slate, as a result of which it acquires the ability to resist mechanical stress. With the help of dyes, this roofing material can be given absolutely any color, thanks to which Euro slate will decorate the roof of any house, giving it a presentable and individual appearance.
In order for the above substances to fully reveal their beneficial properties, they are subjected to special processing. Thus, in the process of producing Euro slate, the materials are subjected to pressing, which is carried out in several stages in vacuum chambers. The result is a material that has a multilayer structure and has all the properties listed above.
Euroslate - ondulin
As you probably already understood, Euro slate does not contain any substances hazardous to human health, therefore the roofing material in question is environmentally friendly. In addition, it is worth noting that ondulin, if necessary, can be easily processed.
So, Euro slate differs from ordinary slate in that it has a wide variety of colors and shades. Currently, manufacturers produce ondulin in two classes of color: matte and glossy. Matte ondulin has a somewhat rough surface and is covered with acrylic paint. Gloss is given to ondulin due to the fact that silicone is added to the coloring composition. As a result of this, Euro slate not only takes on a presentable appearance and varied in color, but also additional useful properties. In particular, glossy ondulin retains snow and water to a lesser extent than matte.
What materials and tools will be needed
To start covering the roof according to all standards, you need to prepare:
- Bitumen sheets measuring 2.05 * 0.95 m. The quantity should be 10% more so that there is a reserve taking into account overlaps and cutting.
- The profile is the length of the entire ridge. It is also necessary to take into account overlaps between parts of 10-25 cm.
- Timber for sheathing, impregnated with antiseptic. Recommended sizes: 40*40 mm, 60*40 mm.
- Thick polyethylene film (for waterproofing).
- Special nails to match the color of the sheets.
- Hammer, hacksaw.
- Pencil or chalk, tape measure for marking.
- To assemble the sheathing, use a screwdriver.
- Scaffolding or high ladder.
Moreover, the scaffolding should be of a comfortable height so that you can reach any corner of the slope without any problems.
History of appearance
In our country, ondulin is perceived as a new material.
This is wrong. It appeared immediately after the Second World War. The idea came to the mind of the Frenchman Gaston Gromier. After the hostilities, many homes were destroyed, many people became impoverished. Cheap building materials were needed, but a lot of them were required. Ondulin responded to the requests presented. Despite the low cost, it had high qualities, looked nice, and could be used for a long time. In France, the company OFIC SA was created, which began production of ondulin. It was later renamed Onduline Group to be more recognizable.
At first, the distribution of the new roofing material was limited to Europe, which is why its second name “Euroslate” is associated. Later it spread throughout the world. In the Russian Federation, the Onduline plant was built in 1994 near Nizhny Novgorod.
Key stages in preparing a roof for installation
As a rule, careful preparation is the key to fast and high-quality completion of all stages, the ability to work without downtime with maximum efficiency.
Calculation of the number of sheets
Craftsmen know that in order to obtain the correct number of bitumen sheets, they need to divide the total area of the roof slopes by the usable area of one sheet and add 10-15% of the reserve. The amount of margin depends on the complexity of the roof.
Lathing requirements
Bitumen sheets are mounted to a wooden sheathing. To make it easier to attach the sheathing beams and to ensure that the laying is parallel, it is better to use a pattern. At the junction of the ridge strip, additional battens of the sheathing are fixed.
According to the manual, the parameters of the sheathing vary depending on the angle of inclination of the slope:
- When the indicator is less than 10 degrees, the sheathing is made continuous. It is better to cover the rafters with sheets of chipboard, OSB, and moisture-resistant plywood. In this case, the bitumen coating will not sag or deform under the load of snow.
- At an indicator of 10-15 degrees, it is permissible to produce sparse lathing. To do this, take boards 10-15 centimeters wide and fasten them in increments of 45 centimeters.
- When the indicator is over 15 degrees, the pitch of the sheathing beam can be increased to 60 centimeters.
However, if you have the financial means, installing continuous sheathing will be the most reliable option with any roof slope. The roofing covering will not sag under heavy loads and will retain its shape for a long time, without requiring repairs.
Selection and preparation of waterproofing and vapor barrier materials
Laying waterproofing is not considered a mandatory stage of work, but it will prevent the roof from leaks at fastening points, overlapping sheets, and will be a good protection against condensation. Thick polyethylene film or membrane is suitable as a material.
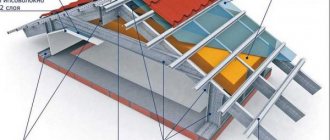
Photo: technological scheme of roofing sheathing
If the building is equipped with a residential attic, a vapor barrier and waterproofing layer is required. This protects the roofing pie from moisture.
For non-residential, seasonal buildings such as a gazebo, shed, shed or cabin, they do not need to be made.
Fasteners
To fasten European slate, you need to take hardware in the color of the material with a wide head and a special sealed gasket.
Photo: fastening ondulin sheets using roofing screws
A metal sheathing is rarely assembled under the ondulin, but if the structure is assembled, you need to use self-tapping screws with a metal drill to fix the sheets. For wood - nails with a wide head.
It is not recommended to take used hardware. In the absence of experience, the risk of unreliable fixation is quite high. To ensure even fastening along the line, you can draw a line or stretch a rope.
Attach hardware directly to the top point of the wave. The top and bottom of the sheet are attached to each wave, the middle goes in a zigzag.
Branded Fasteners
Incorrect selection of fasteners will inevitably lead to a decrease in the performance characteristics of the roofing structure. One strong gust of wind can tear off a fragment of building material, and rainwater easily penetrates under the roof.
Another fastener design option
Most experts advise using special screws. These products are quite durable and reliable, since high-quality raw materials are used in their production. Also, self-tapping screws can be screwed in using an electric drill, which makes installation much faster. With all these qualities, the products are quite cheap.
But self-tapping screws also have a significant drawback - they are not able to provide complete tightness, despite the presence of a rubber tip, which partially mitigates this drawback.
Nails for installing ondulin fragments also have all of the above advantages, but a drill is not suitable for their installation. At the same time, nails ensure the tightness of the structure. This was achieved in the following way: when the fastener penetrates the sheet, bitumen is released, which fills the voids and does not allow water to penetrate inside.
Return to content
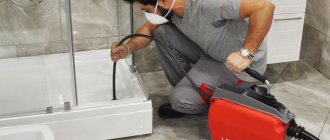
Step-by-step instructions for installing ondulin with your own hands
Before laying bitumen sheets on a single-pitch, gable or hip-pitch roof, it is important to consider a number of points:
- The roof overhang is kept small, no more than 70 mm.
- It is better to make markings with a bright pencil or chalk.
- To cut a piece of ondulin of the required size, a hacksaw for wood is enough. For large volumes, circular electric saws are used in production.
- For high-quality roof repairs, the old layer of ondulin and waterproofing must be removed. This will result in a smooth coating without sagging or bumps.
- Every meter must lie flat. There is no need to pull or stretch the sheets too much. This way the material will quickly fray and lose its properties.
- If you need to move along a roof already covered with ondulin, then it is better to do it along the top of the wave. You cannot walk on the recesses - otherwise the ondulin will be damaged.
A safe installation format without the risk of future leaks is installation from the bottom row at the eaves to the ridge.
Preparing ondulin for installation
You can learn more about how best to prepare sheets for installation and what is the best way to cut them from this video:
Installation of the valley strip
The installation of the valley strip occurs before the installation of the sheets begins. It is secured with special clamps. A continuous sheathing is formed under the plank.
Fixing waterproofing, lathing
The work order is as follows:
- A waterproofing film is attached to the rafters. It needs to be rolled out and cut into strips of the required length. fasten along the slope at a right angle and fix with an overlap of up to 15 cm.
- You need to fasten the film with a construction stapler. Apply tape along the joints.
- You need to install counter-lattice strips on top of the film, fixing them with screws or nails.
For a bathhouse, a summer house, or a residential building that will be used all year round, waterproofing is needed. For outbuildings, waterproofing is not necessary.
Attaching sheets to sheathing
The step-by-step installation looks like this:
- Sheathing strips are placed on top of the laid waterproofing. After which you can begin laying ondulin.
- The sheets are fastened from bottom to top, from the cornice. The whole sheet is fixed. Then the material is selected according to size. Laying is carried out along the cornice in a row.
- According to the standard installation scheme for bitumen sheets, the next row begins with fixing half the sheet. This will reduce the amount of overlap on the sides.
- To ensure that the installation goes smoothly and parallel to the cornice, it is better to use a tightly stretched rope.
- Ondulin is attached to each other with an overlap. The amount of overlap and the pitch of the sheathing depend on the angle of inclination of the roof slope.
- At an angle of less than 10 degrees, the minimum vertical overlap is 30 cm. On the sides, the sheets should lie in two waves on top of each other. If the angle is from 10 to 15 degrees, then the vertical overlap is approximately 20 cm, and there is one wave on the sides. When the angle of inclination is over 15 degrees, the vertical overlap can be reduced to 15 cm, leaving one wave on the sides.
- The sheets are fixed with ondulin nails. The coating must be anti-corrosion. It is permissible to use self-tapping screws, but provided that they are galvanized and have a rubber washer.
- Each sheet of ondulin must have at least 20 attachment points. Hardware is fixed at the top of the sheet along the perimeter.
- You need to fasten it securely, but you should not be zealous so as not to damage the integrity of the sheet.
You can clearly learn how to attach ondulin to the sheathing step by step from this video instruction:
Installation of additional elements
Once all the sheets are securely fastened, you need to proceed to fixing the additional elements:
- forceps;
- skate;
- valleys;
- wind strip;
- cornice.
Photo of additional roof elements: left to right, top to bottom.
1 - ridge element. 2 - metal tong element. 3 - tong element for onduvilla. 4 - universal element for ondulin. 5 - valley made of metal. 6 - covering apron for onduvilla. It is better to purchase elements from the same manufacturer as the sheets. This way the roof will look much more harmonious, there will be no differences in quality and color.
In addition, additional elements reliably protect the roof from leaks.
The ridge must be placed at the junction of two slopes, while maintaining an overlap of 120 mm (this is the minimum). There are ready-made skates for sale. If you wish, you can do it yourself.
When making it yourself, it is better to choose a hot time when the bitumen coating is soft. The top sheets of ondulin should cover the joints. You need to attach it to the top of the opposite slope. The place of fixation can be decorated with a wooden plug.
The ridge is fixed to the lath of the sheathing. Before installation begins, self-adhesive tape is placed under it. This is protection against blowing snow. Such tape should also be attached to the roof overhang. This is especially true for roofs with an attic.
In non-ventilated roofs, sealant is used instead of tape.
The cornice (wind) strip is attached along the ondulin wave. Minimum overlap – from 10 cm.
To ensure a connection to the wall and a contour around protruding elements (stove pipe, etc.), a special apron is used - this guarantees the tightness of the roof.
Video description
The video presents the user's opinion on what is better: nails or self-tapping screws:
Hidden installation
To attach ondulin to the sheathing, the practice is to fix the sheets with staples and polyurethane foam. The first ones are installed along the transverse edges at the bottom of the wave and attached to a wooden beam. The second is applied pointwise to the outer part at the upper points of the profile and covered with a subsequent sheet of roofing material. This method is practical, since due to the overlaps, additional sealing is not required, and the integrity of the canvases is not compromised. A similar fastening system is provided for natural tiles.
How to extend the service life of ondulin
The material will last many times longer if you adhere to the following recommendations:
- Buy materials from recognized manufacturers with a product warranty.
- Adhere to temperature conditions during installation. Do not mount in extreme heat or cold.
- Do not try to stretch sheets in an attempt to save on material.
- Use special nails. Take as many fasteners as required.
- Protect gables and roof ends with wind slats.
- Pay attention to the correct installation of the ridge, valley, and tongs.
- Try not to walk on soft bitumen surfaces during hot weather.
Thanks to the lightness of the material and the simplicity of the installation technology, the entire process can be completed with your own hands, without the involvement of a team of workers. If you follow the step-by-step installation instructions, the quality of fastening will be at the proper level.
Disadvantages of operation
It is necessary to note the disadvantages of the material in order to ensure the possibility of an objective choice of roofing:
- sun and rain can cause the roof to burn out, which will negatively affect the appearance of the coating;
- resistance to water is ensured only for the service life specified by the manufacturer;
- if you intend to purchase a large volume of slate, then it may turn out that some sheets differ in shade;
- fragility - the surface should not be walked on, as most likely dents or other damage will remain on it; the same criterion should be taken into account during transportation;
- As you can see in the photo, the limited color range currently includes only 4 colors: brown, green, red and black.
The technology for laying ondulin is similar to fastening slate, but before starting work you should do a little preparation.
Ondulin coating
Ondulin is a soft roofing covering made from recycled waste paper.
The material began to be produced in the 50s of the last century . Manufacturing technology has changed somewhat since then. To obtain a durable, beautiful and waterproof coating, literally waste is used: waste paper and mineral additives.
Paper waste is processed and made into pulp. The mass is placed in special containers, where it is dried, and then the resulting sheet is compacted and given a wavy shape. The workpiece is impregnated with bitumen-polymer mixtures , which make the base waterproof and resistant to ultraviolet radiation.
The sheets are painted. The color scheme matches the RAL palette , so the desired option can be selected for any building.
The material is often called Euroslate, which is not entirely true. This only emphasizes the environmental friendliness of ondulin.
Pros and cons of ondulin
Low cost with fairly high user characteristics
Light weight, making it easy to transport and install
High moisture resistance
Under the influence of sunlight, bitumen impregnation fills minor defects and cracks
Muffles the sound
Not susceptible to mold or mildew
The coating lasts on average 15–20 years
Installation is extremely simple and much faster than laying slate or shingles
The surface absorbs dyes well: stains of dirt and stains are visible even on new material
Material is flammable
Quickly loses color, sometimes in one season, depending on sun activity
Low mechanical strength
According to the installation rules, walking on the flooring is strictly prohibited. This is especially true for wet ondulin, since at high humidity it loses strength.
Lumber calculation
What is the optimal lathing size for ondulin? To carry out calculations, first take the necessary measurements on the slopes. After this, you can begin to calculate the required amount of lumber, proceeding in accordance with the example below:
- The total roof area is 96 m2 (the perimeter of one slope is 6x8).
- The size of the boards used is 0.2x6 m (thickness 30 mm).
- The area of the board is 0.2*6 = 1.2.
- The total number of boards is 96/1.2 = 80 pieces.
- The cubic capacity of one board is 0.2*0.03*6 = 0.036 m3.
- The total number of cubes of lumber is 80 * 0.036 = 2.88 m3.
When lathing with a pitch of 0.4 m for the same roof area, the calculation will be as follows:
- The number of boards on one slope is 6/0.4 = 15 pieces.
- Moldings of boards on one slope – 15*8 = 120 m.p.
- On both slopes the molding will be – 120*2 = 240 m.p.
- The total number of boards 6 meters long is 240 m/6 = 40 pieces.
- The volume of lumber will be – 40 * 0.036 = 1.44 m3.
When calculating, you should not forget about the so-called “special zones”, which include dormer or dormer windows. The continuous sheathing around these structures is calculated according to the above diagram, taking into account their area. To calculate the number of ondulin sheets for a roof, you will need an online calculator.
Another roof detail, the presence of which should be taken into account when calculating lumber, is the ridge. To arrange it, additional boards are nailed at the top of the roof - one on each side of the slope, and another in the center - for installing ridge elements.
It is worth adding 10% to the calculation results for installation costs.