Self-leveling floor "Starateli" is popular among buyers. For this reason, it is worth talking in more detail about the products manufactured by the Russian enterprise. However, before we begin to describe the characteristics of materials and discuss their advantages and disadvantages, some clarity should be provided.
In fact, the products produced by the company, presented in the corresponding section of the catalog, belong to the category of self-leveling building mixtures. It is assumed that after pouring and hardening, linoleum will be laid on top of them, tiles, laminate or parquet will be laid. Meanwhile, real self-leveling floors do not require this, since the surface polished using special equipment acquires all the necessary decorative and performance qualities.
This is a very significant difference that those who intend to use purchased materials in the construction or repair of industrial workshops, transport enterprises, medical institutions and other similar facilities should be aware of. However, to avoid confusion, we will stick to the terminology used by the manufacturer.
Solution of the problem
Both problems are perfectly solved by a self-leveling composition, with which you can create a perfectly flat, durable, monolithic surface with no seams in the shortest possible time. Among the advantages, we should highlight the possibility of self-filling without professional help. Today on the market you can find a fast-hardening self-leveling floor “Starateli”, which can be thick or finish.
Types and characteristics of self-leveling self-leveling floors for the home
Types and characteristics
Quick-drying self-leveling floors are sold only in dry form. And beginners do not always understand that mixtures have different characteristics depending on the base that is used in them.
Plaster compositions
Popular option Gypsum compositions
A very popular option, which is chosen for wooden bases. Gypsum mixtures dry very quickly and have excellent thermal conductivity.
They are also characterized by:
- Complete drying after 3 hours;
- environmental friendliness;
- zero shrinkage;
- creating a healthy microclimate by drawing in excess moisture.
The latter property limits the scope of application of the mixtures - they are contraindicated:
- on industrial areas;
- in kitchens;
- in the bathrooms.
Important! Gypsum compounds have low wear resistance. Therefore, after drying, the floor needs a finishing coat.
Cement compositions
Cement compositions
These compositions are chosen by craftsmen quite often, since it is permissible to introduce various additives into them. They are flexible and resistant to any type of wear. And:
- may be stained;
- insensitive to moisture;
- have increased strength.
But it is precisely such mixtures that have a lot of disadvantages:
- shrink;
- takes a long time to dry;
- may crack;
- high consumption.
Important! Liquid cement floors are poured only onto combined surfaces. This reduces the risk of cracking.
Polymer compositions
Modern polymer compositions
Modern compositions based on different components - polymers (their number is not limited). They have an astringent nature and, after drying, delight owners with a beautiful aesthetic appearance.
The best two-component polymer self-leveling floor:
- hardener;
- plasticizer
Such mixtures have a long list of advantages:
- have no restrictions on the scope of application;
- high wear resistance;
- the ability to use dye;
- resistance to temperature changes.
The latter characteristic makes polymer liquid floors the best option for country houses, where power outages and sudden temperature changes are possible.
Important! Polymer mixtures are very expensive and require strict adherence to technology. Otherwise, the floor will lie unevenly and will not be uniform.
Characteristics of thin finishing self-leveling floor of the “Starateli” brand
This finishing composition is used for leveling floors that may have different characteristics. At the same time, different humidity levels may remain in the room. It is permissible to lay parquet, tiles, linoleum or other materials on the surface. With this composition you can form a layer with a thickness of 1 to 20 mm. After 28 days, the fast-hardening self-leveling floor “Starateli” will reach a pressure resistance of 20 MPa. The solution will remain active for 40 minutes, so care should be taken to use it up during this time. The surface will completely dry within 4 hours, which can be considered a big plus. One square meter of surface will require 16 kg of dry composition, this is true if you form a centimeter layer. For a 25 kg bag, add about 6 liters of water.
Advantages and disadvantages
Reviews of the self-leveling field “Prospectors” left by users on various information resources allow us to get a general idea of the advantages and disadvantages of this material. From the point of view of consumers, the strengths of the mixtures on sale should be considered:
- Affordable price. This is important for buyers on a tight budget who are trying to reduce their expenses.
- Short hardening time. After finishing pouring the quick-hardening mixtures, you can walk on the resulting surface after 4 – 6 hours.
- An easy-to-learn pouring technology that does not involve the generation of large amounts of waste. As a result, the consumption of the Starateli self-leveling floor is at an acceptable level.
Flaws:
By observing the requirements specified in the instructions, it is possible to achieve the desired results without unnecessary costs. However, users are dissatisfied with:
- Stains forming on the surface. In principle, they do not matter, since they are not visible under the floor covering. However, such a feature is a sign of uneven structure of the mixture.
- There is a tendency, albeit slight, to shrink. Without experience working with brand products, it is difficult to accurately comply with the required dimensions on the first try.
- Weak fluidity. Despite the fact that the product name contains the word “self-leveling”, it takes effort to achieve final leveling.
The characteristics of the Staratel self-leveling floor declared by the manufacturer do not confirm that the proposed mixtures are moisture resistant. When using materials in rooms with high humidity, problems may arise.
Application Features
The final fast-hardening self-leveling floor “Starateli” must be applied and evenly distributed over the surface. A needle roller must be used to remove air pockets. Since the material is made on the basis of cement, polymer additives and fillers, cement, anhydrite, and gypsum bases can be used as a rough base. However, their strength should not be less than 150 kg/m2.
The base should be cleaned of dirt and dust. Otherwise, the mixture may not adhere to the surface so firmly. Before starting work, all irregularities should be removed by filling them with special mixtures. You need to pour about 6 liters of water into the container, into which one bag of dry fraction is poured. Using a construction mixer, mix the composition for 4 minutes until you get an average mass without lumps. The mixture sits for 3 minutes and is mixed again. To avoid unexpected results, add the amount of water recommended by the manufacturer.
How to pour the self-leveling floor “Prospectors”
The Starateli self-leveling floors do not have any special differences in application technique from compositions of similar purposes from other manufacturers. Therefore, given the availability of more detailed publications on our portal, we will limit ourselves to a brief story about this process.
| Illustration | Brief description of the operations performed |
| Work always begins with an inspection of the condition of the surface on which the self-leveling floor will be poured. All large growths must be knocked down, unstable areas, for example, with peeled or crumbled screed, must be cleaned and removed. | |
| The entire surface is thoroughly cleaned of dust and construction debris. Brooms and brushes are used, but a construction vacuum cleaner will do the best job. | |
| Particular attention is paid to identified defects. They must be cleaned of dust with special care. | |
| Detected cracks or crevices should be cut in width and depth by 15÷20 mm so that the repair solution is guaranteed to fill them. | |
| Special putties or waterproofing mixtures are often used as a repair composition. But ordinary putty, for example, façade putty, may also work. You can get by with a cement-sand mortar, but it has too long a setting time, and the work will be delayed. | |
| After cleaning, all defects are thoroughly primed, and when the soil dries, they are tightly filled with a repair compound to the general level of the base. Why is this getting so much attention? It's simple - such surface defects may contain voids that negatively affect the adhesion strength of the self-leveling floor to the base. In addition, cracks and cracks can cause water to escape from the mortar being poured, which will disrupt its proper maturation and strength gain. The appearance of cracks on the resulting leveled floor, or even areas of obvious instability of the coating, cannot be ruled out. | |
| The next step after repair and cleaning is to thoroughly prime the entire surface of the base. For cement-sand screeds, it is best to use the universal deep penetration primer “Starateli”. | |
| It happens that pouring has to be done on a smooth reinforced concrete slab, which has practically no ability to absorb moisture. For such foundations, it is better to use a special primer - such as “Prospectors Beton-Contact”. | |
| The primer is applied generously with a roller or wide brush. As a rule, for high-quality processing, at least two passes are required, the second time after the first layer has dried. | |
| The next step is to set up a beacon system. The methods can be different - from the usual galvanized profiles (which will then have to be dismantled and the remaining grooves sealed), to screwing in self-tapping screws and aligning their heads exactly in a single plane. But the best thing for self-leveling floors is to use portable benchmark beacons. The benchmark is a tripod, in the center of which there is a rod ending at the top with a horizontal platform. In a set of such beacons, the lengths of these rods are exactly the same. The position of the rod relative to the support can be changed by rotation - it has a thread cut into it. | |
| The laser builder sets a horizontal plane at a certain distance from the floor (convenient for work). | |
| The first benchmark beacon is installed at the highest point of the foundation to be leveled. By rotating the central rod, the clearance from the surface is set, which will become the minimum thickness of the poured layer. Attention - the thickness cannot be less than the permissible one specified in the instructions for use of the composition. | |
| After the position of the first beacon is set, the distance from its top platform to the laser projection of the auxiliary plane is measured. Next, everything is simple. But the rest of the benchmarks are evenly spaced across the area of the room. And all that remains is to bring the position of their sites to a level corresponding to the measured level of the control beacon. As a result, the lower ends of the central rods of all beacons will stand exactly in one plane and will serve as reference points for the height of pouring the leveling compound. | |
| If you don’t have a laser plotter, no problem. You can transfer the position of the first, control benchmark to all the others using a regular building level, sequentially moving it from one beacon to the next. The result will ultimately be the same. | |
| The last operation of the preparatory stage will be gluing an elastic damper tape to the walls, exactly at the level of the base. It is necessary to compensate for the linear expansion of the poured screed, which can be observed both during hardening and during operation of the finished floor. | |
| The tape is glued completely along the entire perimeter of the room (with the exception, of course, of doorways). Many types of such tapes have an adhesive layer covered with a protective paper backing. If not, it’s easy to fix the tape onto a thin layer of ordinary gypsum putty. | |
| You can proceed to mixing the filling solution. The amount of water strictly established by the manufacturer is measured and poured into a clean container. | |
| Then the dry mixture is poured in there (preferably with constant stirring). Order "A. Water → B. Mixture” is mandatory, and changing it is unacceptable. | |
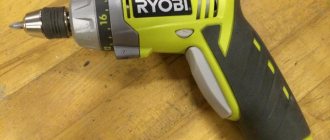
| Active mixing of the solution begins, for which either a construction mixer or an electric drill with an appropriate attachment is used. It is almost impossible to perform such an operation manually. | |
| The goal is to achieve complete homogeneity of the mixture, without the slightest sign of undissolved lumps. Particular attention is paid to the areas near the bottom of the container, where unmixed deposits often like to accumulate. | |
| The minimum first mixing time is indicated in the instructions. When the required homogeneity is achieved, a pause is made for 4–5 minutes. - for “ripening” the solution. | |
| After this, one more vigorous stirring for a minute - and the solution is ready. Important - it is unacceptable to “experiment” with the composition, for example, by adding more water to it than specified by the manufacturer to increase fluidity. The vast majority of “screwed up” floors are precisely because of this. An imbalance of the binder and water (in any direction) leads to disruption of normal hardening and maturation, and the floor will lose its strength qualities. | |
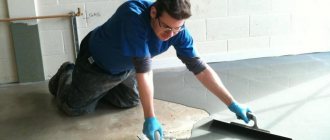
| The finished composition is poured onto the floor surface. The best thing is not to “swell” the entire container into one place, but immediately try to pour it as evenly as possible, covering a certain area, depending on the planned layer thickness. In order for the work to proceed non-stop (and this is important, since the setting of the spilled composition will begin quite soon), it is advisable to organize it so that the mixing of the composition, its pouring over the surface, and distribution proceed in parallel. That is, a team of 3–4 people seems optimal. And it is advisable to have several mixing containers at your disposal. | |
| In order to be able to move freely on the floor surface filled with mortar, paint shoes like these are put on your shoes. Traces from their thorns will immediately and spontaneously be covered with liquid composition. | |
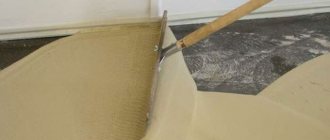
| The spilled composition is evenly dispersed over the surface, trying to achieve approximately the same level, that is, helping the mixture to spread and level out under the influence of gravity. For initial acceleration, you can use a wide spatula, usually, or even this T-shaped “mop” with a wide crossbar. From the author’s personal experience, a similar tool was made independently from the aluminum rod tubes of a used vacuum cleaner. It turned out easy and very convenient. The reference points for the distribution of the liquid composition will be the lower tips of the central rods of the benchmark beacons. | |
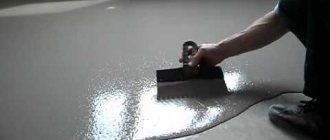
| A needle roller, which is best equipped with a long handle, is also used to distribute the solution. The length of the roller spikes should be several millimeters greater than the thickness of the poured layer. | |
| A needle roller will come in handy in any case - they must be used to roll the distributed composition in order to ensure that all air bubbles that may remain in the solution are completely released. | |
| As the solution is distributed and rolled, when the required filling level is reached, the benchmark beacons are removed. As long as the composition has not lost its fluidity, the footprints will immediately heal on their own. This continues until the entire room is filled and leveled. And with proper filling, the “forces of nature” will take their toll, and the floor should take on a perfectly horizontal position. | |
| The floor after completion of pouring and distribution of the self-leveling composition. It is left in this position until it dries. Important - all work must be carried out at normal room temperature (it is indicated in the instructions). Overheated areas should be excluded (for example, from direct sunlight through windows or from heating appliances). Drafts are completely unacceptable. The poured layer should harden evenly over its entire area and thickness. | |
| If you follow the pouring technology, after the time specified by the manufacturer, you can move on the floor. | |
| All that remains is to carefully cut it with a knife to the level of the resulting floor... | |
| ...and remove excess damper tape. | |
| The result of the work is a durable monolithic surface, precisely placed in a horizontal plane. After the period established by the manufacturer for a specific finishing coating, you can proceed to subsequent finishing. |
Reviews of the thick self-leveling field of the “Starateli” brand
According to buyers, the fast-hardening self-leveling floor “Starateli” (25 kg) is also offered for sale in the form of a mixture, which is used to form a thick rough layer. Concrete floors can be used as the main surface. Users emphasize that the areas of application are renovation and construction of commercial residential premises. According to users, the thickness of the application layer can reach 100 mm. This composition can be used in tandem with a heated floor system. It is noteworthy that the quick-hardening floor is non-shrinking and is suitable for both indoor and outdoor use. The fast-hardening self-leveling floor “Starateli”, the technical characteristics of which will be important to you if you plan to use it, has frost resistance qualities. When working indoors, conditions should be normal humidity. Application can be done either mechanically or manually. As users emphasize, linoleum, block parquet, natural stone, carpet, laminate or floor tiles can be used as a subsequent finishing coating.
Description and properties of self-leveling floor "Prospectors"
Self-leveling floor "Starateli" is a polymer composition sold in powder form, like cement. Like cement, the mixture is diluted with water. Afterwards, the solution is poured onto the rough screed and... the differences from cement begin.
Floors made from it and concrete mixture have to be leveled manually. The filling composition is self-leveling. Surface tension forces cause the mixture to spread evenly over the surface. Not only is there no need to swing a shovel, but also to install beacons showing the level of the final screed.
Cement and sand may be present in the “Starateli” mixture. But the floor acquires innovative properties due to polymer additives. Typically these are epoxy resin and polyurethane. They not only help the other components of the floor to spread when pouring, but also provide waterproofness to the screed.
Conventional sand-cement mixture is not 100% resistant to moisture. It is not for nothing that the foundations of houses are treated with waterproofing, and the wall masonry made of concrete blocks is protected with roof canopies and facades.
The polymers in the filling field fill the pores. In addition to water, dirt can penetrate into them. Washing it out of a simple concrete screed is problematic. Caring for liquid, on the contrary, is simple. It is enough to brush away the dirt from the dense floor surface.
The self-leveling floor is very smooth, which makes it easy to clean
Its density is also a guarantee of hardness. In order to damage or scratch the “Prospectors” you will have to try. Just look at the self-leveling floors in shopping centers, where thousands of heels click on the pouring and carts roll around.
Despite their onslaught, the coatings continue to sparkle with gloss. However, the density and hardness of floors has a side effect. It is difficult to dismantle the screed. You literally have to bite into the stone-like coating with a tool.
Like other self-leveling floors, “Starateli” is distinguished by its rapid hardening. With the tendency to make repairs in a short time, this makes us pay attention to a new product. In addition, it does not limit the imagination of designers.
The self-leveling floor is durable and resistant to scratches and chips
By placing decorative elements under the surface layer of the polymer screed, they achieve a 3D effect from self-leveling floors. Under the transparent fill, whales can swim, stars sparkle, and grass can grow.
Polymer floors are non-flammable and resistant to chemically active substances such as alkalis, acids, and salts. The only thing that can damage coatings made from household elements is sunlight. Direct exposure to ultraviolet light gradually destroys the fill.
However, for fading and cracking under the rays of the sun, the floor must be outside the walls of the house and not covered by a roof. In rooms, self-leveling coatings, like self-leveling apples, attract with beauty and freshness.
Staratel self-leveling screeds can also be attractive at a comfortable temperature. All brand mixtures are suitable for pouring heated floors. Accordingly, the screeds withstand heating from the inside without cracking, expanding and shrinking along with the heating and cooling of electric heaters and hot water pipes.
Self-leveling flooring is suitable for creating a 3D effect and a “warm floor”
Main characteristics of the thick floor “Prospectors”
This mixture is gray in color. The recommended local layer thickness is 10 mm, but the minimum thickness of the general layer is 30 mm. For 25 kg of mixture, as in the case described above, you should add about 6 liters of water. The minimum volume is 5 liters. This indicates that one kilogram will require approximately 0.24 liters. The use time remains the same, and the temperature should be maintained within +23°. Quick-hardening self-leveling floor “Starateli”, the consumption of which is mentioned in the article, can be used in just two days. It is important to note that the manufacturer indicates the recommended temperature for work; it can range from +5 to +30°. If the floor is installed on the outside of a building, it will be able to withstand about 35 freeze-thaw cycles. With a layer thickness of 10 mm per 1 m2 of surface, approximately 17 kg of dry composition will be needed.
Calculation of the required amount of dry mixture for filling the floor
It is clear that in addition to choosing the optimal composition, the owner who has started the renovation will also be faced with the task of determining the required volume of dry mixture to purchase. Making your own calculations is not that difficult.
You will need to be armed with the following information:
- The area of the room in which the floor will be poured. As a rule, most rooms are rectangular in shape, that is, there are no problems at all. And other, more complex configurations, with the right approach, are not difficult to figure out.
One of the basic quantities when calculating construction or finishing work is the area of the room
It happens that the shape of the room differs from the usual rectangle. And quite often redevelopment of premises leads to this. It's okay: follow the link to the article on our portal dedicated to calculating areas - many different examples are considered there, and special calculators are posted.
- The existing height difference if the floor has a slope. It is determined when constructing the horizon of the future coating - by drawing an ideal horizontal baseline along the perimeter, followed by measuring heights at various points. This is even easier to do if you have a laser plane builder at your disposal.
How to inspect the floor for slopes and unevenness?
This operation cannot be avoided in any case, no matter what method of leveling the floor surface is chosen. Details about taking measurements and determining the “zero level” of the future floor are described in detail in the article “Do-it-yourself concrete screed” .
- The planned minimum pour thickness is for the highest point of the floor base. The minimum thickness should not be less than that recommended by the manufacturer.
- Finally, the last value will be the approximate consumption of the mixture per unit of floor area, which is indicated in the passport characteristics of the compositions.
To simplify the task for our reader, below is an online calculator that will allow you to carry out calculations quickly and with a sufficient degree of accuracy. “Passport” costs of bulk trains “Starateli” have already been included in the program database.
The answer will be given in kilograms and immediately converted into the number of factory packages (bags). It is recommended to purchase dry mixtures with a reserve - this 5% reserve is already taken into account in the calculations. Naturally, a whole number of packages are purchased - the fractional number of bags is shown for reference purposes only. That is, if, for example, 12.3 bags are shown, then you need to buy 13 pieces.
You can also get acquainted with the Unis self-leveling floor and the Volma self-leveling floor in special articles on our portal.
Calculator for calculating the amount of dry mixture “Starateli” for filling the floor
Go to calculations
Surface preparation
Quick-hardening self-leveling floor “Starateli” (25 kg bag) can be purchased by you to level surfaces. At the same time, to obtain a positive result, it is necessary to properly prepare the base. It should be cleaned of oil stains, dust and other substances that could reduce the adhesion strength to the surface. If necessary, you can apply a universal primer of the same brand. After this, leave the surface for one hour until completely dry.
If you have to work with highly absorbent substrates, then priming can be carried out in two layers. A damper tape should be fixed along the walls around the perimeter of the room and around columns, as well as other protruding elements. In order for the fast-hardening self-leveling floor “Starateli” to lay down in an even layer, it is necessary to install beacons. The correctness of their location is checked with a level or building level.
Sequence of base preparation
Preparing the supporting base when using a self-leveling floor with your own hands is as important as preparing the solution. As an example, let's take a preparation for a floor labeled fast-hardening/thick.
The general process of preparatory work for various dry mixes “Starateli” will have almost similar stages of implementation:
- removal of old flooring;
- removing debris and dust;
- elimination of heavy concrete flows;
- eliminating surface damage;
- sizing of damper tape;
- marking the height of the future floor.
Removal of old finish is done using power or hand tools. The finishing coating and the old floor structure are removed down to the concrete surface of the floor slab. Large construction waste is collected in thick bags; it is best to use an industrial vacuum cleaner to remove fine dirt and dust.
If strongly protruding beads of concrete are detected on the surface, they are removed using a hammer drill. Dismantling should be carried out carefully - the main goal is to remove the influx so that its level is not higher than the expected floor level.
To eliminate possible damage on the surface of the concrete slab, a cement-sand mortar or “Starateli” gypsum plaster is used. Minor damage is erased immediately after cleaning. For large cracks, it is recommended to carry out jointing, cleaning from dust, priming in one layer and grouting with gypsum plaster.
The expansion joint is glued around the perimeter of the room. For this purpose, a damper tape based on foamed polypropylene is used. The lena is fixed onto gypsum plaster or using a construction stapler.
Marking the level of the future floor is done using a laser or bubble level. To do this, a level is applied to the plane of the wall and a horizontal line is drawn. The distance from the floor can be any - usually no more than 70-100 cm.
Next, the line is transferred to the plane of all the walls in the room. They retreat from the resulting lines at a distance in compliance with the minimum thickness according to the instructions. That is, for the fast-hardening self-leveling floor “Starateli”, the minimum thickness of the leveling layer at the highest place on the surface is 50 mm.
To check the marked level, you can use universal beacons for bulk mixtures - benchmarks. The lighthouse is set according to the minimum thickness in various places in the room. From the floor, the distance to the central leg of the lighthouse is measured and checked.
When determining the level for a heavily damaged surface, a similar approach is used, with the only difference being that the distances to the floor level are first measured. Find the minimum and maximum values. From the minimum value, set aside the minimum possible thickness and mark the level on the surface of the damper tape.
The second method is more accurate and for a large floor area it can save up to 20% of materials.
Application Features
The solution should be distributed using a pump or manually; if necessary, leveling should be done with a rule or a lath. To eliminate air bubbles, it is recommended to walk over the surface with a special roller; this must be done immediately after pouring each portion. The fast-hardening self-leveling floor “Starateli”, which has the most positive reviews, can be used for arranging a screed, while the thickness of the fill on the separating layer should be 30 mm. In the first 48 hours after completion of work, drafts and exposure to UV rays should be avoided. If you plan to use parquet boards, plywood or block parquet, then these coatings must be laid after 4 weeks, which will depend on the drying conditions. If you use a thick, quick-hardening self-leveling floor “Starateli” (25 kg) for subsequent laying of tiles, then installation work should be carried out after 7 days.
Technical characteristics and range
The consistency is dry powder, intended for leveling significant differences in height and small deviations from the surface of the supporting base. The basis is dry cement with the addition of fine fillers, reinforcing fibers, mineral and polymer components.
The range includes 4 types of self-leveling floors, each of which performs a specific task, and one type for screed.
Leveling compounds:
- "Thin"
- "Thick"
- "Practical"
- "Fast-hardening"
Screed S-10 is a separate composition used strictly for the finishing coating.
Self-leveling floor Prospectors Quick-hardening
The most popular among consumers is Starateli self-leveling floor. Due to its properties, it allows you to level out significant differences of 0.5-10 cm and is used as a screed. Suitable for rooms with moderate humidity levels, and also as a good base for a warm floor system. Technical penetration can be carried out 4 hours after pouring.
Prospectors Fast Hardening
The solution does not shrink and has high strength, which is ensured by mineral additives in the composition. The decorative coating on top of the self-leveling floor Starateli can be laid after 7 days. The solution is best used in a warm, heated room with a minimum base temperature of 5°C. To mix the solution from a 25 kg bag of self-leveling quick-hardening floor Starateli, you will need 8-9 liters of clean water. Kneading is done manually using a mixing attachment attached to a drill, or with a mixer.
Specifications:
| Packing | 25 kg bag |
| Consumption | 13.5-14.5 kg/sq.m with a layer of 1 cm |
| Breeding | 0.32-0.36 l of water per 1 kg of dry mixture (8-9 l per 25 kg bag) |
| Technical bypass | in 4 hours |
| Frost resistance | 50 cycles |
| Layer thickness | 5-100 mm |
| Operating temperature | -40 to +70 °С |
| Flooring installation | in 7 days |
| Viability of solution | 40 minutes |
Price per package 270 rub.
Pros:
- dries quickly;
- Suitable for cement, gypsum and anhydrite substrates.
Minuses:
- cannot be used externally;
- difficulties with leveling.
Instructions for use Prospectors Quick-hardening
Self-leveling floor Prospectors Thin for the bathroom
Self-leveling floor Starateli Thin, packaged in 25 kg bags. Designed for leveling minor surface irregularities of 0.1-3 cm. It is used for final leveling of the floor, so it can be called finishing. Minerals and polymer additives provide strength even in the thinnest layer. And most importantly, using the self-leveling floor Starateli Thin is suitable for showers, bathrooms and kitchens, because it is not at all afraid of moisture.
Prospectors Thin
In addition to the fact that it is used in domestic conditions, such a self-leveling floor will withstand loads even in administrative buildings. The possibility of walking after 4-6 hours depends on the thickness of the fill. To mix 1 kg of powder, you will need 360 ml of water. After stirring, allow the solution to swell for 3-5 minutes, then stir again.
Specifications:
| Packing | 25 kg bag |
| Consumption | 14-15 kg/sq.m with a layer of 1 cm |
| Breeding | 0.32-0.36 l of water per 1 kg of dry mixture (8-9 l per 25 kg bag) |
| Technical bypass | in 4 hours |
| Frost resistance | 50 cycles |
| Layer thickness | 1-20 mm |
| Operating temperature | -40 to +70 °С |
| Flooring installation | in 3 days |
| Viability of solution | 40 minutes |
Price 300 rub.
Pros:
- laying ceramic tiles, porcelain tiles after 72 hours;
- excellent spreadability;
- heated floor system;
Minuses:
- if used as a finishing coat, do not pour it in several approaches to obtain a denser coating; it may crack and spread poorly.
Operating instructions for self-leveling floor prospectors thin
Self-leveling floor Prospectors Thick
Unlike the Starateli modification, the “Practical” self-leveling floor, the “Thick” self-leveling floor weighs 5 kg more, and its structure allows you to work with unevenness up to 100 mm. The cement-based composition is completely free of any shrinkage. The self-leveling floor Starateli Thick, having a weight of 25 kg, can process 1.47 m² of area, provided that the layer height does not exceed 1 cm. Suitable for external and internal work at a temperature of +5/30 ° C.
Prospectors Tolstoy
To dilute the solution you will need 5-6 liters for the entire package. For the first 48 hours after pouring, drafts and exposure to sunlight on the treated surface should be avoided. If you are planning to decorate the floor with products that contain wood, you should wait 3-4 weeks. But tiles or natural stone can be laid already on the 7th day. Withstands loads well, suitable for garages and high traffic areas.
Specifications:
| Packing | 25 kg bag |
| Consumption | 13.5-14.5 kg/sq.m with a layer of 1 cm |
| Breeding | 0.2-0.24 l of water per 1 kg of dry mixture |
| Technical bypass | in 4 hours |
| Frost resistance | 35 cycles |
| Layer thickness | 3-10 cm |
| Operating temperature | -40 to +70 °С |
| Flooring installation | in 7 days |
| Viability of solution | 40 minutes |
Price 250 rubles per bag.
Pros:
- for baths, bathrooms and shower rooms;
- use as a rough screed;
- heating floor.
Minuses:
- does not spread well.
Instructions for working with self-leveling floor Starateli Thick
Self-leveling floor Prospectors Practical
It is used for high-quality leveling of concrete floors with differences and slopes of up to 7 cm for subsequent coating. Used in rooms with normal humidity during construction or renovation of public buildings. Underfloor heating is recommended for the system. It has proven itself to be excellent when leveling floors in hallways.
Specifications:
| Packing | 20 kg bag |
| Consumption | 14-15 kg/sq.m with a layer of 1 cm |
| Breeding | 0.27-0.3 l of water per 1 kg of dry mixture |
| Technical bypass | in 6 hours |
| Frost resistance | 50 cycles |
| Layer thickness | 7-70 mm |
| Operating temperature | -40 to +70 °С |
| Flooring installation | in 7 days |
| Viability of solution | 40 minutes |
Price 250 rub. package.
Pros:
- suitable for leveling significant differences;
- belongs to the category of universal; spreads well.
Minuses:
- No outdoor use allowed.
Preparatory work
Before you start pouring, you need to carefully prepare everything. You cannot skip this step, because you risk getting a result that is not at all pleasing to the eye.
- You should start by eliminating all unevenness and peeling - remove them using a scraper or a special grinding machine.
- After such manipulations, a lot of dust and debris is formed, which must be removed with a vacuum cleaner.
- Defects, holes and cracks must be repaired with cement-sand mortar.
- After complete drying, we begin priming.
- To compensate for the thermal expansion of the screed, you will need to install a damper tape around the perimeter of the area, going around all the reliefs of the structure, including protruding ones.
- If you work outside, you need to install a heating element that will cover the work surface from the sun.
- Indoors, get rid of all possible sources of drafts.
The best manufacturers of self-leveling floors
Liquid (self-leveling) floors are produced by many companies. The best brands are collected in the list:
- Vetonit . The company produces mixtures in a wide range and with a large number of individual features. All items are of good quality and are in demand in the construction segment.
- Knauf. The brand specializes in gypsum compositions with the addition of quartz sand. They have restrictions on their use, but are very popular among craftsmen and ordinary people.
- Volma . A relatively young brand occupying the economy segment. But at the same time, the quality of the mixtures is always decent.
- Moment (Ceresit) . It produces mainly mixtures that are positioned as basic ones. They have an average drying time and only some lines are fast-drying.
Important! When choosing self-leveling floors for a house or apartment, ask the seller for a license. There are a lot of counterfeit products on the market, which scammers label as products of well-known brands. Only a license and a quality certificate give you confidence in purchasing an original.
Reviews
- Denis, 27 years old: “When I was pouring the floors at home, I used the Ceresit compound. What attracted me was the low price, but good quality indicators. Since I am new to this business, I thought that I would not be able to cope with the task, but everything turned out to be very easy. When the mixture was poured, it still took 4 hours to dry. The result is a reliable, durable and level floor. It’s worth noting that you don’t need to prepare the solution much, since after 30 minutes it begins to thicken.”
- Anatoly, 45 years old: “My work is related to construction and repair, so I often come across the task of pouring a self-leveling self-leveling floor. Most often I have to work with Volma Level Express mixture. Very high quality products, can be used to create the base of the floor for the kitchen and bathroom. After this, you can lay any type of coating.”
- Mikhail, 35 years old: “When my wife and I bought a house, it was in terrible condition, everything had to be done from scratch. To create the floor I used the composition Prospectors. I am very pleased with this manufacturer, it has saved me more than once. What I like about self-leveling flooring is the smooth surface it provides and the speed of work. I prepared the surface, installed the beacons and poured the prepared solution. After just 3 hours it hardened. Then I laid laminate on the floor.”
Self-leveling self-leveling floors are becoming very popular today. And this is not surprising, because this design is of high quality, strength, reliability and durability. And the most important thing is that all the work can be done by an ordinary person who does not have such experience behind him.