Combining a balcony with a room is a procedure that allows you to increase “useful meters” in Brezhnevka, Khrushchev or new buildings.
But immediately questions arise related to the coordination of work and implementation. Is it possible to demolish part of the wall? What about connecting a loggia to a kitchen, bedroom or living room?
Will it be possible to insulate part of the room? Will there be any problems with selling real estate later?
How to legally combine a loggia with a room
In order for the redevelopment to be completely legal and to have complete confidence in its safety for the entire residential building, it is necessary to coordinate the planned work with the authorities dealing with these issues. Of course, preparing the necessary documents can take a lot of time. However, having an agreement will provide you with legal protection in possible controversial situations. Moreover, you yourself will be sure that you are not causing damage to your entire apartment building.
To simplify this administrative stage for yourself, you can contact the specialists of one of the city’s construction companies. Such companies already have experience in carrying out such operations, their employees know how to combine a room with a loggia or balcony, and they probably have photos of their work. And, most importantly, their specialists will take care of all coordination issues themselves.
❗ List of prohibited actions
When connecting a loggia to a room, the following prohibitions should be taken into account:
- you cannot demolish the threshold, which is part of the supporting structure (it protects the slabs from freezing, and floor slabs often rest on it);
- the window sill block can be removed only if it is not part of the load-bearing wall;
- It is forbidden to remove the partitions if you live above the fifth floor - they are part of the fire protection system;
- Wet areas should not be removed.
Is it possible to combine a room with a balcony without breaking the law?
Read
Buying an apartment with illegal redevelopment
More details
Permissible noise level during apartment renovation
Look
How to properly combine a loggia or balcony with a room
Carrying out work when combining a room with a loggia or balcony is carried out in a similar way. However, in the latter case, this operation is somewhat more labor-intensive and complex. Therefore, in the future we will talk specifically about connecting the balcony. If your apartment has a loggia, it will be easy for you to understand which of the works listed below will simply need to be excluded.
Preparing to attach a balcony
First of all, a welded structure of the balcony frame is made, which can be sheathed on the outside with siding that has a low level of thermal conductivity. For better heat conservation, glazing is best done using two- or three-chamber plastic windows. We have already talked about their types, advantages, structure and installation procedure here.
All external walls of the balcony (loggia) should be insulated using Penofol or Penoplex and at the same time performing steam and waterproofing work.
Loggia insulated with Penofol
The insulation is attached to the wall using dowels or glue. The joints of the sheets are taped with aluminum tape. When using Penofol, its foil side should face the inside of the room.
Important! Extending central heating pipes into a combined loggia (balcony) is not allowed!
Dismantling the opening to combine a room with a loggia
It must be remembered that in panel houses, complete removal of the partition is unacceptable. This can cause damage to the entire building. In brick houses it is quite possible to do this, although it is not at all necessary. The choice of option depends on the preferences of the apartment owners.
Combining a loggia with a room, performed without completely dismantling the opening
If only the window unit is being dismantled, then to complete this work you will need a hammer and a convenient-sized hacksaw. If the opening is completely dismantled, then you should have a grinder and a hammer drill on hand, the choice of which we talked about here. If the opening is completely dismantled, the heating radiator will also need to be moved.
Combining a loggia with a room, made with complete disassembly of the opening
After this, the slopes of the resulting opening are finished by plastering and puttying. GCR can also be used for finishing, the features of which we have already talked about here.
Threshold of the attached loggia
It is not always possible to remove the threshold at the entrance to a loggia or balcony, since this can negatively affect the stability of the house structure. To level this threshold, you can build a small ramp or raise the floor level in the attached loggia.
In the loggia attached to the room, the floor is raised to the level of the threshold
At the final stage, the newly created living space is finished. The finishing style should be combined with the interior design of the room to which the loggia has just been added.
This is the amount of work required to properly combine a loggia with a room.
Can this be legalized, and what is the procedure for submitting documents?
In the case where the owner has made an unauthorized association, it will not be easy to legitimize the balcony as part of the room.
If all technical requirements are taken into account when connecting the space of the room and the balcony, then there is undoubtedly a chance. If at least one of them is not observed, it will not be possible to obtain redevelopment on a legal basis. The procedure for submitting documents is the same as described above. Sometimes it becomes necessary to legalize balconies on the ground floor. An unauthorized balcony in this case is classified not as a hanging structure, but as an extension. That is, the status of the land beneath it changes. Cases of transfer of this part of the land into ownership are extremely rare. It can only be rented out if a positive court decision is received. After this, documents are prepared in the BTI and registration authorities.
Expert opinion
Mironova Anna Sergeevna
Generalist lawyer. Specializes in family issues, civil, criminal and housing law
It is very difficult to agree on the combination of a loggia and a room or the addition of a balcony to a room. When deciding on unauthorized redevelopment, you should remember that big problems can arise when making real estate transactions. Also, illegal alterations will be an obstacle to the transfer of housing by inheritance. In addition to the costs incurred for the arrangement, you will have to return everything to its place, and even pay a fine.
How to combine a room with a loggia: video
According to the Decree of the Moscow Government of October 25, 2011 N 508-PP, the combination of loggias, balconies, terraces, verandas with interior spaces is not allowed, that is, such redevelopment is illegal and cannot be registered. How did you resolve this issue?
In different Russian cities, the approach to this issue may be different. To legalize the association described in the article, you must contact the appropriate authorities in the city of your residence.
Dear Sergey! The article says that it is impossible to extend central heating batteries, but the photo shows that after combining the batteries everything is already on the attached balcony/loggia. How is this issue resolved? Thank you in advance for your response.
Yulia, this issue must be agreed upon in advance, even before the start of work, with the relevant city authorities
What can you put on the attached squares?
Work zone
The most popular option among workaholics. A computer desk and an office chair are placed behind a shelf improvised from the window sill. You can throw a carpet on the floor.
Sleeping place
Although experts do not recommend it, brave individuals can move the sleeping area to the panoramic glazed balcony part of the bedroom. In fact, it’s better to just place an extra bed there, and put it on the podium. The role of a bed in this case can be played by a folding sofa, futon, or air mattress.
Mini gym
Sports lovers will be able to organize a small gym in the balcony area, with appropriate flooring and equipment.
Wardrobe
The presence of two blank walls will allow you to place a pair of wardrobes with mirrored doors along them. The latter will not only help you get yourself in order, but will also play a space-correcting role.
Library
Have you always dreamed of having a personal library? Combining a bedroom and a balcony will give you a chance to get it. Use hanging shelves or racks to store books. For comfortable reading, you can place a cozy deep chair or rocking chair, next to which you can place a round table and a floor lamp standing on one figured leg.
Boudoir
You can create a great corner for gatherings with friends if you place a soft corner and a low table in the balcony area. In this case, the window and walls can be draped with rich fabric. Lay a shag carpet on the floor. Add a TV or home theater here and you will get an excellent relaxation area. Instead of equipment, you can install a fountain on the former balcony or install a panoramic aquarium and populate it with bright fish.
How to legally combine a balcony with a room?
Combining a balcony with a kitchen or room is a common issue when renovating an apartment. With a few extra square meters, the kitchen can be turned into a dining room, and the room can have a small office.
However, in 2021 this redevelopment was prohibited. Such measures were taken due to the fact that inconsistent layouts harm the entire building.
For example, in 2011 in Yaroslavl, a resourceful entrepreneur demolished a load-bearing wall in an apartment on the 1st floor to make renovations for a store. The investigation - the entrance collapsed, 18 apartments were destroyed, 67 people were left without housing, 1 was killed.
In 2015, a three-story building collapsed in Kazan due to redevelopment. 4 people were injured, 60 were left without apartments.
What is forbidden to do when remodeling a balcony:
- remove batteries into this room
- remove the lintels above the opening
- dismantle the threshold when removing the window sill block
- completely combine the balcony with the kitchen
- trim the side walls of the balcony
- create additional loggias
- extend the balcony beyond the level of the facade wall.
How to do everything right?
Merge partially
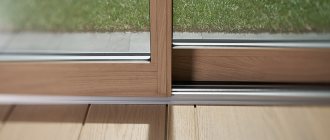
The room with the balcony had to be divided. Sliding doors will come to the rescue. A prerequisite is double glazing and guides at the top and bottom. This is only permissible in monolithic houses where the facade is not a load-bearing wall. In panel, block and brick houses, demolishing a window sill, top lintel or threshold is dangerous.
Related article: Why you can’t combine a loggia with a room
Where should I put the battery?
Let's say you're lucky and can demolish the window sill block. But where should I put the battery? The answer is on the adjacent wall. You cannot remove it completely or take it out onto the balcony. The room and kitchen are warm rooms, and the balcony is cold. When moving the battery to the balcony, the thermal circuit of not only the apartment, but also the house is disrupted.
Proper insulation
The new room must be insulated. To do this you need:
- install double glazing
- raise the floor level so that there is no transition between the kitchen-threshold-balcony
- insulate the floor and walls with thermal insulation material
- install a heated floor or think about an electric radiator.
Coordination of redevelopment
The redevelopment must be legalized or it may be required to be returned to its original state. The fine for illegal redevelopment for individuals is from 2,000 to 2,500 rubles, for legal entities - from 350,000 to 1,000,000 rubles.
Legalized redevelopment is important when selling and buying an apartment. When applying for a mortgage, an employee of the appraisal company comes to the apartment. He takes photographs, reviews documents and writes a formal appraisal report for the bank. If the redevelopment is not legalized, difficulties may arise. The worst case scenario is that the bank will refuse to issue a mortgage for such an apartment.
Today, the vast majority of apartments are purchased with a mortgage, so illegal redevelopment can seriously complicate the sale.
Procedure
- Prepare a redevelopment project. To do this, you need to contact a design organization that has the appropriate license.
- Coordinate the project with the sanitary and epidemiological station (SES) and the district administration.
- Carry out redevelopment according to the project
- Invite a district administration employee to accept the work.
- Receive a new technical passport from the BTI and register the apartment with the new areas for cadastral registration.
- Submit a package of documents to the MFC, receive a new extract from the Unified State Register.
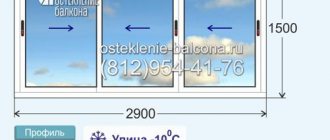
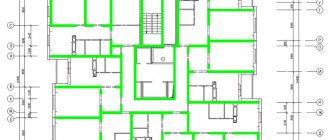
Example of a BTI plan:
It is almost impossible to legalize a redevelopment that has already been completed, but if you still want to try, the procedure is as follows:
- Make a technical conclusion in the design organization. The conclusion will describe what happened before the redevelopment and what happened after.
- Provide a conclusion and technical apartment plan at SES for approval. There is a high probability of refusal.
- Receive a written refusal from the district administration to legalize the redevelopment.
- Go to court. As a rule, the court will refer to the refusals of the SES and the administration and also refuse. In addition, the court may require the signatures of all residents of the house. If the house is multi-apartment, it is almost impossible to collect them.
We do not recommend remodeling your apartment. If you are not satisfied with the layout of your apartment, just change the apartment.
There are always many apartments on the market with completely different layouts. You can choose the one that suits you. Why suffer and live in an uncomfortable apartment? Developers, real estate agencies, banks are at your service. Don't put this question off. Solve it today!
List of references for an in-depth study of the issue: Housing Code of the Russian Federation (Articles 25–29); Decree of the Government of the Russian Federation No. 491, issued on August 13, 2006; Resolution issued by the State Committee of the Russian Federation for Construction and Housing Complex on September 27, 2003, number 170. PPM No. 708-PP - On approval of standards for the operation of the housing stock. — Updated version of SNiP 01/31/2003 — SP 54.13330.2011 “Residential multi-apartment buildings.” SanPiN 2.1.2.2645-10 “Sanitary and epidemiological requirements for living conditions in residential buildings and premises.”
Nuances of insulation and heating
Before joining, the loggia needs proper insulation and glazing. In this case, certain nuances are taken into account. For example, it is not advisable to move heating radiators and radiators to the balcony, as well as to connect them to the general house system. This problem can be solved using electric heaters or warm water floors. An economical infrared heating system allows for convenient temperature control using a thermostat.
For high-quality insulation in the finishing of walls and ceilings, mineral wool, penoplex and fiberglass are used. The glazing uses double-glazed windows that will correspond to the existing weather conditions. The most optimal solution is to install double-glazed windows only on the front side of the loggia, and make the side walls blank.
The photo shows heating and insulation of the balcony combined with the bedroom.
What documents are needed to combine a balcony/loggia?
Combining a balcony can occur in two ways: simply by removing the window block without demolishing the window sill part of the wall and threshold, and by removing it. If you only decide to remove the window/doors, no permit is required. Upon completion of the work, you take the apartment plan from the BTI and make the changes made
For this option of combining a balcony and a room or kitchen, permission is not required
If there is a need to remove the window sill part of the wall, then such a change is called redevelopment and requires a number of permitting documents to carry it out. Moreover, keep in mind that in recent years in the capital it has been allowed to remove a window sill block only if glass sliding doors are installed. Please also note that radiators are not allowed on the balcony or loggia. It will be necessary to separately organize the heating of the balcony, and also to determine a new place for the radiator, which was previously on the window sill block.
Required documents and actions
In any case, you will need:
- Get the registration certificate for the apartment from the BTI.
- With a technical certificate, contact a design organization that has a certificate for the right to provide such services to draw up a redevelopment project. The second option is to order a redevelopment project from an organization that has developed a standard design for your house (for residents of the capital this is a more reliable option).
- Having taken the received project, documents confirming ownership rights, a completed application for redevelopment, contact the Housing Inspectorate.
After receiving the permitting resolution, work can begin. Upon completion of the renovation, you will need to invite a representative of the Housing Inspectorate to obtain a Certificate of Completion of Redevelopment Work. With this document, you contact the BTI again to receive a new registration certificate.
Such an association requires documentation
Please note that when choosing the second option, only the part that was under the window is subject to demolition. It is categorically forbidden to demolish the remaining side walls and thresholds without additional approval, just like cutting down the window beam. They may also require strengthening measures. All work will be specified in the redevelopment project and must be carried out scrupulously.
Related article: Do I need permission to glaze a loggia?
If you need to remove walls and beams, please discuss this with the design organization when submitting documents. They are calculating whether this option is possible. If yes, measures to restore the load-bearing capacity and a list of works are issued.
Loggia insulation process
Now it’s time to talk about how to properly insulate a loggia. For those who decide to do everything themselves, step-by-step instructions are the key to success. Therefore, I will continue to try, based on my own experience, to describe everything to the smallest detail.
The loggia is completely covered with Penoplex.
Glazing of the loggia
Previously, in such places, as a rule, lightweight homemade wooden frames with one glass were installed. At that moment there was simply nothing else. But it was very difficult to get a standard wooden frame with two glasses, plus it did not fit in dimensions. This miracle of Soviet design stood on my loggia.
Equipping any kind of insulation with such frames is a stupid and useless task. Therefore, wondering where to start, I decided to dismantle the old frame and put in its place a modern plastic version with double-glazed windows.
I had no problems dismantling the old frames, but I want to warn you: if you have such frames on your loggia, then first remove the glass from them. And only after that you can remove the frames themselves. Otherwise, glass falling from the top floor can cause a lot of trouble.
After calling the surveyor, do not hesitate to pester him with questions and ask him to explain his actions to you. The fact is that at one time I relied on the person’s professionalism and as a result they delivered frames 200 mm shorter than the window opening.
Aerated concrete parapet.
There is one caveat here. As the guys who came to install the windows told me, the width of the support must be at least 50 mm and such a platform is installed strictly horizontally.
In my case there was an ordinary, still Soviet parapet made of thin rolled metal. Plus, this parapet was skewed, the camber at six meters was about 100 mm. As a result, I had to pay extra for people to install the fiftieth corner.
Although if the parapet is concrete or brick, then consider yourself lucky. It is much easier to install frames on such capital structures. But in any case, you need to consult with those who will install.
Loggia trimmed with clapboard.
Again, based on my own experience, I want to give one more piece of advice. If the loggia is long and the apartment is on a high floor, it is better to divide the entire structure into several sections. I had 2 sections of 3 meters each and it took about three hours to lift these windows to the seventh floor. It’s good that the time of delivery was agreed upon in advance, otherwise we would have had to pay for that as well.
Parapet installation
As I already said, the ideal option is when your project initially provides for a capital parapet. I had to “fence” almost everything all over again. The first thought was to cut the grille down to the supporting corner for the window frames and lay out the parapet from aerated concrete or facing bricks.
Lathing on a brick parapet.
Facing brick is, of course, beautiful, but to lay it, you need to be a mason; you can’t do it haphazardly here. With aerated concrete, everything is much simpler, since it has clear shapes, and most importantly, it is mounted not on a cement-sand mortar, but on construction adhesive.
But here another problem emerged. It turns out that aerated concrete needs to be properly plastered on the outside, otherwise it will become saturated with moisture and begin to actively deteriorate. Plus, its insulating qualities will disappear completely.
To be honest, I didn’t dare to plaster aerated concrete while hanging over the parapet with my own hands from the outside, and on the seventh floor. It’s not that I don’t know how to plaster, it’s just that working at heights is dangerous.
A variant of a clinker panel fixed to the wall.
As a result, I settled on clinker panels without insulation; I really liked the look of the beautiful brickwork. A clinker panel is a sheet trimmed with clinker tiles; in my case it was brickwork. Asbestos cement or waterproof OSB is used as the base. You can, of course, take a panel with insulation, where polyurethane foam is used as the basis, but it costs almost half as much.
Metal parapet grating.
Since the supporting corner under the window frame was extended slightly beyond the lattice metal parapet, I horizontally secured 4 rows of wooden blocks on the outer and inner sides of the lattice. They then became the supporting frame for exterior decoration and interior insulation.
There was a 30 mm thick block on the outside, and a 50 mm thick block was installed on the inside. Plus, from the inside, between the horizontal bars, in increments of about a meter, I mounted vertical guides. This entire structure was pulled together and secured with long self-tapping screws and metal clamps. Vertical and horizontal bars were fixed to each other with corners.
Clinker panels are assembled like a designer's puzzle, the façade part is solid. I screwed the panels themselves to the wooden sheathing with self-tapping screws and a press washer. Plus, to be sure, each panel was fixed at 3-4 points to the old metal lattice parapet.
Insulation with polyurethane foam.
To do this, I used U-shaped iron clamps with a removable jumper. The screws and clamps on the outside were later covered with grout. This is quite simple and it is not visible between the clinker tiles.
Scheme of fastening the clinker panel to the parapet grating using a U-shaped clamp.
At the end, I filled all the cracks from the inside with polyurethane foam. As a result, I ended up with a continuous façade in the form of perfect brickwork. By the way, manufacturers of such external panels provide a guarantee of 30 years on their products.
If you don’t want to bother with the parapet, you can do without the parapet at all. In this case, the fence is cut off completely and, roughly speaking, a large plastic window frame is installed instead. This is done by the same companies that deal with windows and this design is called “French Balcony”, but the price for such a pleasure is substantial.
A few words about choosing insulation
The question of how best to insulate a loggia is quite controversial. In general, there are several main contenders, but it all depends on the size of the budget and the desire to work independently.
Polystyrene foam on the balcony.
- The classic and still most beloved material by the people is polystyrene foam with a density of 25 kg/m³ . It is lightweight, not afraid of water, quite easy to install, and what attracts most of all, naturally, is the low price of polystyrene foam. In my opinion, the only drawback of polystyrene foam is its flammability, but to tell the truth, most insulation materials used in such structures suffer from this drawback;
Laying basalt wool.
- Mineral wool is also relatively cheap . Previously, glass wool was used, but this is a bad choice, it is afraid of water and quickly cakes. Plus, to install it you need to wear gloves and a respirator. Otherwise, the glass will go into the skin and you will itch for a long time. It is much easier to install soft mineral wool mats; such hard protection is no longer needed;
- But if you buy, it is best to opt for dense basalt slabs ; this material can even be plastered if necessary. Although remember, any cotton wool does not burn, but is afraid of moisture;
Extruded polystyrene foam with joint grooves.
- The most fashionable material today is extruded polystyrene foam or Penoplex , as we usually call it. In essence, this is the same foam, only made using a different technology. But if polystyrene foam is considered a partially vapor-permeable material, then its extruded counterpart is an absolute waterproofer. Its thermal conductivity is one third lower, which means that where foam plastic 50 mm thick is installed, extruded polystyrene foam 30 mm thick can be used. But personally, I like Penoplex for its high mechanical strength. This material is used to insulate the road surface, so it can easily be laid in a dry or wet floor screed;
Spraying polyurethane foam.
- At the moment, the most expensive insulation on the market is polyurethane foam . This is a liquid insulation that can be sprayed onto a surface of any geometry. As a result, you get a continuous insulating shell, without any gaps or cold bridges. This coating has excellent sound insulation. In terms of its characteristics, polyurethane foam is somewhat reminiscent of extruded polystyrene foam. The problem is that, in addition to its high cost, polyurethane foam can only be applied using special compressors; you cannot do it yourself;
Penoizol in sheathing.
Uninformed people are often offered to insulate the loggia with penoizol instead of polyurethane foam; it is sprayed in the same way as polyurethane foam. So I don’t advise you to do this. Behind the obscure, tricky name hides ordinary polystyrene foam, the only difference being that it is sprayed in liquid form, and accordingly they will ask for quite a bit of money for it. Why pay more if you can buy sheets of foam plastic and do practically the same thing, only at least 3 times cheaper.
Expanded clay in floor sheathing.
- For reasons of economy, people sometimes insulate the floor on the loggia with expanded clay granules . Expanded clay is porous, foamed and fired clay. The thing is good in principle, but expanded clay is a free-flowing material and is only suitable for floors. In addition, he is afraid of moisture, and the worst thing is that the thickness of such an embankment starts from 150 - 200 mm. Accordingly, it can only be used in apartments with high ceilings;
Penofol structure.
- There is also such a “smart” insulation as penofol . This is a sheet of foamed polyethylene, covered on one or both sides with foil. In its structure, penofol partly resembles foam rubber. But the thickness of this material is only 10 - 15 mm. Therefore, in our case, it can only be used as auxiliary, additional insulation.
In general, I believe that insulation should be comprehensive, only then will it be reliable and effective. That is, you cannot rely on only one type of insulation; it needs to be supplemented with something.
Insulation of facade parapet and load-bearing walls
For reasons of economy, I used 50 mm thick foam boards for the walls and ceiling. Of course, it would be better to install extruded polystyrene foam, but it is about 2–3 times more expensive.
And the easiest way out was to call specialists, pay and let them fill everything with polyurethane foam, but I didn’t have that much money at that time, all the reserves were “eaten up” by apartment renovations.
Polystyrene foam on the parapet of the loggia.
As you remember, we have already installed a frame made of wooden beams 50 mm thick. Now all that remains is to cut the sheets of foam plastic exactly according to the size of the finished niches and insert them there as tightly as possible, and fill the remaining small gaps with polyurethane foam.
But the thermal conductivity coefficient of wood is several times higher than that of foam plastic, so the wooden frame will act as a kind of cold bridge.
By and large, one could ignore this, but we are doing it for ourselves, so the next layer I secured foil penofol over the entire inner surface of the parapet, as a continuous sheet. Moreover, penofol needs to be secured with foil inside the room, so the reflection of heat rays will be an order of magnitude higher.
I chose wooden lining as the finishing cladding. Accordingly, I needed guides for it. To do this, I secured another block with a cross-section of 30x40 mm on top of the foam foam directly onto the horizontal frame wooden beams.
Laying polystyrene foam in the niches of the wooden sheathing.
The fact is that the minimum thickness of load-bearing bars for wooden sheathing is 25 mm; if you take thinner ones, they may crack when you hammer in nails or screw in self-tapping screws.
In addition to wooden lining, plastic or MDF panels can be mounted on such a sheathing. In general, anything you like, even drywall for plastering if desired.
If instead of polystyrene foam you choose basalt wool slabs, then the sequence will be slightly different. As I already said, any cotton wool is afraid of moisture, so before installing it you will need to secure a layer of waterproofing.
In general, it is recommended to install a vapor barrier membrane, but I think that in this case it is a waste of money.
After all, we have a clinker panel on the outside, and foil penofol on the inside. Both of these materials are vapor-tight. Accordingly, instead of expensive vapor barrier, you can safely install cheap technical polyethylene. The rest of the insulating pie will be the same.
Blank for installation of the finishing coating.
As for the walls, they are also covered with wooden beams 50x50 mm. After that, sheets of polystyrene foam are inserted, penofol is applied, the load-bearing sheathing under the lining is attached, and then the lining itself comes. Naturally, you will have to additionally lay polyethylene under the cotton wool.
Ceiling insulation
The ceiling can be insulated in two ways. In essence, I have already told you about one thing. It is done in the same way as we insulated the side walls.
Only wooden blocks are attached to the ceiling with anchors, and foam plastic is not just inserted into the niches, but is also additionally glued to the ceiling. Then everything is as usual, we apply penofol, fix it with counter lathing under the clapboard and sew up the ceiling with clapboard.
Gluing Penoplex to the ceiling.
But I decided to take a simpler route: in this option, wooden sheathing is not provided at all. The foam sheets here are simply glued to the reinforced concrete ceiling slab. These slabs are absolutely flat, so problems with fixation, as a rule, do not arise.
Polystyrene foam can be glued to Liquid Nails, polyurethane foam or Ceresit CT83 construction adhesive. But in all these cases, it is advisable to cover the concrete slab with soil a couple of times.
Insulation of the ceiling under the sheathing.
- Liquid Nails glue is sold in tubes adapted to fit a construction gun. This glue must first be spread on a sheet of insulation, attach this sheet to the ceiling and immediately tear it off. Then the glue should dry a little for 5 - 7 minutes. After this, the sheet can be finally glued;
- Polyurethane foam is applied to the insulation in a random pattern and immediately applied to the ceiling. But this sheet will have to be pressed to the ceiling several times at intervals of 10–15 minutes. It is well known that foam expands and until this process ends, the sheet will move away from the ceiling;
- My favorite is Ceresit CT83. This is a dry mixture that is diluted with water, instructions are on the package. It was originally created for gluing Penoplex, but since these materials have the same base, this mixture is also well suited for foam. It is applied with a notched trowel with a comb depth of up to 10 mm.
Construction adhesive Ceresit CT83.
After I glued the foam to the ceiling in a continuous layer, filled the gaps with foam and the glue finally set, I decided to plaster my ceiling over the foam. This is not difficult to do, the sequence of work is something like this:
Scheme for plastering the ceiling using polystyrene foam.
- Initially, on top of the foam, using the same comb spatula, I applied a layer of Ceresit CT83 glue. You can use starting putty, but underneath it you will need to apply primer to the foam;
- Before the glue hardened, I carefully sunk the serpyanka (reinforcing fiberglass mesh) into it with a spatula;
- After this, holes 30 - 40 mm deep are made through the insulation with a hammer drill in the reinforced concrete slab. For each sheet there are approximately 4 - 5 pieces;
- Plastic umbrella dowels are inserted into these holes and fixed tightly in them. This dowel consists of a plastic body with an umbrella and a central rod. So, first, the dowel body itself is inserted all the way, and then the central rod is hammered in;
Umbrella mounting diagram.
- At the last stage, a layer of finishing plaster is applied.
If you have a problem with plastering and are too lazy to attach the wooden sheathing under the lining, then you can do it even easier. In this case, the foil foam sheet is simply glued to the foam.
If you decide to glue penofol to polystyrene foam, choose the glue carefully. The instructions should indicate that it is suitable for these materials. Otherwise, penofol or polystyrene foam may corrode the solvent contained in the adhesive.
Floor insulation
Finally we got to the arrangement of the floors. This stage is considered one of the main ones. The easiest way out is to install a wooden sheathing, put insulation in the cavity and cover it all with a floorboard. But such a “pie” will take at least 70 mm.
Traditional floor insulation under the sheathing.
I wanted to make the floor as thin as possible, plus install an electrical “Warm Floor” system underneath it. Therefore, I decided to do without lathing, and used high-strength extruded polystyrene foam as the main insulation.
Previously, I had linoleum on my balcony, so removing it and cleaning the concrete slab to perfect condition was not very difficult. In my case, the slab turned out to be level; if the situation with your floors is different, you will have to fill in a small screed. Penoplex is laid only on a perfectly flat surface.
If you do not have proper experience in leveling screeds, then it is better to buy self-leveling compounds. They, of course, will cost more than a cement-sand mortar, but you are not pouring a hall, but just a loggia; you don’t need much material for it.
Scheme of dry floor insulation with installation of the “Warm Floor” film system.
Before any insulation, the reinforced concrete floor of the loggia must be waterproofed. I used technical polyethylene as waterproofing. It is covered with a solid ball extending onto adjacent walls, just above the level of the finishing coating. Then the excess is cut off.
Now it's time to install the penoplex. There is nothing complicated here. The foam sheets are equipped with joining grooves on the sides, resulting in a smooth and beautiful flooring.
Water heated floor according to Penoplex.
Warm floors can be equipped in different ways. If you have official permission for redevelopment and the loggia is being equipped as a living space, then it would be best to lay a water-heated floor and power it from the radiator outlet, which you will remove when you demolish the cabinet under the window unit.
Electric heated floors come in two types: film and those that use a heating cable. Mats with a heating cable, as well as water system pipes, should be laid in a screed. I didn’t want to carry dirt and fill the screed, so I chose a film floor.
Film floors are quite easy to install. A foil material called izolon is laid on the previously laid extruded polystyrene foam. As far as I understand, this is one of the penofol derivatives.
Sealing isolon joints.
Next, the heating elements themselves and the temperature sensor are laid on top of the isolon. The control panel is mounted on a wall nearby. Everything is covered with plastic film on top and you can begin installing the laminate.
The good news is that such a system comes with all the material, down to the smallest detail. I even had a CD with video instructions. How to install such a system yourself is shown in the video in this article.
According to the rules, laminate planks must be installed along the loggia. But no matter how hard I tried, the locks did not fit together well and kept coming apart. As a result, I left this hopeless task alone and installed the laminate across the loggia. Fortunately, the planks fit just right, they even had to be trimmed a little.
Film heated floor on the loggia.
Work order
When working on connecting a balcony to a kitchen or room, the main attention should be paid to insulation. It will be necessary to insulate all parts of the structure except the inner wall. Use the most efficient materials, otherwise the entire room will be very cold in winter. Also, when installing glazing, you will need to pay special attention to the junction of the frames and the wall - lay it with a vapor barrier material. It will block access to warm air from the room, preventing the formation of condensation.
Preparatory work
First you need to destroy everything to the ground, and then... build everything anew. In general, the order of preparatory work is as follows:
- Dismantling of old glazing and finishing materials on the balcony/loggia (we leave the window unit in place in place for now). A metal fence remains on the balcony, and a thin standard partition, if there is one, on the loggia. If there is no partition on the loggia, only a metal frame remains. It is necessary for work safety.
Removal of old glazing and finishing materials
If the edge of the balcony slab is uneven, it is concreted
If the standard finishing of a balcony or loggia has been removed, in parallel with the construction of the wall, it must be sheathed on the outside with the selected finishing material. Usually - siding. Why are wooden blocks attached to the outside and siding attached to them?
At the same time, they are cladding the outside
The finishing of the balcony from the outside should be carried out at this stage. Then you will need to call industrialists, and their services are not cheap at all. In the meantime, there is no glazing, you can get insurance and do everything from the balcony.
Glazing and insulation
Gradually, the concrete platform sticking out on the wall takes on a different look. Now you can believe that not only birds can be here. Glazing is carried out in parallel with insulation. And it’s better not to skimp on insulation. Otherwise, the room will be very cold, and heating bills will be high.
- Installation of window blocks. For glazing it is necessary to use double-glazed windows. Their area will be large and single-chamber ones will not be able to provide the proper degree of thermal insulation. A profile for windows should also be taken with a large number of cameras - at least five. Although the profile has a smaller area, heat flows through it greatly.
Windows are usually installed by a campaign
Dismantling the window block
Insulation of all cold surfaces
In fact, the combination of the balcony can be considered complete after laying the penofol. Next, finishing work begins, and it greatly depends on whether the room is connected to a balcony/loggia or to the kitchen, as well as on the design of these rooms.
Selecting glazing for an attached loggia
The first step is to glaze the loggia. It is best to use a warm glazing method using double-glazed windows and profiles with air chambers. This will contribute to better heat retention and sound insulation. In order to save money, you can order a window with 1-2 opening sashes, the rest - blind. The installation of a balcony frame is similar to that of a window: the structure is installed on the parapet, fixed with bolts, all gaps between the frame and the surfaces of the loggia are filled with foam. Additionally, a canopy, ebb and window sill should be installed.
Next, you need to insulate the loggia using heat and sound insulation. Insulation can be carried out both outside and inside.
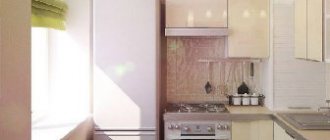
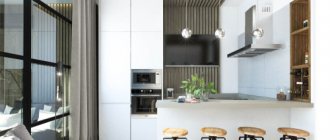
Kitchen combined with a balcony: ideas + design photos
Combining a balcony and a kitchen allows you to make this room more comfortable: a fairly substantial area is added, unloading the “main” room.
But not everything can be taken from the kitchen to the balcony. It is allowed to put there:
- Electrical appliances and household appliances. You can install a refrigerator, electric oven, electric stove, microwave, in general, any appliance that runs on electricity. It is important not to forget to make a sufficient number of sockets.
You can take out any electrical equipment
Can you move out the dining area?
Several photo examples of possible design and use of a window sill inherited from a former window.
How to insulate?
To thoroughly insulate a loggia, you must obtain permission. These works involve major changes:
- Glazing with at least double glazing;
- Insulation of walls, floors and ceilings;
- Installation of heating elements.
In this case, a thermal engineering calculation of the insulation of the loggia may even be required, since there is a danger of changing the status of the room to “residential”.
Without obtaining permits, you can insulate the floor with thermal insulation materials, if the structure is not heavy, including installing an electric heated floor as a heating element to make being on the balcony comfortable at any time of the year.
Combining a balcony and a room: options for using space
Even a small area of a few square meters provides a lot of possibilities for its use. The final choice depends on what is your priority. So, what can you do on the attached loggia (balcony):
- Workplace or mini-office. Do you often have to take work home, but have nowhere to retire? Create a workspace on the attached balcony.
Sleeping place on the loggia
Make a relaxation area on the attached balcony
Combination with living room
Not many people decide to redesign their living room. But in some cases everyone goes for such apartment renovations. If you use additional meters as a separate zone, then it is better to make a place for relaxation or hobbies on them. A comfortable small sofa will come in handy. Book lovers can install shelves. It will also be pleasant to be indoors if there are pots with ornamental plants in it.
view album in new window
In the photo: Interior of a balcony in a neoclassical style apartment
Arch design
How harmonious the attached loggia will look largely depends on how the passage is designed. In some cases and styles, a rectangle looks good. Then all you need to do is beat him correctly. And from a lack of planning it turns into a decoration.
To prevent the opening from looking like something alien, play with it, for example by decorating it with shelves
In the bedroom with an attached balcony there is an arcing exit - cover everything with translucent tulle from wall to wall. Hard lines are softened, harmony is restored.
Tulle hides imperfections
Sometimes a simple rectangle just doesn't cut it. Then the corners need to be rounded, adding smoothness.
To justify such a portal, two niches were made on the sides
Another option to add meaning to the remaining part of the window sill wall is to add shelves above it.
Shelves - useful and beautiful
If the arch is made round only on one side, it will fit better into modern design; with appropriate design, it will be suitable for minimalism and hi-tech.
Bedroom or rest area
Imagine that you are lying on a hot summer day by a window wide open and admiring the picturesque landscape. You will have this opportunity if you decide to install a small sofa in the loggia for relaxation. An influx of fresh air and the ability to create a secluded area for reading and sleeping is an excellent option for using the loggia space. Of course, in this case you need to carefully consider measures for insulating walls and windows.
Pros and cons of combining a room with a balcony
For owners of small-sized housing, additional meters allow them to create unique interiors.
The zoning method creates a personal space, a cozy corner for studying or relaxing.
- in order to combine, it is necessary to document the redevelopment;
- material costs for glazing, insulation, and lighting of the balcony will be significant;
- technical difficulties of completely demolishing a wall due to the design features of the house (in panel Khrushchev or Brezhnevka buildings, the window sill area cannot be dismantled);
- restrictions on the load on the balcony area; heavy furniture and household appliances cannot be placed there.
Combining a balcony with a room allows you to significantly expand your living space
In what cases can they refuse?
The Housing Commission may refuse to issue a permit if:
- if the planned alteration involves the demolition or partial dismantling of load-bearing walls;
- in case of significant damage to the facade of the house;
- if the house is a historical architectural monument;
- when the interests of the owners of other apartments are infringed;
- when the structure being erected blocks an emergency fire exit.
Remodeling an apartment is a difficult and costly matter, and it is better to start it legally, then a lot of trouble will not interfere with enjoying the comfort of an additional recreation area.
Legal points
Permission is required if the wall is completely destroyed.
When you sell your home, you will have to return everything to its place. If the window sill and part of the wall will be dismantled, official permission is required.
Connecting a balcony to a room is possible only after obtaining permission from government agencies and services
Related article: How to glaze a loggia with your own hands
It must be obtained before starting work; refusal is possible for several reasons:
- if the wall is load-bearing, its destruction is fraught with consequences;
- the apartment is located in a building with the status of a city architectural monument;
- the house does not have a power reserve for connecting to the power supply or heat supply system;
- the loggia serves as an exit to the fire escape; its dismantling limits evacuation in case of fire.
Design organizations are responsible for obtaining planning permission. Solving issues on your own takes a lot of time.
But it is worth remembering that such an extension may be considered illegal
What to do:
- develop project documentation that will indicate the layout, connection diagram of lighting devices, installation of heated floors or connection to the heating system of the house;
- coordinate the project with BTI;
- contact the architecture department of the city or district administration for permission;
- hold a meeting of owners in person or in absentia, obtaining the consent of more than 50%.
The permit is issued by the housing inspection within two weeks after the application.
The package of permits is approved by local regulations; sometimes permission from the Ministry of Emergency Situations and coordination with a licensed design organization is required.
In order for the reconstruction of the balcony to be called legal, it is important to carry it out only after agreement with the regulatory authorities
Legislation on this issue
Both a balcony and a loggia are not residential premises, so the law does not approve of the issue of unauthorized combining them with a room or kitchen. This is understandable, since an ignorant person will not be able to understand the structure of the house, determine the load-bearing walls of the rooms, see the method of attaching balcony fragments and take into account other specific points. Let's try to figure out how to solve this problem.
Combining a loggia with a room, like combining a balcony, increases the living space. This leads to a discrepancy between the actual size of the room and the square meters indicated in the technical passport and title documents. The purpose of the balcony room is also changing.
Article 25 of the Housing Code of the Russian Federation classifies actions to combine residential and non-residential premises as redevelopment, since the configuration of the rooms changes. For this reason, you will have to formalize the redevelopment and make changes to the technical and cadastral passports.
However, not a single legislative document directly states that this cannot be done. The same Housing Code of the Russian Federation, in Article 26, examines in detail the procedure for obtaining permission to reconstruct or redevelop residential premises.
Preparation of documents for obtaining approval for combining premises (rooms) begins with the preparation of design documentation. This work is carried out by an organization with a special license. Most likely, the developer will visit the site to draw up a sketch and assess the technical feasibility, using the design of your home as a basis. The resulting document will guarantee that the redevelopment does not infringe on the interests of neighbors, is safe for the building structure and complies with the requirements of SNiP and SanPiN.
Next comes the stage of coordinating the project with the gas and fire services, as well as the city power grid and heat supply organization. If the house is classified as a cultural heritage site, then approval from the monument protection authorities will be required.
The next step is to draw up an application in the prescribed form and submit it to the urban architecture department or to the multifunctional center. The following documents are attached to it:
- project;
- title documents for the apartment;
- written consent of all citizens living in this premises;
- technical certificate;
- an extract from the personal account about the composition of the family;
- conclusion from the fire organization;
- owner's passport;
- expert technical opinion.
Sample application for reconstruction and (or) redevelopment of residential premises
Sample application page 2
Sample application page 3
Documents, at the request of the applicant, are provided in the form of certified copies or in electronic form.
The application is considered by the architectural department or housing inspection for no more than 45 days, depending on the complexity of the project. The owner is given a receipt for accepting the documents.
After consideration of the issue, within three working days a permit (or a reasoned refusal) is issued to carry out the work, which indicates the deadline for completing the redevelopment. You can obtain permission in person or by mail.
After registration, all necessary operations for remodeling the rooms are carried out. The next steps will be to draw up a new technical passport and issue a certificate of completion of work by the acceptance committee. Then all documents for the already large living space are submitted for registration.
Zoning options for combined space
Depending on technical capabilities, they do:
- an arch in place of a destroyed wall, the loggia is made a continuation of the room or zoned, separating it with textiles, folding screens, sliding or accordion doors;
- They remove only the door and window, deepen the window sill area as much as possible, expand it to the size of a counter or a small table, there are solutions with a figured arch (right corners are rounded with false overlays).
Combination of balcony and room, arch in place of the wall
Sometimes it is not possible to dismantle the threshold, the level of the balcony is higher than the floor in the room. Then they make a low pedestal of a rectangular or figured shape.
It is necessary to consider additional heating, since the insulation does not protect the balcony opening from the winter cold. Brickwork and reinforced concrete slabs significantly increase the load on the balcony slab.
A warm floor is considered the ideal option; additional heating radiators are less often installed under the windows of the loggia. The problem with lighting is solved by laying cables under the facing panels or in cable channels. They consider protection from sunlight; blinds or Roman shades are hung on the windows. Colored textiles look original; they match the color scheme of the room.
Removing a window and balcony door without window sill space
It is important to know that the installation of insulation starts from the floor and ends at the ceiling. Penoplex or basalt mineral wool is used.
The main problem that is primarily encountered when continuing work is different floor levels
Choosing a color palette
Thanks to the wide windows, the balcony has a very “soft” atmosphere. Since the space is small, this effect should be doubled by using a combination of white and warm colors. The standard colors include orange, walnut, beige, sand, yellow, pink, carmine red, garnet, and coral. Aquamarine, mint, olive, cornflower blue, sky blue, amethyst and emerald are added in small quantities. The use of cold tones must be strictly dosed, so they are used in accents.
Design project
Before connecting different rooms, you need to think through the project itself.
It is convenient to cover walls with liquid wallpaper, plastic panels, artificial stone, and decorative plaster. Laminate is more often used for flooring, and multilayer linoleum is less often used.
You can connect two former premises together without separating two different zones through common finishing
Possible combination options:
Bedroom-balcony
The balcony area is zoned to create a cozy sleeping area. Install a bed or narrow sofa, bedside table. A sconce is enough for lighting. It is necessary to provide an additional outlet for connecting a fan or heater. The entrance arch is decorated with curtains or sliding doors are made. When installing windows and doors, a coffee table with a table lamp is made from the window sill area, or flower stands, exercise equipment, and a massage chair are installed.
If space allows, built-in wardrobes for bedding are made on the loggia. The side fire escape is transformed into a lightweight shelf for books and magazines, cosmetics, perfumes, and jewelry.
Design of a bedroom combined with a balcony
Living room-balcony
If possible, the balcony becomes an extension of the hall. Armchairs, a beautiful coffee table, and flower stands are installed by the window. If zoning is necessary, the loggia is turned into a winter garden, a relaxation area with a small bar counter. The lighting solution depends on the design of the room. In the winter garden, flat fluorescent lamps are installed on the ceiling. In the recreation area, sconces or an additional ceiling lamp, as in the room, are appropriate.
Attaching a loggia to a room
Bedroom extension
An excellent solution would be to enlarge the bedroom using a loggia. This is especially true for apartments with small rooms. In this case, you can use either full or partial connection of the loggia. In both cases you will get a good interior design. The vacated squares can be used for a designated rest area, as a separate work area, or as a room as a whole, without dividing into zones.
view album in new window
In the photo: Interior of a balcony in a classic style apartment
If you want to arrange a place to relax, then you can put a bedside table and a couple of armchairs or ottomans on the loggia. For the work area it is better to install a table and shelves.
view album in new window
In the photo: Interior of a balcony in a Scandinavian-style apartment
Children's room-balcony
The use of zoning allows you to create an additional cozy corner for the child.
- a playroom filled with toys;
- a study room with bookshelves, a table, a board with crayons or markers;
- sports corner with rope ladders, rings, wall bars.
A children's room requires several light sources and good insulation.
Children's room with a balcony for a boy
Kitchen-balcony
It is popular to use the window sill area as a bar counter or dining table.
Combination of kitchen and loggia
The balcony should not be overloaded with household appliances and a refrigerator.
An abundance of textiles in the design is not welcome; it absorbs food odors. A small garden would be appropriate - boxes of fresh herbs or flowers.
Real photos
Bedroom design with a balcony is the best idea to transform the interior of the room. This planning move not only increases the area and unloads the space of the loggia, but also surprises with its originality.
Functional workplace
A loggia can be an excellent place to create a work office. Wall cladding with wood panels, a desk and ceiling lights in the ceiling area will help create an ergonomic office space for full-fledged work. Bookcases can be placed on the walls.