At the moment, a gazebo is not just a garden building for relaxing in the fresh air, but a building structure designed to give a feeling of joy and comfort. A glazed gazebo with a barbecue is a modern solution that allows you to enjoy outdoor recreation and food without leaving your comfort zone. Depending on the size of the structure, you can gather your closest people or a whole group of friends here. By installing a dining area and a couple of small sofas here, you can make the gazebo an indispensable place to relax, both in summer and winter.
Construction awning
A simple and inexpensive way to close your gazebo for the winter. Construction awning is a synthetic fabric made of pure polypropylene. Thanks to this, it does not let moisture in and can well protect the tree from hostile winter weather.
If you plan to use the place in the cold, then you should remember about the light resistance of polypropylene. Some finishing work may be required using a utility knife to cut out window and door openings.
Normal operating temperature is up to -40 degrees Celsius. Therefore, it is quite suitable even for the most severe cold weather.
In addition, right from the factory it is equipped with insert rings to cling to the pegs.
However, there is one drawback, why many do not want to cover the gazebo for the winter with a construction awning. It is not very beautiful - still a crude industrial solution. But on the other hand, it is cheap and very effective.
Instructions for glazing windows
Great importance is attached to the type of construction. It can be continuous or partial; in the first case, polycarbonate is installed from bottom to top.
In the second case, it assumes the existence of an obstacle. Consequently, window frames are an assembly into existing barriers.
- It is necessary to plan the placement of windows in advance and take into account their sizes. This must be reflected in the drawings of the future structure. If the gazebo has already been built, a global reconstruction will be required.
- Frames can be purchased, but they will be expensive. It's better to make them yourself. You can use wooden structures, since it will be impossible to install aluminum ones at home.
Polycarbonate is not always a good solution, because it transmits ultraviolet radiation and in the summer it can be very stuffy in the gazebo.
PVC film
How to close a gazebo inexpensively and discreetly? In this case, polyvinyl chloride film will help. Its advantages include:
- Transparency. If the awning covers a beautiful structure, then the film will not change it at all.
- Price. The cost varies, but rarely goes beyond $0.5 per linear meter. Therefore, even a large gazebo can be finished inexpensively.
- Strength. PVC film stretches very well, so you won’t be able to tear it unless you overdo it.
It also has disadvantages. First of all, it creates a sealed room. Closed gazebos do not allow air to pass through, so mold may form. In addition, with a sharp drop in temperature, PVC begins to harden.
At the same time, it becomes so rough that it can easily crack at the constriction site.
Therefore, several requirements must be met:
- You need to make holes in the plastic. This will ensure minimal air circulation, and fungi and rotting will not form inside. It is better to melt the holes, since the cut may crack further and the coating will tear.
- No tension. It is better to leave a slight sag so that in the event of severe frosts, breaks do not occur.
Finishing with clapboard or boards
If the gazebo allows you to create a finish from boards or lining, then it is possible to completely close yourself off from any bad weather. To close the gazebo, you can use any suitable boards.
As with polycarbonate, there are two ways to close the gazebo:
Note!
Do-it-yourself garden path using a mold: a review of original and inexpensive ideas + step-by-step instructions with photos
Do-it-yourself gazebos for a summer residence - 300 photos of exclusive ideas. Instructions for building a beautiful gazebo (diagrams, drawings, foundation, roof)
How to insulate a veranda for winter living: floor, ceiling, walls. Examples of insulation from the inside and outside (instructions + photos)
- Completely close the walls.
- Do partial finishing.
In the case of the second option, you can try unusual methods, but they will not protect against wind or rain. In the first option, the gazebo will be sheltered from the weather, but from the outside it will not look aesthetically pleasing.
Tarpaulin
A gazebo in the courtyard of a private house can be covered with an ordinary tarpaulin, and it’s better to start right away with its disadvantages:
- Price. A special-purpose material that uses natural fiber and fire-resistant and water-resistant impregnations. Therefore, its price is much higher in comparison with polyvinyl chloride film and construction awning.
- Design. You can't call tarpaulin a beautiful material. Its purpose is exclusively working, on which its high quality depends. A tarp doesn't have to be pretty, but if you need reliable protection, it's the best.
Tarpaulin is a durable canvas made from flax, jute and cotton with the addition of synthetic fibers. It is impregnated with special liquids that prevent it from burning. In addition, it repels water perfectly (which is why tents are made from it).
Preparing a gazebo for winter, by the way, is not so easy. You will need to order cutting from a special company or buy a tool. It is very hard and practically cannot be cut with ordinary scissors. And if you need to fix it, you will have to make holes with a special hole punch.
But, if you manage to cover the gazebo from snow with a tarpaulin for the winter, it will never suffer from excess moisture and cold.
How to close the veranda from rain and snow. Simple ways to protect your summer veranda from snow and rain
Usually, the meaning of a veranda is the additional area of a house or cottage, which often plays the role of a balcony or open area.
Quite often this is something like a greenhouse or winter garden. Often the veranda is an additional extension of the cottage.
Today, few standard projects involve the construction of a veranda simultaneously with the construction of a particular house. For this reason, many people build verandas on their own.
Most often, such a structure is already a closed roof or canopy, since it is much more convenient to enjoy fresh air and the landscape when the hot rays of the sun are not shining from above and the rain is not dripping.
Sometimes it all starts with creating such a site or simply trying to expand the living space. Open verandas look extremely tempting in the summer, allowing you to have a good rest and enjoy the freshness of nature.
However, with the onset of colder evenings, its use becomes extremely difficult and inconvenient.
Few people want to abandon a well-maintained territory that is too cold to stay in. Those who spent almost the entire summer relaxing on open verandas note that the house becomes extremely crowded.
That is why many resort to solutions such as closing verandas from unfavorable factors and even insulation, which provides this building with the actual status of part of the house.
Today, there are a large number of ways that allow you to close the veranda from a wide variety of adverse natural phenomena.
In addition, it is better to think about the possibility of insulating the veranda at the initial construction stage. Subsequent reworking of the basic design into an insulated one may require additional costs and be much more labor-intensive than the initial design.
Flexible windows
An interesting and relatively inexpensive solution, designed specifically for gazebos, terraces and verandas.
In general, the idea of closing the gazebo from snow for the winter with plastic is a good one. But unlike film, which in principle is not intended for “glazing”, panels cope much better with protection because:
- They do not crack in the cold. It is thicker compared to a regular bar. The strength of flexible windows is much higher and they can last about 50 years.
- They are inexpensive. This is true for full glazing. Plastic is much cheaper than real glass (about $20 per square meter). In principle, you can save even more if you find a thick polyurethane film separately and install it yourself.
Features and stages of work
When constructing a gazebo, builders use wood, timber, stone, plastic, and brick as materials. But it is wooden gazebos that are in demand among consumers. Because they are easy to install, have a long service life and low cost.
But you need to remember that wood is not a moisture-resistant material. Therefore, to protect and use the building in winter, you need to properly insulate the walls, ceiling and flooring.
It is not recommended to carry out work on the outside of the building, so as not to spoil its appearance and finish.
To obtain high-quality thermal insulation, it is worth touching all elements of the building (floor, walls, roof), using the services of craftsmen, or with your own hands.
Roller shutters
How to cover a gazebo at the dacha? A very convenient, but expensive way to provide protection from snow and moisture. They are made of metal and plastic, so nothing happens to them even in extreme cold.
Winter terrace and veranda for the house: 60+ photos of the best options with a beautiful designHow to build a firewood shed at your dacha with your own hands
Turnkey construction of gazebos
They are made to order, so there are no questions about how to cover the gazebo from rain and wind. Roller shutters have enough advantages:
- Fits any window. The bets are made from separate pieces of the profile, so they can be made to fit any opening.
- There is a convenient height adjustment of the shutter. They move along a vertical plane, so the amount of light can be changed. It is worth remembering that even in winter the gazebo needs to be ventilated and roller shutters are the most convenient for this.
- Excellent anti-vandal system. Many summer residents suffer from the fact that in winter vandals and robbers enter and strip everything down to the skin. How to cover a place to rest? Roller shutters here act as a good barrier, which is not so easy to break.
Heated gazebos. Electric outdoor heaters
The basis of their design is a heating element (tube), inside of which there is a nichrome spiral. Depending on the body material, heating tubes are glass (quartz), ceramic and metal (aluminum).
Glass heaters have the shortest service life (2-3 years). This drawback is partly compensated by their low price. Ceramics and metal have a service life several times longer.
Infrared rays are directed into the heating area by a metal reflector in the form of a cap or flat panel.
Outdoor electric heaters are more varied in design than gas heaters. In addition to the panel design, you can find devices in the form of tables, lamp posts, table lamps, pyramids and even propellers.
IR heater propeller
In terms of heating area, electric outdoor heaters for summer verandas are inferior to gas ones. Their power, as a rule, does not exceed 3 kilowatts. This makes it possible to supply heat over a distance of up to 3 meters.
But in terms of efficiency and thermal output, they outperform gas devices. Measurements have established that the electrical device is capable of maintaining the temperature in its area of operation at + 20C (outdoor air temperature +5C). A gas heater provides such indicators when it is no colder outside than +10C.
The main disadvantage of electric systems over gas systems is low mobility. The gas appliance can be placed anywhere in the summer cottage or taken by car to a country picnic. The range of action of an electric heater is always limited by the length of the wire.
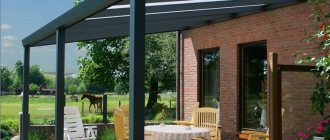
Traditional glazing
How can you close the windows to make it look nice and neat? The most elegant way is still traditional glazing, which:
- Lets all the light in.
- Not afraid of severe frosts, heat and even temperature changes.
- Protects from moisture and snow.
- Ecologically safe.
- It's beautiful, as you can see in the photo.
The only disadvantage of glass: the price, both for the material and for the services. You will have to order the frame from third-party companies or make it yourself.
Glass is also bought in huge sheets and cut or ordered to be cut.
Instructions for covering with clapboard
In order to trim the gazebo with clapboard, you must first create wooden supports and secure the railings. The space at the top will be open, the space at the bottom will be finished with clapboard.
To attach it, you must first nail it around the perimeter of the slats. Nail the lining to them from the inside with small nails.
Instructions for finishing with wooden lattice
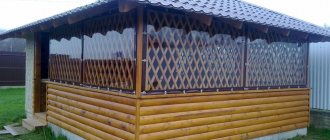
So, most often, the gazebo is closed from above. Climbing plants are suitable for this type of decoration.
It is easy to do yourself; the wood is sawn into many small slats, which are nailed at equal distances from each other and at an angle. You can also apply a second layer to create a diamond-shaped trellis.
There are many varieties of mesh that can be purchased in stores, such as colored or in specific patterns.
Step by step construction
After choosing a suitable location, selecting tools and creating drawings, you can begin the construction itself. This process is lengthy and requires a lot of work. The owner will have to create a foundation, form a frame and do the exterior decoration of the room. For convenience and to increase the speed of construction, it is advisable to enlist the support of several more people.
Foundation
Brick structures or structures built using masonry technology are heavy. For stability and reliability of the building, it is recommended to lay a slab or strip foundation.
You must act according to the following algorithm:
- At the site of the future building, dig a hole, the depth of which should be 1 m.
- Pour a 20 cm thick layer of crushed stone into the recess and compact it.
- Lay the waterproofing film.
- Install the fittings.
- Make a solution of crushed stone, sand and concrete in proportions of 5:3:1, respectively.
- Pour the resulting mixture into the hole.
- Install metal pipes in those places where load-bearing poles will subsequently be mounted according to the drawings.
Pay attention to landscape design ideas for a summer cottage using scrap materials.
For the solution to completely harden and seal the structure, you must wait at least a week. After this, separately using the same principle, you can build a concrete base for the furnace. The last stage is the installation of load-bearing pillars.
Creating a wireframe
For strength, warmth and fire safety, it is better to build a structure from brick. You will also need a universal solution of 1 part M500 cement and 4 parts fine sand, diluted with water.
Having the necessary materials, the owner needs:
- Soak the bricks in a container of water.
- Start laying from the corner: lay out the first row without mortar to find out whether the perimeter of the structure is a multiple of the dimensions of the building materials.
- Use a level to determine the evenness of the resulting surface.
- If necessary, saw the last brick in the row to match the dimensions of the structure.
- After laying the first row, form corners for the next 4-5 levels.
- Achieve a meter height of the structure.
Important! It is recommended to lay no more than 6–7 rows at a time to avoid deformation of the building.
In the same way, you can lay the frame in 2 rows to insulate the room. If you make a building with a thickness of 0.5 bricks, you will get a gazebo suitable for use only in the summer season. Don't forget to leave the doorway: otherwise, dismantling part of the wall will be problematic.
Floor
A foundation poured with concrete can already be considered a finished floor, but for decorative purposes the owner can lay another layer. If the gazebo is supposed to have a barbecue, the wood covering is not recommended for use.
Check out
Landscape design for a recreation area
Therefore, other common options remain:
- natural stone slabs;
- DSP;
- paving slabs.
Provided that the foundation is poured with concrete correctly, further leveling of the floor will not be required, and you can immediately begin laying one of the materials.
Whatever material you choose, the installation principle is the same:
- Form alternate layers of sand, gravel and river soil, 3 cm each, and compact.
- Fill in another layer of sand and cement the entire mixture.
- Using a rubber hammer, lay the slabs.
- Use a level to check whether each element is mounted level.
This method of installation allows you to make the floor the smoothest and most pleasant in terms of appearance. However, installation of slabs is not necessary if there is a good concrete foundation.
Roof and roofing
Before building this structural element, it is important to think through the drawing to the smallest detail and decide on the type of roof: the most classic and simple options are gable and hipped.
Next, follow the following algorithm:
- Form the main frame from rafters using wood or metal materials.
- Install insulating films from steam and water, as well as insulation, between the slats.
- Secure the cross bars and interior trim.
- Lay the roofing covering on the resulting structure.
- Mount skates on the protruding parts to completely fix the structure.
Decorative mill on the site
It is noteworthy that almost any material can be used for the roof if you create a soundproofing layer. To do this, it is enough to lay sheets of plywood on the counter slats and cover them with soft material, for example, roofing felt.
Glazing of the gazebo
After all the work done, all that remains is to install the windows.
To do this you need:
- Treat the wood with an antiseptic, which will subsequently be used to form the frame.
- Mount the supports on the site in 1 m increments to divide the entire structure into sections.
- Use custom frames or cut them yourself so that a gap of up to 0.5 cm is allowed.
- Secure the frame without glazing.
- Fill the remaining cracks with foam.
- Seal the grooves using silicone sealant.
- Install glass.
- Treat the edges of the windows with sealant.
- Secure the glazing using a thin piece of wood.
When building a gazebo, you may be interested in learning about the features of vertical gardening.
After this, it is recommended to install a low tide. This will help to avoid excess moisture in the seams between the frame and the glass elements, and will also prevent the formation of mold.
Video: Frameless glazing of the gazebo
Transparent materials (glazing)
The interior space is reliably insulated from cold, slanting rain and piercing wind with the help of transparent walls, and you will enjoy your vacation with maximum comfort. Three types of transparent materials are available:
- Windows (film) PVC . Soft (flexible) windows protect from the external environment, without affecting the illumination inside and the external view. The film is environmentally friendly, odorless, and does not grow mold. PVC curtains are made to individual sizes; various mounting options and fittings are possible (on guides and rollers, on a simple and rotary bracket, on a profile).
Source ah-vkusno.su
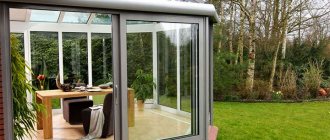
- Plastic windows . For permanently built gazebos, it would be a good idea to install structures with double-glazed windows. Ordering and installing Euro-windows is not a cheap undertaking, but you are guaranteed excellent thermal insulation, which is important for many Russian regions. After the conversion, you will be able to use the building all year round, especially if you install a heating device in it.
Source arskplast.ru
- Frameless glazing . A more stylish (but also expensive) option compared to frame windows. Despite the apparent fragility, the structure is no less durable and just as reliably protects from the vagaries of the weather. Frameless glazing is made to order, according to the shape of the building. There is no need to worry about the sashes: they move easily and fit tightly to each other, so there will be no drafts or heat leaks.
Source stroyudom.su
Comments
Oh, thank you very much for the article) Otherwise, at the dacha there is a small shed and there is a table there, where we eat kebabs in the spring and summer. And when it starts to rain, you have to sit at home, because the rain falls from the side under the canopy. So my husband and I were thinking about how to cover the sides and still couldn’t find any options, either it was expensive or the wall wouldn’t let in any light. After reading the article, I suggested polycarbonate to my husband and he really liked the option. Both inexpensive and practical. Let's go buy polycarbonate this week) And we'll start building in September)
Selecting a location
There is only one strict requirement for the placement of the gazebo. The structure must be located away from residential buildings for fire safety reasons. The remaining decisions depend solely on the owner: for example, you can build a gazebo both in the shade and on the sunny side of the site.
If you don’t know or trust your neighbors well, start building as far as possible from the borders of your estate. Take care also of convenience: it is better when the entrance to the room is directed towards the dacha - it is more convenient to move from building to building when preparing food or serving.
Important! If there are perennial plants in the garden area, try not to destroy them. They will further serve to create shade near the gazebo and be decorative from the point of view of landscape design.
Drawing with dimensions
Before building a gazebo, the owner should decide on the shape of the future structure.
It could be:
- rectangle;
- hexagon;
- octagon.
The first option is the easiest to implement. It is better that the length of each side is a multiple of 1.5 or 2 m. This is due to the fact that it is at this distance that the support pillars must be placed both from the point of view of the safety of the building and based on financial justification. Don’t forget about the foundation: in the drawing, add 10 cm on each side so that the base extends beyond the structure.
When planning hexagonal structure, calculate the area so that there is 4 m² of space per person. A standard gazebo of this type, when viewed from the side, has a diagonal of 3 m and a height of 2 m.
“Octagon” is the most spacious variation of the gazebo. For maximum convenience, 4 of the sides should have a length of 1.5 m each, and the rest - 80 cm. Such a room will allow you to place not only a table, a bench and a barbecue, but also a work desk and even a refrigerator.
It is also better to design the oven itself in advance. The grill must be made of heat-resistant brick, and its dimensions must fit into the overall dimensions of the gazebo. For example, for an octagonal building, the width of the oven can be 1.2 m, and the optimal depth is 75–100 cm.
Required Tools
Since it is planned to build a gazebo with a barbecue, brick will be used as the main building material. From this we get a list of necessary tools, mainly consisting of a spatula, a sledgehammer and a level. When laying the foundation, you may need a concrete mixer. A shovel is also useful for preparing the site for the construction of a building.
Anti-mosquito net (an interesting way!)
I saw this approach from Dmitry Maltsev, who was building his 3 by 3 meter gazebo. It will protect you from wind, mosquitoes, light rain and sun.
Read also: How long can raw eggs be stored at room temperature?
The point is this:
- Buy a cheap roll of mosquito net. For example, in Leroy Merlin.
- The entire external area is covered with a layer of this mesh and “tightly” attached around the perimeter.
- The mesh holds back light rain, wind, and also creates darkness in the room.
The idea really works, even if it does not completely solve the issue of protection. It's definitely worth taking note of.