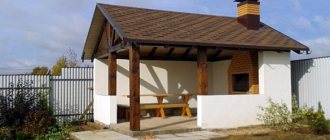
The interesting shape of the hexagonal gazebo evokes surprise and admiration. Everyone is already quite tired of the classic “squares” and “rectangles”; they want something new and aesthetic. It is the structure with six sides that in this situation is the center of attention.
Wooden hexagonal gazebo idea
You can find more photos in the publication about ideas for country hexagonal gazebos.
In this article we will focus on the intricacies of construction, and also provide detailed instructions of 13 steps
There is absolutely nothing difficult about building a hexagonal shape. Even installing the roof is not particularly difficult, although some features are present.
In this article we will show you step by step the process of building a hexagonal gazebo.
About materials
The disassembled options mainly relate to wooden street houses.
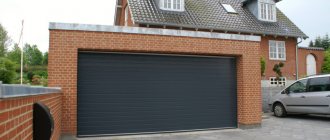
Of course, this material looks very good and is environmentally friendly. But we must not forget that the sensitivity of sanded wood to excessive dampness is very high. Brick gazebos should be preferred if durability and ease of maintenance come first. In terms of fire resistance, they are initially many times better than wooden ones. Treatment with fire retardants, while increasing wood's resistance to fire, worsens its environmental and sanitary qualities. And therefore, in the end, the brick turns out to be even more natural.
As for metal structures, only stainless steel grades should be used for them - otherwise durability cannot be ensured.
Both main types of structures on the site (made of wood and bricks) can be supplemented with decorative details based on forged metal. Openwork designs will delight owners and guests and make the space as comfortable as possible. The use of glazed openings helps improve illumination and add additional attractiveness to gazebos.
Choosing a site for construction
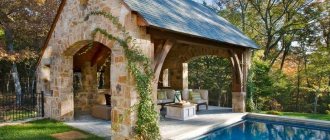
The best option for locating the gazebo is in the shade of trees, where you don’t have to worry about the sun all day long. Also, the construction of a building is appropriate near a pool or artificial pond.
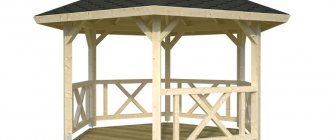
Aesthetic appearance is not the only advantage of a hexagonal gazebo. This structure is practical and easy to use. In addition, the structure is erected easily and quickly. Thanks to the presence of identical elements repeated six times, the gazebo is easy to install.
Photo: 3D model of the gazebo
Advantages of the building:
- Compact, occupies a small area of the local area.
- Capacity.
- Possibility of placing several benches.
- Strength and stability.
- Attractive appearance due to side decorative design.
With your own hands
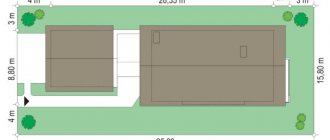
The process of building a 5x3 meter gazebo with your own hands is quite simple. If you follow the basic rules for constructing a gazebo, you can easily assemble such a structure with the help of two or three people.
If you are seriously thinking about self-construction, then the step-by-step instructions below will help you with this. During the explanation process, photographs will be used that will reveal some issues in more detail.
Foundation
For a wooden structure 3 by 5 meters, the following types of foundations are suitable:
- Columnar: foundation blocks, bored piles or TISE.
- Strip: pouring the foundation around the perimeter of the building.
The most reliable is the second approach. Metal reinforcement and a solid strip of concrete will withstand any loads associated with construction of such a scale. If you are building your recreation area for a long time, then this is your option.
Tape
If you need to raise the gazebo from flooding, or you don’t want to deal with a trench and concrete, then you can use a columnar foundation. The cheapest option would be foundation blocks. If you want something more reliable, then professionals recommend drilled piles - there will be no problems with corrosion protection and raising the building to the required height.
Drilled piles
Floor
The floor is laid according to the classical scheme using logs, on which the boards will subsequently be laid. Fastening is done using self-tapping screws or nails.
Bottom trim with joists
Frame
The most popular building material for the frame of a wooden gazebo is timber with dimensions of 100 by 100 mm or 150 by 150. With their help you can lay out:
- The lower trim, which will serve as the basis for the structure itself and the floor;
- The pillars on which the walls will be attached;
- The top trim is the basis for the rafter system.
Gazebo frame diagram
If for some reason the timber does not suit you, then you can consider the option with a log.
We published a very detailed and interesting publication about building a log gazebo on our own just a few hours ago:
DIY log gazebo: photos, videos, construction options, drawings with dimensions
Roof
Above we looked at photographs of buildings with a pitched roof. This is the simplest and cheapest option that will allow you to save on construction
If you are planning a more serious design, then you can pay attention to a gable and hipped roof
Four-slope (hip)
Gable
Decor elements
Gardening with wild grapes
To decorate the gazebo, you can use various types of decor:
- Use of decorative sheathing;
- Landscaping with climbing plants.
Such elements will allow you to turn your gazebo into a more comfortable place to relax.
In addition, a wooden crate will allow you to hide from prying eyes and at the same time observe what is happening while indoors. Builders have long noticed this interesting feature, so they always recommend adding it to the design of the building.
Step-by-step construction from wood
It is best to wait until the warm season to begin construction work. The optimal period would be the end of spring, when there is no heat yet, but the snow has long melted and the soil has warmed up and dried out sufficiently.
Important! In order to save on the required volume of concrete mixture, as well as to increase the strength of the foundation, it is recommended to load trenches with broken bricks, concrete scrap or stones before pouring.
The construction of any structure begins with site preparation:
- clearing the territory of green spaces;
- removing the top layer of turf;
- marking using stakes and rope.
After completing the preparatory work, you can begin construction directly.
Foundation
For gazebos of similar dimensions, light types of foundation will be sufficient, which include:
- Foundation on screw piles - Suitable for all types of soil, except rocky areas. The installation is carried out step by step: steel supports with blades are screwed into the ground to the required height, then all the posts are leveled, and then the excess length is cut off using a grinder and the headrests are installed. Additional structural strength can be given by a concrete composition poured into the cavities of each product.
- Made from concrete blocks (not allowed in wetlands). The bottom of the hole prepared for the foundation is first filled with crushed stone, after which recesses are made in the corners for blocks (up to 20 cm). In addition to the installed supports in the corners, one block is placed in the middle of each longitudinal wall.
- On shallow-buried strip concrete - dig a trench along the marked perimeter (depth - 20 cm, width - 20 cm). Next, the formwork is installed so that part of it is 20 cm above the ground level. The formwork space is filled with concrete (acceptable cement grade - M150, M200) and left to dry (this may take two to three weeks).
- Tier made of timber (section 20×20 cm) — a crown is assembled from these lumber and laid on a flat surface, the edges are secured with dowels or large hardware. It is also permissible to use a mount with a stem (using the “claw” or “dovetail” system). Upon completion of installation, the timber is treated with an antiseptic, which will help avoid rotting or mold formation.
Bottom harness
The next step after laying the foundation is the bottom trim. To do this, taking into account the type of base, a metal or timber grillage (a structure that will distribute the load from the load-bearing elements of the structure) is laid on the supports.
The strapping tier serves as a reliable fastening of the main structure to the foundation and is necessary for all types of foundation (the only exception may be a gazebo made of timber laid directly on the ground). To do this, the lower crown is fixed to the foundation using the “half-tree” method, by cutting in the corners. At the same time, it is taken into account that the possible period of “life” of the gazebo will directly depend on the strength of the coupling.
It should also be remembered that all wood materials should be treated with moisture-protective and antifungal agents.
Installation of pillars
The supporting supports that will hold the frame and roof are pillars installed in the corners of the structure. If wood is used as the main material for constructing the gazebo, wooden posts are secured vertically at the corners of the lower frame using corners, dowels or pins.
We recommend that you learn how to apply landscape design for a country house.
To extend the service life, the strapping tier and the lower part of the poles are treated with fuel oil or painted with oil paint (minimum 2 layers). After drying, all elements are wrapped in roofing material, which will act as a waterproofing material that can reliably protect them from the negative effects of moisture.
Upper harness
This strapping involves securing the timber to the upper ends of the racks. It is carried out in exact analogy with the bottom using the same method of fastening. Pay special attention to fastening the crown both in the corners and in places of contact with the support posts.
Cross railings
The design of a future structure may involve the presence of railings between the pillars - as a decorative fence and to ensure the safety of vacationers. Installation of this system involves the use of boards with a thickness of at least 5 cm, and their fastening at a distance from the level of the trim of at least 80 cm.
We recommend reading how to use flowerpots in landscape design.
The installation procedure consists of:
- measuring the distance between pillars;
- preparation of pieces of lumber of the required length;
- marking the supports (marking the attachment points);
- direct installation of railings using self-tapping screws (twisted “at an angle”) or metal corners.
Attaching joists and laying the floor
A floor covering made in several tiers will help ensure maximum reliability and durability of the future structure.
Did you know? Experts recommend using yacht varnish to treat all wooden elements
—
in addition to its high protective properties, it has the advantage of a high drying speed (depending on the different groups of substances in the composition, complete drying can take from 1 to 16 hours).
The algorithm of actions consists of several stages.
- First of all, markings are applied to the bottom trim, which will indicate the places where the joists are attached (the step can vary from 70 to 100 cm).
- Next, measure the distance between walls opposite each other.
- The wooden beam is cut to the required length.
- Then, according to the markings, the logs are installed and secured with hardware.
Wide, thick or rough boards are usually used as flooring on top of the joists, on top of which plywood or edged lumber is laid. After laying, the floor is treated with varnish or stain, which will greatly facilitate the maintenance of the coating in the future and prevent its rapid wear. Other materials are used extremely rarely - due to their inexpediency. For example, tiles, laminate or linoleum have a high risk of injury, as well as a short service life in such conditions.
Creating a roof truss system
The construction of the roof truss system is carried out on the upper frame of the structure, according to the project. For the manufacture of the frame, a wooden beam of 10x10 cm is used, for the sheathing - unedged boards (width - from 15 to 20 cm, thickness - 3 cm). In this case, the laying step is about 30 cm.
Also learn how to use trellises in landscaping.
The roof installation process is as follows.
- On the ground, all elements are assembled into a rafter system.
- Raise the assembly to the top of the structure.
- Secure it to the top harness with hardware or metal corners. The fastening pitch is 70–80 cm.
- All parts of the rafter system are treated with a preparation with a protective composition.
Next, to arrange the sheathing, unedged boards are laid, securing them with self-tapping screws. This approach will help to evenly distribute the load over the entire surface of the roof.
Sheathing
When choosing a skin, you need to focus not only on its appearance and technical characteristics, but also take into account the expected speed of working with it. The modern market offers many options, the most suitable of which are materials such as siding or OSB panels. They can be used both for covering the back wall, and for covering spans or for fencing. Before working with a grinder, you will need to cut the sheets to the desired size. Fastening is carried out with self-tapping screws.
Roof
Typically, gazebos of this design are quite light, and therefore require a single or gable roof. As roofing materials, it is permissible to use flexible or metal tiles, sheet iron, colored ondulin, slate, polycarbonate, and profiled sheets.
Familiarize yourself with the rules and features of landscape lighting in your summer cottage.
During the construction of the roof, the angle of its inclination must be taken into account, which will allow the snow to move freely while it melts, without overloading the entire structure. When securing pre-cut roofing material to the sheathing, you can use fasteners with rubber washers. And to prevent the penetration of all kinds of precipitation under the roof, polymer gaskets are installed at the joints of the sheets.
Decorating the gazebo
Both the finishing work and the procedure for decorating the gazebo provide space for flights of fancy. You can decorate a new building with a hedge, hang light curtains or equip the spans with shutters. The gazebo itself can be painted with paints of any color or stain, which will preserve the natural appearance of the wood for many years.
Important! According to fire safety standards, the distance from the gazebo, which contains a barbecue, barbecue or oven, to a residential building must be at least 5 m, and to the neighbors’ fence
-
from 8 m.
You should also worry about furniture, which should be light and resistant to moisture. Then install the required number of light sources. A similar area of the gazebo will also allow for zoning, allocating a special place for a barbecue. And of course, don’t forget about the little things, for example, pillows, tablecloths and other things. After all, they are the ones who add coziness to any room.
How to calculate material
Let's give an example of a 3x4 wooden gazebo for a summer house, but these are only preliminary approximate indicators.
First, let's look at a set of wooden beams:
- 3 pieces 10x10 (3 m).
- 3 pieces 10x10 (4 m).
- 4 pieces 10x10 (2.3 m).
- 5 pieces 10x10 (1 m).
- 8 pieces 5x10 (2 m).
- 7 pieces 5x10 (3 m).
- 2 pieces 5x10 (1 m).
- 2 pieces 5x10 (4.3 m).
Calculator of the required material for a 3x4 gazebo for a summer house.
Additional material
For work we will also need additional materials:
- Bricks.
- Bag of cement M400.
- For the roof, any material can be used, tiles can be used.
- 20 mm by 30 mm slats.
- 22 squares of lining.
- Roofing boards.
- 12 board squares.
- Self-tapping screws.
Tools for work
In order to fully complete all the work with our own hands, we will need a certain tool:
Electric planer for surface treatment
Tape measure or ruler for marking, pencil
Circular Saw
Circular saw for cutting wood
Screwdriver
Brickwork technology
Laying gazebo walls
The next step after the foundation will be brick laying. It is made from both ordinary and facing bricks (in the first case, the appearance will suffer).
If you use bricks of different colors, you can give the gazebo a decorative and sophisticated look.
The bricks are laid on cement mortar using a trowel. The cement mortar consists of:
- 1 part cement M400;
- 3 parts sand;
- water (added as needed).
To give the building a complete look, you can use figured lattices as decoration, as well as decorative architectural elements. If wood products are used, they must be impregnated with an antiseptic to prevent rotting and mold. Products can also be varnished.
As you can see, if you try hard, you can achieve the desired result, and then the gazebo will become a source of pride, and using it will bring a lot of joy and pleasure.
Do-it-yourself gazebo with a pitched roof: step-by-step instructions, drawings, photos of options
A pitched roof is the simplest, cheapest and most reliable protection for a gazebo. By choosing high-quality material and approaching installation with all responsibility, you can get a beautiful roof at an affordable price.
First of all, we will look at the characteristics of the gazebo and the basics of its construction - the foundation with the frame, the frame and the top frame. After this, we will move directly to the roof - studying the drawings, constructing the rafter system, sheathing, laying waterproofing and roofing.
Lastly, we will consider options for buildings with a pitched roof. You may probably like one of the proposed ideas, and you will want to use it as the basis for construction at your dacha.
Required Tools
For quick and high-quality installation, you will need to prepare the necessary tools and consumables. Integral representatives are:
- hacksaw for woodworking;
- hammer and nails;
- rope for marking;
- plane;
- chisel;
- drill with a set of drills and bits;
- building level;
- roulette;
- shovels and bayonet shovels;
- homemade tamper.
In any construction project, the use of electric tools will significantly reduce the time for preparing materials and increase the speed of construction.
Construction of a wooden gazebo floor
To attach the logs to the bottom frame, it is best to use special brackets made of galvanized metal, which will greatly simplify and speed up the work. Using a level or spirit level, marks are set for installing the brackets.
Bracket mounted on a beam. You will need to use an ax to cut a flat area on the log to install the bracket.
Floor boards should have normal humidity (no more than 20 percent), since if you use damp wood, subsequently, when the flooring dries, cracks will inevitably form and creaking will appear when moving on the floor. The thickness of the floor board must be at least 20 mm.
Floor boards have grooves that are connected to each other
The floor boards are fastened with screws installed at an angle of 60 degrees into the lower part of the groove.
To ensure that the screw heads do not interfere with the installation of the subsequent board, secret recesses 2-3 mm deep are made with a drill. The diameter of the drill must match the diameter of the screw head.
The outermost flooring boards are additionally secured with screws installed in secret recesses at right angles to the joist.
A simple device consisting of two wedges and a clamp will help ensure a tight connection between the floor boards.
To make a DIY gazebo board covering, you will need the following tools:
- Hammer.
- Screws.
- Drill with drill bit.
- Screwdriver or screwdriver.
- Clamp.
- Saw on wood.
Having finished with the floor covering, you can move on to constructing the rafter system.
What you need for work
For construction, building materials are required in full, which must be located near the site where the gazebo will be erected. Buy lumber, roofing elements, paint, and protective products from the same batch to avoid differences in quality.
Before construction work, prepare the following tools:
- poles or pegs;
- rope;
- construction tape of at least 5 m;
- bayonet shovel;
- screwdriver;
- drill;
- ladder;
- building level;
- hammer;
- Bulgarian;
- hacksaw;
- saw.
Follow safety precautions when building a summerhouse. Work in a protective suit, use gloves, safety glasses, and wear comfortable shoes with thick soles.
Interesting ideas
Building a gazebo in your dacha is not a whim, but a necessity if you need a place to hide from the sun, sit quietly, and take a break from the gardening struggle for the harvest. What it will be - a simple roof on poles or an elegant semi-closed building with a barbecue - is up to the owners of the dacha to decide. The main thing is that the gazebo will in any case become a decoration of the site, and at the same time it will still perform its practical function regularly for many years.
A typical project can look original if it is made in a certain style.
- Russian style is all about wood, in particular log buildings. Naturalness and aesthetics are the main distinguishing features of this direction.
- Alpine (Chalet) style - stone and wood, it shows a gray-brown color scheme. Solidity and closeness to nature.
- Canadian style - clear lines, simple materials (wood, stone, glass), even some cubism.
- Oriental style - calm and tranquility are inherent in this flow, and also - double boat roofs.
- Modern style (such as high-tech). Metal or polycarbonate will simply fit perfectly into the design direction. This is also a field for real experiments with form. For example, you can make a round roof.
Even one seemingly simple detail can make a gazebo bright and unique: round windows or doorways, laconic curtains, cute flower pots and much more. The main thing is not to be afraid to embody your ideas and plans, to customize the design of the gazebo for yourself and to your taste.
You will learn how to build a gazebo with your own hands from the following video.
Decor and operating rules
A gazebo, furnished in a classic style, can be decorated with flower pots with fragrant petunias at any time. Art Nouveau fans instead prefer wooden furniture and bedspreads made from natural fabrics, which are convenient for decorating window openings. But lovers of oriental style create stained glass windows of incredible beauty using frosted and colored glass.
The minimum shelf life of a wooden gazebo is 15 years. But if from time to time the wood is treated with bitumen and alkyd impregnations, the natural processes of destruction can be delayed.
Types and form
Open
There is nothing restricting which form to choose for the future design. There are 3 main types:
- Open. The easiest to build. This option is great for spending time in good weather or in rain without wind. Otherwise, the precipitation will be blown away by the air flow.
- Half open. In this case, several sides of the gazebo have barriers of some type, which partially prevent the entry of splashes and gusts of wind.
- Closed. In some respects they can resemble a summer kitchen. This option, for example, can be entirely assembled from a metal-plastic frame and double-glazed windows. It looks very impressive, and inside is cozy in any weather.
Semi-closed
Never try to lock yourself into standard square or rectangular shapes. There is no obstacle to part of the structure being made in a semicircle. It is possible to build a triangular or hexagonal gazebo. The main thing is to calculate everything correctly so that the structure is stable.
Glazed gazebo
Most often, wood is chosen as a building material for gazebos. And this is really justified, because it is easy to process, but requires proper care to avoid drying out and cracking when exposed to weather conditions. Nothing prevents you from using a profiled metal pipe or a lightweight frame profile. For semi-closed and closed options, some type of building blocks are suitable, which you can purchase or make yourself.
Planning
In order to understand the question of how to build a reliable and high-quality gazebo, you should first create a clear sketch of the future structure. Today, you can contact any construction and finishing company to draw up this important document, or you can complete it yourself, using the options suggested at the end of the article. Properly prepared drawings, combined with accurate measurements, will allow you to complete any work with minimal labor and time losses. At the planning stage, it is worth deciding on the dimensions of the building and the type of consumables.
It is most advisable to choose wood as the basis for the gazebo, since this material can be easily purchased and delivered to any point in the world. In addition, the pricing policy of wooden products is significantly lower than other analogues and replacement options. Timber and boards made of spruce or pine can easily cope with this task.
What materials will you need?
Coniferous timber 100×100 mm
Since we will be building a gazebo for a 3x3 m summer house from lumber, we will have to prepare wood, fasteners and roofing. In detail, you will need:
- coniferous timber 100×100 mm;
- board 100×50 mm;
- board 70×40 mm;
- board 20-25 mm thick (can be unedged) or sheet material such as moisture-resistant plywood, OSB-3 or OSB-4 for roofing sheathing;
- block 50×50 mm;
- roofing;
- fasteners: steel perforated corners and plates, self-tapping screws, anchors;
- ordinary or silicate (solid) brick;
- cement, sand, crushed stone.
A few words should also be said about the choice of wood, or more precisely, about its quality:
- humidity - according to GOST 8485-86, the first and second grades of wood can contain up to 22% moisture, it is also called air-dry, which is ideal in this case;
- integrity - there should be no cracks or falling knots on the profiles (boards, beams);
- color - black spots on the wood indicate fungal mold, and blue spots indicate improper storage (the raw wood was covered with polyethylene and they were steamed). In both cases, this is a defect and you should not buy such building material.
Does form determine content?
This philosophical thought applies not only to the universe, but also to the creation of human hands. From an aesthetic point of view, as well as for reasons of maximum strength and capacity, a hexagonal gazebo for a summer house is the best option.
Hexagonal gazebo - laconic, beautiful and roomy
A rectangular structure is easier to build, but is inferior in all respects to an equilateral hexagon. Confirmation of this fact can be found in nature: bees build hexagonal-shaped honeycombs, and no one will force them to make a square cell out of wax.
Construction of vertical supports of the building
Depending on the required quantity, vertical supports are selected for a gazebo for a 3 by 4 cottage with a cross section of 100 by 100 mm, and the length of the supports must be at least 2.3 m. The algorithm for constructing vertical supports is as follows:
- Holes 10 cm long are drilled in the end parts of the beams - they are used to place them on the remaining parts of the reinforcement.
- Before installation, cuts are made in the upper part of the beams into which the roof rafters will be installed.
The most common cut size for rafters is 40 by 100 mm.
- The supports are leveled using a level and secured with temporary slopes. The latter are made from boards 40 by 70 mm and attached to the frame with self-tapping screws.
Roofing work during the construction of a 3x4 gazebo
Note. Before building a 3 by 4 gazebo, you should decide on the shape of the roof - some structures require the installation of additional supports.
The arrangement of a 3×4 shed roof provides for the following algorithm of actions:
- Even at the stage of installing vertical supports, you should decide on the type of roof - in a lean-to structure, only the rear supports supporting the lower slope will be 2.3 meters high. The front supports should be constructed taking into account the angle of inclination of the future roof; accordingly, they will be higher than the rear ones.
- Parallel to the frame of the lower trim along the lower edge of the roof, a Mauerlat is installed on which the rafters will be attached. It is made of timber, pre-coated with waterproofing material. The upper support will be a beam connecting the upper ends of the tall vertical supports.
For reliability, the rafters are attached to the mauerlat using corners or nails
- The distance between the rafters must be at least 70-80 cm. It should be remembered that the edges of the rafters must protrude at least 30 cm from the mauerlat to ensure normal water drainage .
- A sheathing made of timber with a section of 50 by 50 mm is attached to the rafters. The distance between the sheathing elements depends entirely on the material with which the roof will be covered. To cover with metal tiles, the sheathing pitch should be smaller than, for example, when using slate.
- The finished sheathing is covered with waterproofing material and the roofing covering is installed on it.
Installation
A 4x3 gazebo starts from the base.
Foundation
Pile foundation
An economical columnar base is quite suitable for our design.
Installation instructions:
- We apply markings for twelve piles in increments of one meter in an even rectangle.
- We dig half-meter holes.
- We fill in a bed of gravel twenty centimeters thick.
- Pour a thin layer of concrete.
- From above we place columns two bricks thick and also two bricks high above the ground level.
Frame
Wooden frame of garden gazebo
- Lay a layer of roofing material on the resulting pillars for the gazebo to create waterproofing.
- We take beams 100 by 100 mm, three and four meters long, and connect them “in a paw” to each other, forming a rectangle of the lower crown.
Connection "in the paw"
We install wood products 2.3 m long as support posts at the corners of the structure, having previously made a cut at the top to fix the diagonal ligament.
Cutting on corner posts
We mount a diagonal tie on top and surround it with an upper crown around the perimeter.
Wood frame top
From beams 100 by 50 mm, carefully planed, we make railings at a height of one meter.
Smooth wood railings
Roof
Roofing hipped structure
- A beam 100 by 100 mm and 0.8 m long is installed in the middle of the cross of the bundle.
- On top of it we make slots for the rafter beams and install them.
Connection of rafters to the central pillar
Sheathing
We sheathe the finished frame of the building, including the roof. The first is the floor, on which we lay a tongue-and-groove board, then we install bitumen shingles on the roof surface and cover the distance from the floor to the railing with clapboard.
The resulting gazebo
Construction of the foundation
The construction of a 3 by 4 gazebo with your own hands begins with the construction of a foundation for the building. Typically, a columnar foundation is prepared for a structure of this type.
Stages:
- According to the drawings of the 3 by 4 gazebo, markings are made for the locations of future mini-piles. As a rule, for such buildings a foundation with 9 or 12 supports is used.
Before construction, it is advisable to draw at least schematic drawings of a 3x4 gazebo - this will allow you to accurately determine the location and number of supports for the columnar foundation
- In the marked areas, pits are dug 30 cm deep (or one and a half bayonets of a shovel).
- The bottom of the pits is leveled, compacted and piles are built in five rows of brick so that the last row is already above ground level.
- The reinforcement rods are immersed in the resulting corner posts, and another 20 cm are left protruding on top of the pile.
- It is advisable to cover the top of the brick column with a waterproofing material, which can be used as roofing material.
Blocks can be used as a building material for a columnar foundation
Further cladding of the building
Important. Covering a gazebo in a country house measuring 3 by 4 meters must always start from the floor.
Depending on the tastes and financial situation of the owner of the estate, the floor covering is selected. Some site owners leave the floors uncovered, having first compacted the soil. It is often covered with a layer of crushed stone or pebbles. When building a 3 by 4 meter gazebo, a wooden floor is also considered inexpensive, which is constructed as follows:
- Between the beams of the lower trim, at a distance of no more than 70 cm, logs are filled from timber with a minimum section of 110 by 60 mm.
If you plan to use the gazebo in winter, then insulation is laid between the logs. You can use polystyrene foam or basalt fiber as it.
- The floor board is attached to the joists using self-tapping screws or nails.
- The floor is covered with anti-corrosion agents and varnish.
Advice. The walls of the gazebo can be left open, covered with clapboard or half-glazed. One of the latest fashion trends in summer cottage construction is the installation of full-wall gazebo windows.
Installation
A 4x3 gazebo starts from the base.
Foundation
Pile foundation
An economical columnar base is quite suitable for our design.
Installation instructions:
- We apply markings for twelve piles in increments of one meter in an even rectangle.
- We dig half-meter holes.
- We fill in a bed of gravel twenty centimeters thick.
- Pour a thin layer of concrete.
- From above we place columns two bricks thick and also two bricks high above the ground level.
Frame
Wooden frame of garden gazebo
- Lay a layer of roofing material on the resulting pillars for the gazebo to create waterproofing.
- We take beams 100 by 100 mm, three and four meters long, and connect them “in a paw” to each other, forming a rectangle of the lower crown.
Connection "in the paw"
We install wood products 2.3 m long as support posts at the corners of the structure, having previously made a cut at the top to fix the diagonal ligament.
Cutting on corner posts
We mount a diagonal tie on top and surround it with an upper crown around the perimeter.
Wood frame top
From beams 100 by 50 mm, carefully planed, we make railings at a height of one meter.
Smooth wood railings
Roof
Roofing hipped structure
- A beam 100 by 100 mm and 0.8 m long is installed in the middle of the cross of the bundle.
- On top of it we make slots for the rafter beams and install them.
Connection of rafters to the central pillar
Sheathing
We sheathe the finished frame of the building, including the roof. The first is the floor, on which we lay a tongue-and-groove board, then we install bitumen shingles on the roof surface and cover the distance from the floor to the railing with clapboard.
The resulting gazebo
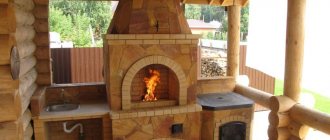
Pavilion 4x3 with barbecue
Many people cannot imagine their country holiday without deliciously cooked meat. And the logical purchase for barbecue lovers is a grill or barbecue. These frying devices can be either portable or stationary.
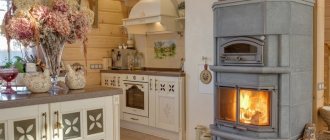
If relaxation is impossible without meat on coals, then you can place a country fireplace in the gazebo. The 4 by 3 pavilion has just enough space to install such equipment. Then the main area will be somewhere around 3x3. There is enough space to accommodate an average family and 2-4 guests.
When building a gazebo with a barbecue, it is worth considering several nuances:
- Even at the design stage, you should indicate on the drawing the location of the future fryer and work surfaces for the cook (if such are planned);
- When creating a drawing, it is worth considering that open fire requires protection from wind and rain;
- highly desirable treatment of wood with compounds that increase fire resistance;
- It is also possible to use other materials for the construction of walls, for example, brick or polycarbonate.
Optimal size and material
The size is determined based on how the summer recreation area will be used and how much space can be allocated on the site for its installation. You can put up a very small structure for family gatherings or a huge pavilion that can easily accommodate a large company. But the best option, according to most homeowners, is a 3x4 lean-to gazebo, the design of which is easy to find on the website of any construction company.
A 4 by 3 gazebo with a pitched roof will not take up much space, but it will have enough space to create a dining area for the family and house guests. At the same time, there will still be a small area for installing a stove or barbecue, or ordinary kitchen equipment.
The materials that are now usually preferred are wood or polycarbonate. The first option is ideal for kitchen gazebos. It is very comfortable to relax in wooden buildings in any weather. Polycarbonate is used to create lightweight and economical open gazebos. It is better not to build closed structures from this material.
Wooden gazebo 3 by 4 Source nasha-besedka.ru
How to choose a standard project?
The appearance of the 4x3 gazebo should be in harmony with existing buildings and landscape.
Therefore, it is important to choose a 3x4 gazebo project with a suitable design and color scheme.
Variant of a standard summer gazebo design
Ready-made version of the finished design No. 2
Model No. 3
Model No. 4
Model No. 5 closed type
Model No. 6
How to choose the right standard project?
- It is advisable to choose one with specifications, technology and accompanying assembly instructions.
This will allow us to pre-fabricate all the components according to the submitted drawings, prepare the required fasteners, and strictly follow the construction sequence.
- Manufacturing parts according to finished drawings will eliminate possible errors, the possible occurrence of which will require corrections with the need for additional costs for new materials.
In addition, the fasteners included in the specifications are guaranteed to ensure the reliability and durability of the structure.
Choosing a roof and roof shape for a gazebo
The roof for a 3x3 m gazebo can be made in several versions:
- Arched.
- Single-pitch.
- Hip.
- Tent.
- Gable.
Arched roofing can only be made from plastic roofing materials such as corrugated sheeting and polycarbonate, but from a design point of view they are best suited for gazebos with a metal frame.
The hipped roof of a gazebo made of timber, covered with metal tiles, is a beautiful and richly decorated option
The most suitable roofing materials for the roof of wooden gazebos are flexible tiles and metal tiles, which have an aesthetic appearance and a rich color palette. Both of these materials go well with wood texture.
It is worth considering the option of a gable roof covered with metal tiles. You can make it for the gazebo with your own hands.
A gable roof with a soft roof is a frequently used option.
The final stage
When the foundation of the building is ready, they begin to install side railings, railings and install the roof.
It is better to make the walls of the structure from wood; the structure of the material with knots looks original and attractive on the gazebo. Treated timber is used to make railings.
It is better to carry out roof construction and assembly work on the ground. This will allow you to fit all the elements as accurately and accurately as possible. The finished roof is fixed directly to the support pillars using bolts.
To increase the strength of the roof, additional elements are fixed between the sheathing beams - one in each of the six parts. The top of the sheathing is sheathed with thin slats or sheet composite. Next, a covering of metal-plastic, ceramic tiles or other material is laid.
At this point the work is completed, you can enjoy the result of your labors.
Gazebos made of metal, polycarbonate, brick
The construction of gazebos made of brick, metal profile or polycarbonate has its own specifics. You can combine all the materials together to create a comfortable place for family and friends to relax.
When designing and planning the construction process, consider:
- metal gazebos will require a lot of work with the profile. You will need a welding machine or a tool for cutting holes for hardware. You can build a building with forged spans and metal railings. Please note that the material is susceptible to corrosion, so it must be treated with special compounds. The structure must be placed on a reliable foundation made of screw piles, blocks or concrete strip. You can make the roof from any material. It is better to make the surfaces of benches and tables from wood;
- polycarbonate gazebos are lightweight structures that can be quickly built. Such structures are installed on blocks, screw piles or a grillage made of timber. First, a frame is built from wood or metal. Polycarbonate sheets of different sizes are sewn onto the frame. You can build barriers up to the middle of the wall and a roof made of high-capacity honeycomb material. Use polycarbonate that is not 1.5 cm thick. Remember that plastic is highly flammable. It is dangerous to cook food on fire in such a building;
- Brick gazebos require the installation of brick supports. You can make masonry instead of posts according to the design. Stone pillars need a strong foundation. Pour a concrete strip or monolith under the building. The railings, walls and roof of the building can be mounted from any other material.
You can combine wood with stone, brick with metal, iron with polycarbonate in your own construction. It all depends on your imagination, desire, ability to design and build.
Preparing for work
Collapsible metal gazebo
Metal gazebos can be temporary or permanent. Temporary ones are installed for the summer period and removed for the winter. A foundation is not needed for such structures. Sometimes hollow pipes are driven into the ground as a foundation, which will serve as the basis for the frame. In winter, the top of the pipes must be closed to prevent precipitation and debris from entering.
91dcdd0df6b5a44003933f0313fe5a98.jpe
3ef1745a5e70fdbe627ddc9aa85da2f1.jpe 5dcfe1a893d61a80d24833891083b2be.jpe
Capital gazebos require a reliable foundation, which is arranged before construction. The base can be wooden flooring or concrete covering. The wooden base elements must be impregnated with an antiseptic, and the metal parts must be primed to prevent corrosion.
Welding machine
During the work you will need the following tools and materials:
- welding machine;
- drill and metal drills;
- Bulgarian;
- roulette;
- building level;
- metal pipes of square or round cross-section;
- primer and paint for metal;
- roofing material.
The installation of a metal gazebo requires a competent and responsible approach. First, you need to draw up a drawing indicating the dimensions and calculate the required number of pipes for the frame and supports, and the amount of roofing material. You need to buy building materials with a drawing in order to purchase everything you need and manage the funds correctly.
Large area gazebos
Hexagonal gazebo
A classic hexagonal gazebo 6x6 m (Fig. 6.1.) can accommodate a company of up to ten people.
Experienced builders identify a standard range of parameters for a hexagonal gazebo:
- The total floor area is about 7 m2;
- The distance from one corner of the gazebo to the opposite is 290 cm;
- The height of the building will be 200 cm. The value is measured from the floor to the very top trim.
- Mold width – 240 cm;
- The value of the standard edge of the gazebo is about 150 cm;
- The total height is about 300 cm, which is measured from the base of the gazebo to the ridge node.
You can consider a drawing of a standard hexagonal gazebo designed for 10 people. The following elements of a 6x6 m gazebo can be distinguished.
- coal base of the building;
- gazebo support posts;
- roof elements in the shape of triangles;
- fencing for sections.