Popular projects of country gazebos are characterized by an integrated approach to organizing country holidays.
From the main house you can move a full-fledged kitchen, utility room for tools and living room furniture into a separate building.
Idea of blocks with stone cladding
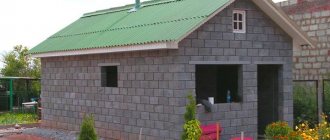
A country guest gazebo made of blocks is an ideal reunion place for the whole family and close relatives.
It is not as common as its counterpart made of timber or brick, but it also looks very interesting.
In addition to the buildings themselves, we will consider the building material from which they are built. These are the types of block that are available on the market. Despite the external similarity, their technical characteristics and prices are radically different.
Construction of a barbecue from blocks at the dacha with your own hands
After the completion of block construction, as a rule, there are a lot of stones left, purchased as a reserve. In this case, you can make a barbecue out of blocks with your own hands at the dacha and get a practical and functional structure at your disposal. Compared to purchased stoves, a barbecue made from expanded clay concrete blocks or similar materials will cost several times less, but will be almost as good in the quality of cooking a wide variety of products. With the right approach to the matter, a homemade barbecue made from blocks will be an excellent decoration for the site.
- Review of basic materials
- Combined barbecue projects
- Construction stages
- Construction site arrangement
- Foundation organization
- BBQ masonry
- Joining seams
- Weather protection
Disadvantages of gas blocks
The main disadvantage of the material is its high hygroscopicity. An open street structure requires the use of protective finishing and cladding with waterproof materials. You won’t be able to get by with a simple canopy - the smoke from the barbecue will begin to irritate your eyes and respiratory organs, making it impossible to stay near the structure.
The next disadvantage should be considered low strength. A foundation that is too weak can cause structural failure. If the area experiences seasonal changes in groundwater levels or soil movement, you will have to take care of a more powerful and reliable foundation. The most stable will be a concrete slab (you can use a ready-made one, or pour the base directly on site).
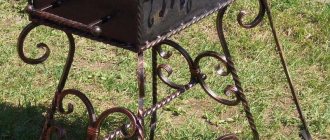
Barbecue gazebo
For a comfortable stay with the whole family or a group of friends, you can build a separate building for a concrete barbecue. You can relax in the gazebo, even if it’s raining or strong wind outside. To prevent a fire from occurring in the barbecue gazebo, you need to make a meter-long distance from the stove to products made from materials that can catch fire. However, if the barbecue is made of metal, a more serious distance will be required - at least 2.5 m. Be sure to purchase a spark arrester for the chimney. A pipe made of materials that are flammable must be inserted over a steel sheet. In a gazebo equipped with a barbecue, be sure to install a floor covering that will not catch fire.
What are there
The building material is selected based on the appearance of the remaining buildings on the site. This also determines the choice of roofing material. And the shape and structure can be anything.
Most often, stone and brick gazebos are made in a rectangular shape: they are usually placed on the border of the site, so that they are located lengthwise. Square or rectangular designs work very well in the corner. To make the atmosphere more intimate, both sides that will face neighboring areas are made solid.
Stone gazebo - two sides open, two sides closed
Pure stone gazebos, and even closed ones, are rare. This is a summer kitchen, not a gazebo. If necessary, insect fencing is made from mosquito nets; for a more comfortable environment, translucent curtains can be hung, which will cover both insects and prying eyes. For winter holidays, glazing is sometimes installed. It turns out that there is already a separate kitchen if there is a barbecue or grill in the gazebo. Glazing is done in the usual way: wooden frames or double-glazed windows; polycarbonate is used less often, but it is also quite suitable and also has lower thermal conductivity compared to single glazing.
Often combined with wood. Both brick and stone look good with them. They also make openwork railings from metal; a combination with polycarbonate is less common.
Brick gazebo with barbecue
Rare combination - with polycarbonate roof
Summer open gazebo: powerful timber racks are installed on stone pillars
This gazebo is only made of stone
Combination of brick and openwork metal fencing
Twisted columns are very decorative
Read how to make a wooden gazebo yourself here.
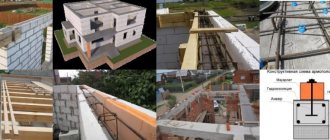
Foundation
Let's start building the barbecue. First we do the foundation. It must be level and able to withstand the load from the grill structure. The best option is a reinforced concrete slab 1500 x 1000 mm, height 150 mm.
We are building such a slab. We remove the fertile layer of soil and make a sand cushion 200 mm thick, leveling and compacting it. We lay a waterproofing material on top of it, which will protect the slab from getting wet. We subsequently use the same material to protect the vertical part of the slab.
We install the reinforcing mesh on certain fasteners, for example, plastic ones, so that after pouring the concrete, the mesh is inside it and the metal does not have the opportunity to corrode. We install plank formwork along the perimeter of the base, and then pour concrete grades B25, M300.
We need to do everything in order: first we will select a place, then we will make the foundation, and only then we will move on to laying the barbecue from blocks.
Selecting a location
These recommendations are general for all types of barbecues on the site. As with all stone grills, block grills cannot be moved once built, so choose your location carefully.
A barbecue placed on an empty area will quickly become overgrown with neighbors, creating a recreation area.
Overall aesthetics are not the only consideration when choosing a location. A barbecue is a fire, and fire safety rules must be followed.
We recommend that you consider these rules:
- Well, there should be flammable objects around the grill;
- There should be at least 5 meters to the nearest building, bush or tree, and branches should not hang over the brazier;
- Gusts of wind should not scatter coals;
- The chimney or hood must be efficient and prevent smoke from drifting into residential buildings and recreational areas;
- It will be convenient to place a table near the barbecue and arrange chairs, so you won’t need to carry the barbecue into the house;
- A test picnic at the barbecue site will dispel doubts.
After choosing a location, check again whether everything is taken into account.
Site preparation
The work itself begins with clearing the site of debris.
It is better to mow tall grass to make work easier.
We remove the fertile layer. We uproot stumps and bushes. If we find stones, we remove them; if we find very large ones, we leave them. This applies not only to the area directly under the barbecue, but also to the entire area for barbecue meetings.
Tools and materials
Materials for a barbecue made from blocks you will need:
- The blocks themselves (it is better to take them with a reserve);
- Oven grout;
- Reinforcing bars or gratings;
- Block glue, cement-sand mixture for masonry or oven mixture;
- Cement, sand, crushed stone - for the foundation;
- Mastic or roofing felt;
- Metal sheet for frying pan.
You may want to add some features or change the finish, so this is not a complete list.
Tools needed for work:
- Shovels (scoop and bayonet);
- Level;
- Roulette;
- Hammer.
Foundation
Thanks to the blocks, the structure of the barbecue is light and a heavy foundation is not required.
A concrete slab 15 cm high with two layers of reinforcing mesh is sufficient. The dimensions of the stove coincide with the barbecue.
The upper plane of the foundation must not be lower than the future surface of the site.
Dig a pit to the size of the foundation and 40 cm deep.
If the soil is strong and the walls do not crumble, you are lucky, otherwise you will need to expand the pit.
A sand cushion is placed at the bottom of the pit. A 15 cm layer of sand is laid and compacted, then the next one. The thickness of the pillow is at least 30 cm (usually 3 layers).
Formwork is knocked together from boards and placed on a cushion on pegs.
Reinforcing bars must be placed in the formwork on spacers (so that they do not move during pouring.
Mix the concrete in the proportion cement: sand: crushed stone 1: 3: 1;
Fill the formwork and level the concrete surface;
Cover with film and let the concrete gain strength. Work can be continued in a week.
Masonry
Apply a layer of mastic or melt roofing material onto the foundation. This will protect the masonry from soil moisture.
Lay out the grill from blocks using special glue. If necessary, secure fasteners in the masonry for grates, spits, etc.
When using glue for blocks, the seams are almost invisible and jointing is not necessary.
brazier
At this point, you should decide on the size of the brazier.
Use a heat-resistant mixture for laying stoves.
Place a sheet of iron on the layer of oven mortar. It should not touch the walls. Cover the blocks on the side of the roasting pan with the baking mixture.
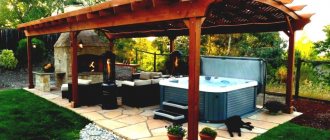
Making a canopy
Having dealt with the existing types of structures, now let’s look at how to build gazebos and canopies for a summer house with your own hands
.This process consists of several stages:
- Choosing a location;
- Frame construction;
- Construction of the roof.
There are certain nuances at each of these stages.
Attached carport with sloped roof
Selecting a location
Gazebos and awnings for summer cottages can be of any type and shape, but the main thing is that they fit correctly into the country house interior.
And for this, the structure must be located in a good location and in a suitable environment:
- Country gazebos and canopies, according to design rules, should be installed at the end of the perspective line. The best place is at the junction of garden paths or at an elevated position with a beautiful view.
- It is also customary to place gazebos near streams and ponds so that you can admire the surface of the water.
- It is better to place the structure among bushes and other plantings. Gazebo canopies at the dacha, covered with climbing plants, look especially beautiful.
Diagram of a canopy with a gable roof
Materials
For construction you will need the following materials:
- Beams with a section of 150X150 mm;
- Beams with a section of 150X50 mm;
- Boards 160 mm wide and self-tapping screws;
- Roofing material.
It is best to use pine beams, since the price of this material is quite affordable and at the same time it has good performance properties.
Canopy frame
Construction of the frame
The most difficult thing when building a gazebo is to install the poles in a vertical position with your own hands. The easiest way is to dig them into the ground.
The work is performed in the following order:
- First of all, you should mark the site and dig holes for installing gazebo posts. The bottom must be covered with crushed stone and compacted well. The verticality of the racks should be checked using a plumb line.
- Then the hole must be filled with concrete mortar. After this, you need to wait a few days until the concrete hardens.
- After the racks are installed, they need to be cut to height at an angle. The easiest way is to make a pitched roof; in this case, one row of racks should be 20-30 centimeters higher than the other. The cutting angle must correspond to the angle of the roof so that the rafters rest completely on the ends of the pillars.
In the photo - a gable canopy
Country pavilion
Roof installation
The further construction process is simple, but it requires extreme care. The installation of the roof begins with the installation of rafters - beams with a section of 150x50 mm.
The work will be performed in the following order:
- The rafters rest on support posts or support boards mounted in advance. To connect the rafter system, you can use wood screws. If you have a gable roof, then you can use metal corners to connect the rafters. The step should be about a meter.
- Then, lathing is done on top of the rafters. For this, an edged board with a width of 160 mm and a thickness of 30 mm is best suited.
- At this point, the construction of the wooden canopy is almost complete. You just need to lay the roofing. Gazebos and canopies in the country can be covered with any material, for example, slate. It is screwed onto the top of the wave using galvanized screws. As a rule, eleven screws are required per sheet.
Now all that remains is to pay attention to the floor. The easiest way is to fill it with crushed stone; you can also make a concrete screed, make flooring or cladding with sandstone.
Description of self-installation of the barbecue
The following requirements apply to this location:
- there should be no flammable objects near the barbecue;
- there should be no trees or bushes nearby;
- coals and sparks should not fly away from gusts of wind;
- there must be an efficient chimney and smoke must not be blown onto buildings;
- It is convenient to place a canopy next to the barbecue, under which there should be a platform for placing a table and chairs;
Installation diagram
You can draw a plan on which to estimate the location of the barbecue and the area near it, then, according to the plan, mark the area and visually make a decision. Step-by-step manufacturing instructions are provided.
Pouring the foundation
Before pouring the foundation for the cinder block grill with your own hands, let’s clear the area for the recreation area from debris. Next should be the following steps:
- remove the fertile layer;
- we uproot stumps and bushes;
- small stones and any debris are removed;
- We clean the entire area, and not just directly under the grill.
- We dig a pit 40 cm deep. The size is slightly wider than the size of the foundation slab. Since the weight of an aerated concrete barbecue is not too large, the thickness of the slab will be approximately 15 cm; Making a pillow. First a layer of gravel about 10 cm, then 10 cm of sand and another 10 cm of sand. We compact each layer separately;
- we lay the waterproofing so that it subsequently covers the ends of the slab;
- installing formwork;
- we place the reinforcement on the clamps so that after pouring it does not come into contact with air;
- mix concrete in a ratio of 1 tsp. cement x 3h. sand x 1h. crushed stone;
- fill the formwork and level the concrete surface;
- cover with film and leave for a week (it is recommended to water the concrete) so that the concrete gains strength.
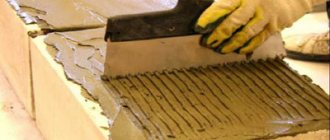
Laying the body
The first row serves to equalize the thickness of the seam. Apply the glue with a notched trowel. If necessary, cut the blocks with a hacksaw.
We lay out the firewood on top of this layer of foam blocks. When laying the blocks, we tie them together. We use blocks of different thicknesses according to the drawing.
We lay the firebox on top of the firewood. We lay out a platform and walls for it. We line the inside with refractory bricks to protect the foam blocks from strong heat. To lay refractory bricks we use a refractory mixture. We fasten the corners on the sides of the firebox with anchor bolts. The barbecue grill will rest on the corners.
Chimney device
We install an exhaust hood to allow smoke to escape. We cover the umbrella with aerated concrete blocks, cutting them to shape.
The front part should rest on a jumper made of a metal corner 50 x 50 mm.
We will complement the design with an exhaust pipe made of foam blocks with a metal sleeve inside.
Exterior decoration
We will cover the outer part of the grill with clinker tiles. We first cover it with fiberglass plaster mesh and secure it with dowel nails. We lay the tiles on cement-sand glue.
If necessary, cut with a grinder. We attach flexible bitumen shingles to the hood.
A brazier made of foam blocks can be of simple or complex design. A complex design means a multifunctional outdoor oven, which is complemented by a hob and a smokehouse. Today we will look at the option of building a simple outdoor oven from concrete blocks.
So, at the preparatory stage it is recommended to make a design for the future structure. You can draw a drawing of a simple barbecue manually or take advantage of special computer programs (Compass-3D, AutoCAD, CorelDRAW, etc.). A graphical representation allows you to see and evaluate the scale of the work, as well as avoid common mistakes during construction.
Materials and tools
It is equally important to prepare and purchase in advance all the materials, tools and construction equipment necessary for the work:
- foam blocks;
- fireproof red brick;
- decorative plaster, artificial or natural stone, facing brick or any other material for decorating facades;
- fireproof mortar and oven grout;
- high quality cement, sand and water for mixing the solution;
- container for concrete mortar, trowel;
- boards 30 cm thick for formwork and wooden beams measuring 10x10 cm;
- reinforcing mesh or metal rods;
- measuring and marking instruments;
- bayonet and shovel shovels;
- hammer, nails and various fasteners;
- roasting rack and other kitchen utensils;
- decorative elements;
- protective gloves and overalls.
Concrete base
The construction of an outdoor stationary barbecue requires a serious and meaningful choice of location. The best option is a garden area that is protected from wind and drafts and is located near the house or summer kitchen.
Now let's move on directly to the construction of the concrete base of the future barbecue:
- Clear the surface of vegetation and various debris. Remove the top layer of soil and level the area. At the same time, do not forget to check the evenness of the horizontal line.
- Using reinforcing mesh or metal rods, pour the concrete foundation. The base area should be 80x60x15 cm.
- After the foundation has hardened, we move on to laying foam blocks. Each side must be leveled and adjusted vertically and horizontally. To do this you will need a building level.
- After the second tier, you need to make wooden formwork for pouring concrete mortar with fine crushed stone. A metal corner is placed at the base of the lintel, which helps to avoid cracking of the concrete when heated.
Grilles and fastenings
It will take at least 10–14 days for the concrete solution to harden. If the weather is cloudy and damp, it is better to wait a little while removing the wooden formwork. Once the concrete has hardened well, you can remove the wooden boards and slats.
At this stage, the fastenings for the spit and grill are installed. As a grate, ready-made cast iron grates from an old wood-burning stove or a grate made of a metal frame and crossbars can be used. The frying grate is installed on the ledges of the stones and filled with concrete mortar.
Don't forget about the grille
The surface for coals must be lined with refractory bricks, which prevents the outdoor stove from heating up and catching fire. It is recommended to close the firebox window where logs and coal will burn with a door made of tempered glass or metal.
Facing and decor
At the final stage of construction, the cladding and decoration of the homemade barbecue takes place. To increase the strength of the structure and prevent the appearance of fungus inside, concrete blocks must be plastered with high-quality cement mortar. After the solution has dried, you can move on to the exterior decor. Red facade or glazed brick, fire-resistant tiles, artificial or natural stone are used as facing materials. Decorative plaster is performed on a mesh fixed on top of the wall.
Design
At the project stage, when drawing up an estimate, you should indicate the costs of finishing and design ideas
It doesn’t matter where the gazebo is located, in a country house or on a site with expensive landscaping, it should be beautiful and delight with its appearance
Exterior decoration
The masonry itself is beautiful, especially with the use of finishing bricks, but there are more complex approaches to external decoration:
- They use figured masonry with offset bricks, or a pattern is introduced into the plane of the wall, resorting to materials of a different color. Carved bricks are also used.
- To improve the exterior, combined decoration methods are used. Artistic forging combines elegantly with brick.
- Elements of wild stone on the base side can be combined with the same lining of a stove or fireplace inside the gazebo.
- The discreet and at the same time spectacular wood carvings decorating the brick gazebo look amazing.
- Stucco can be styled with white masonry.
- The building is sometimes decorated with street lamps or plaster figures.
- Exterior decoration includes not only the gazebo itself, but also the paths laid to it and the area around the building.
Interior decor
Indoor decoration concerns walls, floors, ceilings, fireplace or barbecue installations. Interior decoration should match the external style of the building, as well as other objects on the site.
The walls are tiled and covered with moisture-resistant wallpaper. The floor is covered with tiles, wooden slabs, concrete or stone. The finishing around the stove should be fire-resistant tiles or stone. Forged elements can be used in the decoration of lamps, floors, barbecues, and firewood sheds.
Question with masonry composition
It is very important to choose the right masonry composition for a planned project. The easiest way is to purchase a ready-made solution. But its characteristics may not correspond to those reflected on the packaging.
It is better to find the correct proportions of clay and sand through your own efforts. The formed composition, when dried in the sun, should not crack and retain its strength.
Perhaps your experiments may take longer. But, when you independently achieve the required working mixture conditions, in the future you will spend much less time searching for optimal proportions and will be able to prepare high-quality masonry mortar.
Specifications
Typically, heavy concrete with a density of 1800-2400 kg/m³ is used for the manufacture of FBS. At the same time, depending on the category of the concrete mixture, the grade of concrete is determined. Eg:
- if the category is more than B7.5, then concrete grade M100 is used;
- B12.5 and above – M150;
- for heavy concrete: B3.5 – M50, B15 – M200.
The moisture resistance of blocks according to GOST should not be less than W2. FSB should easily withstand 50 cycles of freezing and defrosting. There is no need to talk about thermal conductivity qualities; it’s still pure concrete. And although manufacturers offer foundation blocks made of expanded clay concrete, the thermal insulation qualities still leave much to be desired.
Marking of the foundation blockSource st29.stpulscen.ru
Let's look at block labeling. For example, FBS-24-4-6 t. What the numbers mean are the sizes of the foundation blocks. That is, length 2380 mm, width – 400, height – 580. The letter “t” means that the product is made of heavy concrete. If silicate concrete was used, then the letter “c” would be placed at the end of the marking. If it was expanded clay concrete, then the letter “p”, that is, with a porous base.
Please note that the minimum weight of the foundation block is 260 kg. Even for this you will have to use heavy equipment. They are usually used to build foundations for lightweight structures. More often, standard products weighing 1960 kg are purchased for the construction of houses.
It is very important to consider the ratio of the mass of the block and its dimensions. For example, if the weight is below standard, then there is a high probability that there are voids inside the product that reduce the strength of the material
Or, during the process of pouring the concrete solution into the molds, the latter was poorly compacted.
Please note that manufacturers also offer other types of foundation blocks. The only difference in their markings is the alphabetic characters.
Eg:
- FBP are blocks that have hollow areas at the bottom.
- FBV are products that contain channels for laying communication networks.
By the way, the weight of FBS differs from the other two modifications.
Hollow foundation blocks - FBPI source stk-uspeh.ru
What is barbecue?
This is one of the ways of cooking food (mainly meat and sausages), not on an open fire, but on the heat emanating from burning coals. This type of cooking is common in America, but is also gaining increasing popularity in our country. According to the cooking principle and some taste qualities, barbecue is close to our traditional kebab.
Literally translated, the meaning of this word is interpreted as “the pit of the sacred fire.” We are accustomed to mean by the word barbecue, a small oven for cooking meat, or the dish itself, cooked in such ovens. Although, of course, more often they look like metal braziers on legs.
Today we will introduce you to the technology of installing a barbecue, or as we usually say - we will build a barbecue from foam blocks with our own hands.
Determining a place for a barbecue - the first stage
Before you start installing the barbecue, you need to decide on some nuances that will help you have a good time in the future without violating the rules for using the stove in your garden.
- Fire safety. It is prohibited to install a barbecue near any buildings, trees, flammable objects, or wooden fences.
- Light supply. For convenient use in the dark.
- Availability of water nearby.
- Determination of the dimensions of the structure.
- Choose exterior finishes in accordance with the design of your site.
- Between the buildings and the proposed location of the future barbecue, paving stone paths should be laid so as not to damage the lawn during installation.
Now you need to decide whether you will make the foam block with your own hands or not? On the one hand, this allows you to save on the purchase of building materials, but on the other hand, you will need to purchase a lot of things, which just costs one foam generator. It will take you several times longer .
Note! Although you can make a foam generator for foam blocks with your own hands, if, of course, you are comfortable with a welding machine. If not, leave this idea, the savings will not be so impressive, but you will lose enough time.
After the above points have been completed, you can begin preparing the site, that is, carry out excavation and masonry work.
Conclusion
We hope that after reading, your desire to make a barbecue yourself has only strengthened, even if you decide to make foam blocks with your own hands. Your dream has become a little closer to you, because after a short hassle, you and your loved ones will be able to enjoy delicious dishes prepared in the fresh air.
Plus, you will have pride in the fact that you did it all yourself, without involving outsiders. In the future, you can continue this tradition and build small buildings on your site, because a wall made of foam blocks with your own hands, as well as a partition made of foam blocks with your own hands, will not require you to spend a lot of money, especially since you will already have experience in this in fact.
In the video presented in this article you will find additional information on this topic.
Advantages and types of blocks
Blocks have been successfully competing with bricks for a long time. Their most noticeable difference is their large size. Strength indicators do not differ significantly from the characteristics of bricks. By laying out the foundation of the gazebo, pedestal, outer walls and functional niches of the barbecue in blocks, you can significantly reduce the consumption of bricks. The use of blocks reduces the cost of construction and significantly speeds up the process. They have other advantages:
- relatively light weight, which makes it possible to simplify, reduce the foundation, facilitate loading and unloading operations, and the masonry process.
- the ability to easily change their linear parameters (by cutting) and make holes.
- high strength, durability.
- low thermal conductivity (due to the cellular structure).
- resistance to frost.
- ribbed structure of spoons, reducing solution consumption.
- corrugated surface suitable for plastering and fastening finishing materials.
The range of blocks on the market is quite wide.
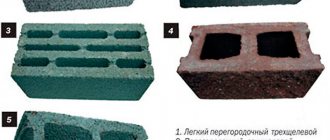
Foam block
Concrete blocks made from a mixture of cement, sand and water acquire a fine-cell structure due to the introduction of a foaming agent (synthetic or protein) and additives that accelerate hardening into the mixture. They are produced in two ways (under pressure and without pressure), and have several varieties according to strength grades. For laying the barbecue frame, a material of structural and thermal insulation type (grades D500 to D900) is suitable.
It also has disadvantages:
- shrinkage caused by a significant amount of water in the mixture (3 mm per meter of height), which is not so important when building a barbecue.
- much greater than that of brick, the ability to absorb moisture (requires finishing with plaster, painting or treating the outer surface with a special emulsion to protect the concrete - a water repellent).
- fragility of edges susceptible to chipping during rough handling.
- Does not hold nails or regular self-tapping screws.
The bright white color of the blocks is a sign of a violation of the production technology. Normal is a light gray shade, perfectly uniform.
Laying foam concrete over traditional mortar is also allowed, but craftsmen recommend using a special cement-based adhesive, which allows you to obtain thin, almost invisible, but very strong seams.
Gas block
The base of the mixture is the same: cement, sand and water. It is enriched with gypsum, lime, and metallurgical slag. Gas-forming agent is aluminum dust in the form of a paste or suspension that actively releases hydrogen when interacting with a highly alkaline cement mortar. The gas trying to find a way out swells the mixture, increasing its volume.
This material is almost not subject to shrinkage, but is even less resistant to moisture than foam concrete. Its through channels are quickly saturated with water. High-quality surface finishing is required for most of its types. But it firmly holds nails and other fasteners, which is important for lovers of hanging decorations.
Review of basic materials
Unlike mobile structures, stationary barbecues are durable, reliable and highly wear-resistant. They are always ready for use and do not require special care. You can build a stationary barbecue out of brick, but this solution requires large financial costs. As an alternative, concrete blocks can be used.
You can assemble a barbecue like this yourself
The advantages of building blocks include:
- high strength and reliability of the finished structure;
- resistance to various atmospheric phenomena, including sudden increases/decrease in air temperature;
- low specific gravity;
- durability and relatively good wear resistance;
- the ability to quickly make holes and change the size of concrete blocks;
- no difficulties with transportation, loading and unloading, masonry;
- low consumption of solution due to the ribbed structure of the spoons;
- minimal financial costs.
However, do not forget about the easy flammability of concrete building blocks. It is recommended to lay out the parts of the structure adjacent to the open fire with fire-resistant red bricks.
A barbecue made from blocks is perfect for open gazebos, semi-closed garden gazebos and summer kitchens equipped with a well-established ventilation system. A homemade stationary design is easy to implement and does not require large investments.
There are many types of barbecues
The modern construction market offers a large selection of concrete blocks:
- Foam blocks are a fine-cell structure building material. It is made from protein and synthetic foaming agents, cement, sand, water and additives that accelerate hardening. For laying the base of a barbecue or outdoor stationary oven, brands D500 and D900 are used. However, if handled roughly, chips and cracks may appear; the stone does not hold screws and nails.
- Aerated blocks are made from a mixture of cement, sand, water, gypsum, lime and metallurgical slag. This building stone is practically not subject to shrinkage. As for the disadvantages, they note a high ability to absorb moisture. Buildings made of aerated blocks require high-quality surface cladding.
- Cinder blocks, which can be hollow or monolithic, contain ash, slag and shell rock in large quantities. Due to its high hygroscopicity, mold and mildew can form in the stone. They are characterized by excellent thermal conductivity and high specific gravity.
Setting up a barbecue area
Considering that the stove itself will occupy an area of at least 1.60 x 0.80 m, the hole for the foundation is dug 5-7 cm wider so that there is room for the formwork. The place for the pit is chosen away from trees, wooden buildings and fences in order to ensure fire safety. Next, a step-by-step arrangement of the strip foundation is carried out. Having marked the edges of the hole on the ground, dig 30 cm deep. This depth will be quite sufficient for the foundation of the stove.
The bottom of the pit is covered with fine crushed stone and compacted thoroughly. The formwork panels made from boards are fixed in the pit using wooden blocks. The shape of the foundation and the perpendicularity of the corners are leveled. A reinforcing mesh is installed at the bottom or pieces of scrap metal are simply thrown over it.
Concrete mortar is prepared in a wheelbarrow or bucket with your own hands using a shovel and drill with a stirring attachment. Before pouring the foundation, the formwork must be thoroughly wetted so that it does not draw water out of the concrete mixture. Concrete is poured in one step to prevent delamination, making sure that the mix of reinforcing scrap pieces is completely covered. The filled space is leveled with a lath. After a minimum of 72 hours, with regular moistening of the top of the foundation, it will completely harden. The formwork is pulled out, and the construction of the foundation is considered finally completed.
A barbecue in the country is a distinctive feature of a pleasant holiday outside the city with a barbecue in good company. Perhaps this is why most summer residents are happy to install a barbecue or grill on their summer cottage.
Yes, you can just buy a ready-made barbecue for your dacha, but there is something attractive in plans to build such a barbecue with your own hands. A country barbecue is not only a gathering place for the whole family and an interesting element of country design,
but also a very effective thing when you need to feed quite a lot of people, for example, for a holiday; because The surface size of a homemade barbecue is usually much larger than a standard store-bought one. In addition, a barbecue made by yourself is more durable, less demanding to use, and has a more “warm, individual” appearance than a purchased one.
The task of making a barbecue with your own hands can be solved by a pair of skillful hands over the weekend. There is nothing complicated in the construction of a country barbecue; you can see this for yourself in the drawing.
How to build
The initial stage of work is pouring the foundation. The foundation is selected based on the weight of the future structure. Read more about the selection and construction of foundations for stoves and barbecues.
The process of building barbecues from combined materials is practically no different from laying a completely brick barbecue, with the exception of the mandatory protection of block elements from moisture.
Of the construction features, it is worth noting that for bricks, use a solution suitable for laying bricks; for foam blocks or other porous materials, use a solution suitable for it. The easiest way is to buy ready-made solutions.
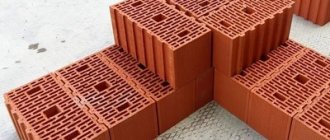
Ceramic block or porous warm ceramics
This porous ceramic block is produced using the same technology as bricks and from the same materials. The whole difference is that the “body” of the material is not solid, but consists of voids and ceramic bridges. This structure is effective: for central Russia, a wall made of porous ceramics should be 50 cm. The same thickness of a wall made of aerated concrete is also needed. And additional insulation is not required with such a thickness. That is, the wall will be single-layer, which is much better than multi-layer. And the finishing can be made from facing bricks or clinker. Ceramics will “make friends” with ceramics without any problems. But not everything is so rosy.
Hollow blocks for ceramic walls could be considered the best option, if not for the high percentage of damage and difficulties with fastening
Advantages and disadvantages of ceramic blocks
The main advantages were listed - good thermal characteristics and low (compared to ordinary or even hollow brick) weight. But ceramics are fragile things. And thin partitions break and break easily. When transporting, you can get about 10% of the battle. In addition, cutting a ceramic block is not so easy. A saw won't help here. Other, more serious equipment is required. Another disadvantage is that special fasteners are required, since only this can be held in thin walls.
| Advantages of ceramic blocks | Disadvantages of hollow ceramic blocks |
| Good thermal insulation properties | Brittle material that chips and breaks easily |
| High level of sound insulation | Requires special tool for cutting blocks |
| Average water absorption | Requires special fasteners |
| Steam conductivity | The blocks are not as big compared to lightweight concrete |
| Good frost resistance | Non-ideal geometry, high cost for polished ones that have stable dimensions |
| High strength | |
| The presence of a corrugated surface, which increases the thermal resistance of the masonry. | |
| High heat absorption. It works as a large heat accumulator, but this is bad for building periodic heating houses. |
Other advantages are the same as those of brick: natural ceramics, average water absorption, frost resistance from 30 to 80 cycles, good sound insulation properties - up to 55 dB, which is a very good indicator. In addition, there is such a thing as heat capacity. It shows how much heat the material can accumulate. The more heat it “accepts” into itself, the longer it will take to release it later. For homes with permanent residence, materials with high heat capacity are more comfortable. And for ceramics it is quite big. Such a wall is a kind of heat accumulator. This is good for a permanent home, but bad for a dacha that is visited only occasionally in winter. Warming up takes a lot of fuel and time. So this building block is not the best for dachas or baths.
It is also worth adding that today the cost of a cube of porous ceramic block and the cost of autoclaved aerated concrete are almost the same. In some places, aerated concrete is even more expensive. But the sizes of aerated concrete blocks are larger, glue consumption and time consumption are less. You can argue about the time, since for ceramics the presence of armored belts is not necessary, but it will not be superfluous either. And you can’t argue with the size of the blocks. And with geometric precision. No, there are polished ceramic blocks that are adjusted to fit. They can be installed with a minimal layer of adhesive. But such blocks are much more expensive. Nevertheless, looking at all the facts, it is worth saying that we all know ceramics. So, all other things being equal, it makes more sense to choose it.
Lightweight blocks for construction made from porous ceramics have good characteristics, but may have cracks, which do not contradict GOST. Some manufacturers change this material without problems. Others don't consider it a marriage
Everything is so, but there is one problem. Ceramic block is a type of brick. And according to GOST, non-through cracks are allowed in brick if they do not affect the strength. This is true for solid brick. The presence of small cracks on one side is not considered a defect and does not affect the quality of the masonry in any way. But if there is a crack in one of the faces of the ceramic block, it will obviously not be as strong. Second. When one of the faces is broken, it diverges and the sides are no longer parallel. It is hardly worth using such a block in masonry, although technically this is not a defect.
Foam block
Characteristics
Photo of foam block
This type of cellular concrete appeared on the construction market quite a long time ago and immediately gained popularity. This was achieved thanks to good properties, which we will talk about later.
Foam concrete is made from simple ingredients, which are cement mortar, sand and a certain amount of water. To impart the desired qualities and structure, a foaming agent is added to the final product.
Production workshop for the production of foam blocks
Some types of foam concrete also contain additional ingredients, such as clay, fiber and even ash. These components are designed to add the characteristics of brick to the quality indicators of the foam block.
To give a competent answer to the question of which is better: foam block, building brick or aerated concrete, you need to consider the advantages and disadvantages of each of these products.
Let's start with the properties of the foam block:
Comparative characteristics of some materials
- Environmental friendliness. These products are completely safe for health, as they are made from natural ingredients.
- Moisture resistance. The foam block resists moisture quite mediocre.
- Durability. The service life is estimated at many tens of years.
- Density. This value is 700 kg/m. cube
- The thermal conductivity coefficient is equal to 0.18. This is a low indicator that allows you to retain heat in the room.
- Weight. The foam block is very light. The mass of a square meter of wall made of this material is 700 kg.
- Fire resistance. This product is classified as non-flammable.
- Price. The price of cellular concrete is reasonable and less than that of many building materials.
Application
Foam block masonry
Foam block is quite common in construction. It is used both by private developers for the construction of country houses and in urban construction. Quite often, foam concrete is used for monolithic pouring, where it is turned into blocks directly on the construction site.
The relative cheapness of this building material and good quality indicators expand the scope of its use. The only limitation on its use is basement floors and foundations. This is explained by the poor moisture resistance of foam concrete.
Project
In order for the construction of the structure to be successful and the result of the work to please the builder, it is necessary to draw up a project. It will help to take into account the nuances of construction in advance, reduce time costs, excess material consumption, and allow for rational distribution of finances.
First of all, it is necessary to determine the appearance and functional purpose of the gazebo.
Its design, size, and materials used depend on this. The full project includes:
- Drawings or sketches showing the main elements of the gazebo;
- List of basic and auxiliary materials that are necessary for work;
- Tool;
- Estimate – calculation of construction costs.
Despite the possibility of making additions and changes, the concept of the structure should be thought out in advance - this will greatly simplify the work. You can order a gazebo project from professionals, find a ready-made one on the Internet, or develop it yourself.
The photo shows an example of a project for a gazebo: