Where is it used?
This type of lighting is designed for use mainly during the dark period of the day. If necessary, other types of lamps that create artificial light can serve as emergency lighting. The standards and parameters of the luminous flux of these lighting devices must coincide with the working, emergency and evacuation types of lighting.
The emergency light is turned on only outside working hours, when all work processes are completed at production and other facilities. During this period, the bulk of people have already finished work, and only a small number of employees remain on site. Therefore, duty lamps are intended mainly for those places where maintenance personnel are constantly located. These are warehouse, utility and technological premises, as well as repair and maintenance areas.
The lighting control system can be additionally equipped with motion sensors, allowing for maximum optimization of the lighting process, increasing the energy efficiency of lamps, and significantly saving energy. The standby mode is approximately 10-15% of the nominal lighting value. Some types of luminaires have the ability to transition from standby to normal operating state. This happens when a motion sensor is triggered when people, vehicles and other foreign objects appear nearby.
How to install a track system
Another undeniable advantage of bus lighting is ease of installation. If you are doing repairs from scratch, then everything is simple: the voltage output is thrown and the bus power is connected to it. If you decide to replace the existing ceiling light in the room, you will need to take a few simple steps to replace it with a busbar lighting system. First you need to remove the old lamp. Then attach the track to the ceiling (usually with self-tapping screws, or plumb bobs and hanging cables). After this, you need to connect the installed system to the power supply. It's best to hire a qualified electrician if you're not sure you can do it. Now all that remains is to install the lights on the bus in the right places and the bus lighting system is ready for use. You will be able to move and turn on the lamps exactly the way you want, and create a lighting scheme that is comfortable for you. Below, using the example of the Paulmann U-rail track system, you can familiarize yourself with the stages of installation of track lights.
Salt lamps
If just dim light is not enough for you, but you want some other effects, then you can look towards salt lamps.
We won’t go into details about whether they really have a healing effect; this has been debated on the Internet for several years. But we must admit that such lamps look very unusual.
Moreover, their shape can be not just in the form of a stone, but also have an original design. They emit a natural warm light of a yellowish tint.
Such lighting creates coziness and provokes a feeling of warmth, even in a cool bedroom. This is not a cold blue shade with an incomprehensible color rendering.
Conclusion
Any advice on lighting a room, without a detailed floor plan, furniture arrangement and color design, is doomed to failure. Therefore, in our article we only outlined the basic requirements and focused your attention on important aspects.
At the same time, if you draw up a floor plan, right down to arranging books on shelves, then the most correct and convenient lighting system will be clearly visible. The main thing is not to overdo it with decorative elements. After all, everything in lighting should be in moderation.
Installation of LED strip around the perimeter
Self-adhesive tape is best suited for this case; it can be attached to or above the baseboards. When selecting materials, it is necessary to take into account that manufacturers make 5 m tapes with different diodes and power consumption. It is not recommended to connect more than two tapes to one power supply. Therefore, it is necessary to carefully calculate the length of the perimeter, the number of tapes and power supplies of appropriate power. For a perimeter of 20 m you will need 4 tapes and 2 power supplies; the number, brand of diodes and power consumed by the tape are indicated on the label. LED strips are classified according to many criteria:
- LED brand;
- color - there are single-color with one crystal or colored with 4 crystals: white, blue, red, green (RGB). Tapes with multi-color diodes can be connected to a program control unit, setting time parameters for changing brightness and color gamma;
- supply voltage can be 12, 24 or 36 V;
- by the number and size of diodes;
- and other signs.
At home, floor-mounted night lighting is often powered by a 12 V unit. SMD 5050 strips with 5 mm diodes, 30 pcs/m, create a moderate level of illumination.
Appearance of various models of LED strip, indicating cut locations and terminals with polarity for connection
Calculation of the required power supply power
A 5 m long SMD 5050 tape containing 30 diodes/1 m consumes 7.2 W/1 m;
7.2 W x 5 m = 36 W. Two tapes consume 72 W, which means you will need a slightly larger power supply, safety factor 1.25 x 72 W = 90 W. For a 20-meter perimeter you need 2 such blocks and four tapes.
Installation sequence
- The protective film is removed from the tape, the diodes are glued along the baseboard or above it.
Mounting the plinth with strip lighting
- It is recommended to use plastic skirting boards with cable channels where the wires are hidden.
- The power and control unit can be placed under the floor covering.
- The switch and program control panel are installed on the wall, the remote control is not tied to a specific location.
Simple, reliable and economical. Don’t forget, the floor lighting strip must have a moisture protection rating of IP65 or IP68; insulate the wire connections with sealant or heat-shrinkable tubing. Then the assembled system will work for a long time, creating cozy night lighting in the apartment and ensuring safety when moving in the dark.
Objectives of decorative lighting
Decorative lighting does not replace the main one - it becomes a stunning addition. The main goal of designers is to make the design of rooms more expressive.
It is important not to overdo it when implementing ideas. You should immediately decide what is best to highlight with light: walls, decorative elements or furniture.
You can combine different lighting effects in one room. Dynamics, color, shimmer - winning solutions for creating a unique interior.
Beautiful lighting in the room
Follow the style
Lamps should still fit into the interior and decorate it, especially today, when there are so many designer chandeliers in stores that look like sculptures. There are manufacturers who specialize only in Art Deco style lighting, for example, or who only make children's lamps. It's always best to go straight to an expert in the field you need. But remember that the number of decorative details, material and color of the lamp will affect the quantity and quality of light, so try to maintain a balance.
Photo by ReRooms
Which option to choose depending on the type of ceiling
The type of lighting fixture depends on the materials from which the ceiling is made.
Concrete floor
For such a budget finish, all overhead models are suitable. You will have to abandon the mortise devices, since there is no room for them in the ceiling. The perimeter of the room can be illuminated with an LED strip if you install a plinth with a groove for this device. Concrete ceilings are one of the few materials that are not afraid of incandescent light bulbs.
If you want something unusual, you can make a lamp that imitates a window. To do this, attach a box to the ceiling, the bottom of which is covered with ice tape. The front part is covered with translucent glass or film, possibly with a pattern.
Stretch ceiling
In this case, any type of lamp is suitable, although mortise models are often preferred. But for such devices you will have to additionally install embedded platforms, which are available in several standard sizes. If the purchased lighting fixture is larger in width, length or diameter, the part is made independently, which complicates the process and affects the cost of the work.
Incandescent lamps are not used for suspended ceilings. But the range of lighting elements is still quite wide:
- Halogen . Power limitation is up to 35 W. It is better to choose models with an aluminum reflector, since a mirror one can transmit some of the light. As a result, an areola is formed, through which communications hidden in the interceiling space are visible.
- Energy saving (luminescent). These bulbs heat up less, but contain mercury and therefore require special disposal. For suspended ceilings without a chandelier, devices of any power are suitable. It is also necessary to take into account that these models are economical only when working for a long time. If you turn them on and off frequently, their service life will decrease. Wear accelerates because the electrodes are sprayed faster, and first the luminous flux is lost, and then flashing occurs and the device stops working. The same thing happens with frequent power outages.
- LED . These bulbs heat up the least, so the power for vinyl trim is not limited, provided that the driver does not allow the device to heat above 60°C.
Any LED panels with a reliable heat removal system and overheating protection are also suitable here. Very often this type of finishing is combined with LED strip - they create “floating” and “luminous” ceilings, false windows, lay out various patterns, use them with perforated canvases and photo printing.
Hanging plasterboard
Since when installing gypsum boards, an inter-ceiling space is formed, mortise models are often used. However, here too it is better to avoid incandescent lamps, as they can damage the material.
Unlike suspended ceilings, there is no need for inserts for spotlights. The strength of drywall allows them to be attached directly to the sheathing. The exceptions are heavy overhead models and track systems. They are fixed to the frame or to the concrete floor through a plasterboard finish.
LED strip is in demand here too. With its help, niches, ledges, and transitions between levels are highlighted. Thanks to such accents, the boundaries seem to be erased, all massive elements lose weight, and the space visually expands.
Multi-level structures
The type of luminaire for multi-tiered structures depends on the material used. Most often, several types of electrical appliances are installed. So, for the lower tier, they usually take recessed lamps or thin diode panels; the transition between levels is decorated with LED strip, which not only decorates, but also adds lightness and volume to the structure. An interesting solution when the entire protruding tier is turned into a luminous ceiling.
Sequence of installation of spotlights
Typically, spotlights are mounted in the corners or perimeter of the room, in the vertical surface of the steps. This arrangement emphasizes the contours of the room and successfully highlights all objects, creating comfortable conditions for movement. It is very convenient to use a switching circuit with a motion sensor, this reduces energy costs. Considering all the requirements listed above, buy lamps that suit your interior, decide where the lighting network will be powered from, where the switch will be and how many wires will be needed. After this, installation work can begin:
- The wiring is laid before the floor covering is installed: boards, plywood, chipboard, laminate, tiles or other elements.
- In wooden coverings, the wires are placed between the joists, and taps are made in the places where the lamps are installed. Calculate them so that they extend 10–15 cm outside the front covering for convenient connection of the lampshade.
- As installation proceeds, holes of the required diameter are cut at the locations of the lamps.
- For ceramic tiles, it is recommended to lay the wires before pouring the concrete screed, making bends. In the places where the lamps are connected, install plastic or metal landing capsules for the lampshades, and insert the ends of the wires into them. After this, you can pour the concrete screed solution. The capsule assembled with the lampshade should protrude above the screed to the distance required for laying the tiles.
Then the front plane of the floor and the lantern will be at the same level. This technology will save you from drilling holes in the concrete screed with a special cylindrical bit with diamond bits.
Floor spotlight in capsule
- All contact connections of the wires are hermetically insulated with silicone or heat-shrinkable tubing.
Heat shrink tube fixing process
- After installing the wiring and laying the floor covering, spotlights are connected to the ends of the outlets and attached to the floor.
Spotlights in tile floor
Lighting scenarios
Lamps are selected and placed based on how the room will be used. There are no universal solutions. The scenarios depend on the functional areas, lifestyle and requirements of the apartment owners.
- In the living room they usually relax, watch TV, and read. As a rule, bright general light is not needed here: it invigorates, not relaxes. But still, the lighting should be solemn: holidays are celebrated in this room and guests are received. Therefore, as a rule, it is decorated more elegantly than other rooms. Soft general lighting will be provided by built-in or pendant lamps. Decorative items are also needed: they will decorate the interior and create the necessary mood.
- In the bedroom they relax, read, watch TV, and change clothes. This is an intimate part of the apartment; comfort and harmony in the interior are important here. You can place dim lamps near the bed, spots or spotlights near the closet, and illuminate the mirrors. Bright ambient light helps you wake up in the morning, so it's worth adding that too. Decorative lighting - optional.
- The nursery should have a lot of light. General lighting is required, and working lighting is required in areas for relaxation, study and play. Decorative - optional: garlands and night lights will make the room more comfortable.
- The kitchen illuminates the work surface and dining area. General light is not necessary, especially if the kitchen is small: built-in lamps along the furniture, lighting above the countertop and a pendant or wall lamp above the table are sufficient.
- In the hallway, the lighting should be bright: there are rarely windows here, so you need to compensate for the lack of sunlight. Built-in lamps are chosen as general lighting. They can be supplemented with a chandelier in the center of the ceiling if the room is large. Working lighting will also be needed: sconces or lamps near the mirror, cabinet lighting.
- In the bathroom you need general lighting and directional lighting (near the mirror). Sometimes built-in shelving is illuminated for beauty.
- The toilet only needs general lighting. Directional is unlikely to be useful, decorative is optional.
Thoughtful scenarios help determine the number and location of lamps. They are marked on the plan of the future interior immediately after the furniture: this way each light bulb will find its place.
Let's look at lighting scenarios using the example of a studio apartment. There is one room here, but it is divided into zones: bedroom, living room, kitchen, dining room, office. The apartment also has a dressing room, hallway and bathroom.
The role of general lighting was played by a track structure on the ceiling in the center of the room. The lamps can be directed where more light is needed - for example, at the workplace.
Track lighting around the perimeter and pendant lamp behind the sofa / Project author: Tatyana Vasilyeva
Each zone has directional lighting: in the kitchen there is lighting above the countertop, in the bedroom there is a sconce, there are pendant lights above the dining table and sofa, and a floor lamp at the desk. They are included as needed.
Lighting above the kitchen countertop, lamp above the dining table / Project author: Tatyana Vasilyeva
Decorative lamps were provided near the bed. They provide soft, dim lighting. Convenient if you want to watch TV before bed.
We decided to place sconces and decorative lighting in the bedroom area / Project author: Tatyana Vasilyeva
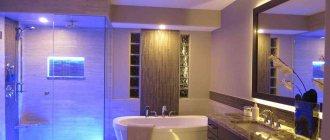
Only general lighting was left in the hallway and dressing room. These are small rooms where you don't need too much light. In the bathroom we decided to assemble a multi-level ceiling and install lamps in it. A mirror with built-in lighting was provided.
Three-level ceiling in the bathroom / Project author: Tatyana Vasilyeva
It turns out that for every action of the apartment owners there is a lighting scenario: you can read in bed, have dinner in the cozy light of a lamp, watch TV comfortably, apply makeup or shave in front of the mirror in the bathroom. The work areas are sufficiently lit to make them comfortable to use. The light can be adjusted to suit your mood: bright for entertaining guests, dim for a relaxing environment.