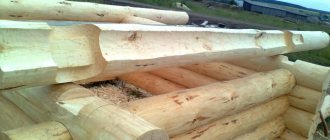
Our country is rich in forests, so wood for the construction of residential buildings has been used by our ancestors since ancient times. Log houses were assembled from logs, beams, carriages. Methods for joining elements at corners have been refined over centuries. One of the popular methods is claw cutting, in which the ends of the elements do not protrude beyond the corners of the log houses. When using profiled beams for log houses, only this method is used.
Varieties of making jaw joints
- Direct connection . Can be one-sided or two-sided. In the first case, grooves are cut or cut at the ends of the beams to the length of the cross-section of the element and to a depth equal to half its thickness. In the second option, the grooves are selected from the top and bottom of the element to a quarter of its thickness. The fastening of the crowns in the corners is done with wooden dowels made of hardwood. Fastening occurs in holes drilled in a staggered pattern. The spikes must fit tightly into the hole, for which their diameter is chosen slightly larger than the holes themselves.
- Dovetail . The paws in such joints are made with a slight inclination. The middle part of each is fixed between the upper and lower legs in the form of a wedge. The connection turns out to be stronger and more reliable, but the most difficult to execute. Sloping surface shapes provide the structure with additional stability, but the inclined surface makes it easier for moisture to penetrate into the corner during rain. To avoid negative consequences, high-quality additional waterproofing is required.
- Connection with an additional spike , called a cut. Cutting corners into a paw with such joints is more reliable than described above, but is more difficult to perform. At the internal corners of the frame, a tenon in the form of a protrusion of about 2 cm and an area of up to a quarter of the area of the notch is left on the top part. A groove is hollowed out in the lower element for this protrusion. The fit of the notch into the groove should be tight without the slightest possibility of displacement of the connection. Assembling a log house is reminiscent of a children's construction set. With high-quality execution, a tight fit of the crowns without displacement is ensured.
Regardless of the method of execution, when cutting a log house into a paw with your own hands without sufficient experience in carrying out such work, it is recommended to follow the golden rule: initially, cut down to a slightly smaller size than the required size. If the cutting exceeds the required dimensions, it will be impossible to correct such an omission, and it is not difficult to fit the connection tightly, removing the excess after fitting.
Peculiarities
Logging in the paw is most often used in the construction of wooden houses than other types.
This can be explained by its advantages such as:
However, with all its advantages, this method is not without some disadvantages, namely:
However, these shortcomings can be easily eliminated by a competent approach to performing the work, strictly following the stages of construction, and observing all the subtleties and features of the construction of such a structure.
When erecting a log house in a paw, it does not hurt to resort to the help of special technical documentation - GOST 30974-2002. It clearly states what joint sizes are recommended for logs of a particular diameter.
Material selection
For any log houses, it is recommended to use coniferous wood with natural moisture, felled in winter, preferably from the northern regions. Pine is the cheapest, larch and cedar are more expensive, but stronger and more durable. The trunks must be even along the entire length and of the same size.
Removing bark from all sides of logs is done using a special tool called a scraper. You can also remove the bark with an ordinary shovel with a cut off spout and a sharpened bottom edge. It is unacceptable to remove the bark mechanically, using power tools, chainsaw attachments or grinders, since the upper layers of the main wood will be damaged along with the bark. After which the workpieces are stacked with spacers for ventilation and covered with roofing felt. Drying lasts ≥ 6 months.
The timber must be dry, free from visible cracks, mechanical damage, falling knots, rot and mold or mildew.
Joining the timber with the remainder
The easiest way to join timber in the corners of a log house is “into the floor of the tree”. A rectangular groove is cut, the dimensions of which depend on the thickness of the timber and are: The depth of the notch is half the thickness of the timber. That’s why it’s called “half a tree”.
We suggest you read: How to quickly dry firewood at home
Connecting the timber in the corners with the remainder - in half a tree, in a fat tail, in an okhryap
The “tail tail” method is distinguished by the presence of an additional tenon, which provides a stronger and more reliable connection, but requires more carpentry skill. More difficult is connecting the timber into an okhryap. Here you cannot make a mistake when calculating the width of the jumper, but it is much easier to implement than on a log: the geometry here is standard and you can use a template, which significantly speeds up the work, and then an error can only occur when cutting.
There are several types of connection. Traditionally, “half-tree” and “paw” are used for bathhouses and houses. They differ only in shape. Half a tree has smooth, parallel edges. It's easy to implement. When joining the timber “into the paw”, the shape of the tenons is made trapezoidal. It is a little more difficult to perform, but there is less chance of through holes occurring.
Joining a beam in a corner without leaving a trace: in half a tree and in a paw.
There are several other types of butt jointing of timber. They are not very reliable and do not provide proper tightness, although they are economical in terms of material consumption. They are rarely used for residential buildings, mainly for the construction of outbuildings.
A simple butt connection occurs with alternation. This makes the angle stronger. For reinforcement, you can use steel plates or knock down the beam with long nails at an angle.
Butt joint of timber
There are also methods for butt assembly with dowels of different shapes.
Another method of construction: using frame-timber technology. Then, in the corners and at the joints of the timber along the length, a vertical stand is placed with grooves formed in the required planes. At the ends of the beam, a spike is formed into the appropriate shape. When laying, you have to “put on” each element from above.
The advantage is that you can mold all the studs according to a single template, and then simply assemble everything like a construction set (not forgetting to lay inter-crown insulation). The connection turns out to be airtight and quite reliable, moreover, the joint itself is not visible and the appearance is very attractive.
Connecting timber using panel technology: quickly, warmly and reliably
Marking when chopping a log house into a paw
It is possible to cut down log houses efficiently only if the ends of the beams or logs are correctly marked. It is recommended to choose timber of the same section; with increasing thickness, the house will be warmer, since this reduces the number of corner joints. When using logs, the element with the smallest thickness at the end is taken as a sample and the rest are adjusted according to it. In order not to work with each end individually, it is recommended to make a template from thick cardboard or plywood for chopping into a paw, which will allow marking by applying the template to each end.
Markup includes the following operations:
- careful trimming of elements;
- drawing a horizontal line along the center of the log from each end, checking with a laser level, marking its middle;
- Having attached the template, two vertical lines are drawn, spaced by the width of the template from the center, control is carried out using a vertical building level;
- a strong thread is stretched along the outlined lines of the cheeks of the paws, along which the longitudinal parts of the cheeks are drawn with a length equal to the diameter of the log;
- According to the markings made, the cheeks are cut out, checking the correctness with a template, which should fit tightly, but without much effort.
After cutting all the logs into a paw and carefully adjusting them, a control assembly is carried out on a flat area away from the foundation, and kept assembled for several months. To ensure a tight fit of the logs, a longitudinal groove is developed at the bottom of the upper rims, into which jute tape or tow is placed during assembly. Using an electric planer, the surface of the logs inside the log house is processed, trimming them, cutting off knot protrusions and sharp bends. Each element is subject to marking, according to which it will be possible to perform final assembly.
After this, the knot protrusions are processed with an electric planer. If there are sharp bends or protrusions on the log, then they are aligned.
Ready-made kits made of timber with cut-out paws and markings for the assembly order can be purchased at specialized bases.
Cutting logs with corners without residue
As we said earlier, the corners are colder without any residue, but they allow you to significantly save on building materials.
Angle "to the paw"
Among the joints of logs in the corners, the “paw” method is popular. It is easy to implement, and at the same time provides high strength and reliability of the connection. Also, the presence of inclined cuts makes it possible to achieve high tightness. The method has been tested for a long time, even GOST standards have been developed: size tables for each log diameter (see photo).
Table of foot joint sizes for different log diameters
All dimensions are plotted relative to the found middle of the log and a vertical line drawn from it (it is drawn using a plumb line).
Connecting logs without leaving any residue.
Angle into the paw The order of work is as follows:
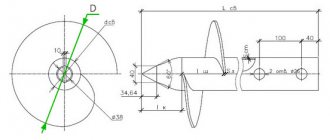
- Find the length of the cut part (called the block). It must be no less than the diameter of the largest log available (in the figure it is marked L). We set this value aside from the edge of the log (let it be 250 mm), draw vertical lines in these places. They will be the boundaries of the idiot.
- Let the diameter of the processed log be 200 mm. From the middle line, 1/2 of the value of A is set aside. D for a 200 mm log is 141 mm. We divide this value in half and put it on both sides of the center. We draw vertical lines.
- We trim (cut with a chain saw). As a result, you should get the same picture as in figure a).
- We take the appropriate dimensions from the table and mark them on the block.
- We trim off the excess (cut it off). The result should be a figure like in Figure b).
This is what the angle from the logs into the paw looks like (dovetail due to the fact that the connection is in the form of a trapezoid)
All logs are processed in this way one by one. As you can see, the dimensions depend on the diameters of the logs. In order not to have to worry about drawing every time, they make templates from thin plywood according to the diameters of the logs that are available (they label them). Then, having found the middle and made a block, they apply and trace a suitable template. With this order of work, there is less chance of making mistakes, and chopping bowls takes less time.
Construction of a log house
Scope of work:
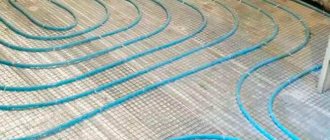
- Construction of the foundation. The log house is lightweight, so there is no need for massive foundation structures. Most often, columnar or shallow-depth tapes are used. Waterproofing of surfaces in contact with the ground, if necessary, installation of insulation. Backfilling with drainage soils.
- The supporting lower crown is laid on a horizontal waterproofing made of two layers of waterproofing. The first two elements are laid strictly parallel, the next 2 logs are laid perpendicularly on top of them. The resulting rectangle is carefully leveled using a laser level.
- Installation of the following links with a tight fit of the paw connection. Tow is used during assembly.
- After assembly is completed, longitudinal and corner seams are sealed. The wood is treated with fire retardant and antiseptic preparations.
- Finally, the corners are insulated from the inside with modern heat insulators.
After completion of the assembly, the frame is kept for a year, protected from precipitation, after which the cracks are re-caulked and further work on the roof installation and finishing work is carried out.
- Wall kit