Number of views: 2,192
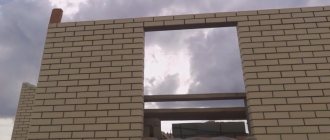
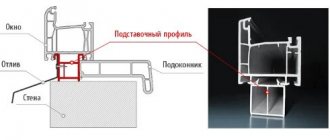
The foundation is an important part of any house; it bears all the load. It is necessary that the foundation maintains its strength and integrity. The part of the foundation that protrudes above the ground is called the plinth.
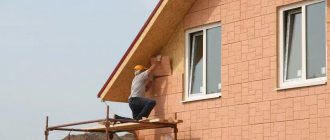
Finishing the base is an important stage of façade cladding. In this article we will look at options for finishing the plinth with various materials. By choosing the one you like, you will not only decorate your home, but also protect the foundation from premature destruction.
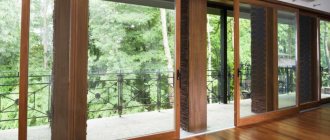
Window design without slopes
Siding on windows without slopes.
Photo No. 12. If the window has no slopes and is located on the same plane as the wall, the cladding technology is slightly different: platbands or a wide J-profile are used.
- First we need to know the width of the window frame. Then - the width of the platband.
- After this, we take the platband, which will be placed at the bottom of the window opening. On it we measure the width of the window frame + two widths of the casing. If the width of the frame is 90 cm and the width of the casing is 4 cm, then we need to measure 90 + (4*2) = 98 cm. Then the excess part of the casing is cut off.
- From each end of the casing you need to measure an angle of 45° (the mark can be made with a pencil or chalk). Then, using this mark, you need to cut off the outer part of the panel.
- The same measurements and trimming must be done with the platband, which will be attached at the top of the window opening.
- The side trims are measured using the same principle, but there is no need to cut them at an angle.
- After the preparatory work, the lower casing is mounted on the sheathing under the window opening. Then you should secure the side strips one by one, inserting their edges into the inside of the lower casing. This way there will be no gap between the panels.
- The final stage is the installation of the upper casing.
!
Expert advice.
Covering a window with siding is usually done before the installation of ordinary panels begins.
H-profile fastening
The H-profile is designed to connect siding planes in the longitudinal direction. Its installation is no different from the installation of internal or external corners, it is carried out simultaneously with them and is subject to similar requirements.
The only caveat may be the location of the H-panels, which can be installed symmetrically, distributing the length of the panels into equal sections, or, to save material, using the full size of the panels on one side and trimmed parts on the other.
Most often, the first option is used on the front sides of the house, and the second - on the reverse, invisible sides.
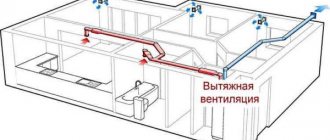
When is thermal protection required?
An urgent need to install additional protective elements arises in cases of non-compliance with the fire-safe distance between the stove and the surfaces adjacent to it.
At an unsafe distance, the infrared radiation released when heating sauna stoves hits the walls and is not scattered. This leads to damage to wooden surfaces or a fire hazard in general.
The safe distance between the wall and the heating structure depends on the material from which it is made:
So the distance from the wall to the stove:
- made of brick - 35 cm;
- made of metal (without interior decoration) – 100 cm;
- made of metal (with interior decoration made of brick or fireclay tiles) - up to 70 cm.
In small rooms where it is not possible to maintain a safe distance from the wall to the stove, it is more rational to install a protective screen or casing.
Let's start finishing step by step instructions
Finishing window slopes with siding from the outside is not a complicated process, however, to successfully carry out this work you need certain tools:
- hacksaw;
- hammer;
- square;
- level;
- pencil;
- roulette;
- screwdriver or screwdriver;
- self-tapping screws
Preparatory stage
High-quality finishing of windows from the outside with siding requires certain preparatory measures.
They include:
- removal of decorative elements;
- cleaning old plaster;
- removal of old wooden structures;
- removal of communications - wires, pipes, drains, etc.
An example of lathing and finishing profile arrangement
Naturally, you also need to remove a variety of large objects - air conditioners, antennas, etc. It is also recommended to clean and dry the surface.
Such preparation is especially important if, in addition to windows, you plan to veneer the entire facade.
Frame installation
If you want to know how to add siding around a window, then be prepared for the fact that you won’t be able to make cladding without creating a sheathing.
It is necessary for at least two reasons:
- for simplicity and reliability of fastening the material;
- to ensure surface leveling.
This is what the frame looks like
To create the sheathing, one of the two materials below is suitable:
- wooden beam with a section of 4 by 6 centimeters;
- metallic profile.
The frame elements are attached at a distance of approximately twenty centimeters from each other in a vertical position.
Arrangement of insulation
When installing siding, finishing windows involves installing insulation, which will protect not only the window frame, but also the entire house from the negative influence of cold air and sudden temperature changes.
For insulation, it is recommended to use polystyrene foam, which is attached using dowels with wide, round caps.
Sealing cracks with sealant
Since even with the help of insulation you will not be able to avoid the formation of small cracks, prepare a sealant that will improve the waterproofing properties of the entire structure.
If you are covering a façade
And although the article is devoted to the topic of how to decorate a window for siding, we cannot help but talk about exactly how to decorate the facade of a house. Since quite often complex cladding of the entire structure is carried out.
Well, the most important thing is that self-tapping screws will allow you to perform fastening according to all the rules, which means a small space for the panels to “walk”, which will prevent damage to the panels during their thermal expansion or contraction at different times of the year. Installation of siding is installed strictly from the bottom up and not vice versa, and when you reach the window openings, be prepared to cut the panels
Siding installation is done strictly from the bottom up and not vice versa, and when you get to the window openings, be prepared to cut the panels.
Cladding of window slopes
According to experts, finishing windows with siding involves arranging drainage, which will protect against the negative effects of moisture:
- window;
- frames;
- walls;
- insulation.
The following can be used as drainage:
- special drainage;
- plastic pipe cut in half.
The drainage system is secured as follows:
- cut the pipe to the required length;
- bend it along the edges;
- this will create a border;
- the structure should be located at a distance of about five centimeters or much more from the wall;
- Apply a little foam to the protrusion under the frame;
- apply the dewatering device and press it into the foam until it hardens;
- wait until everything hardens and additionally secure with self-tapping screws.
The side panel slides under the top
After the drainage system is secured, you can begin installing slopes, which will be small strips of siding:
- the side parts are inserted under the top ones;
- to ensure the tightest possible connection, the tongue of the top panel is cut at an angle of 45 degrees;
- It is recommended to treat the joints with sealant.
It is also worth installing aluminum flashing, which will protect the walls and windows from moisture.
Low tide installation example
Such installation will ensure the maximum level of insulation, protecting the structure from moisture penetration
As you can see, the essence of arranging slopes is exactly the same as facing walls - the only difference is that you need to pay special attention to the joints
Finishing arched windows with siding will also not cause problems - you just need to create a sheathing in the shape of an arch.
Method No. 2: semi-rigid paving slab path
A semi-rigid path lined with paving slabs is installed in a similar way; in fact, the only difference here is the absence of a reinforced concrete layer. The arrangement technique is approximately as follows:
- We start, as usual, by digging a pit, the average depth of the pit is 30 cm. But in a semi-rigid structure, it is advisable to immediately place curbs so that the tiles do not slide down the slope;
- We dig a small recess under the edges of the borders. On average, the dimensions of a curb stone are 1000x150x300 mm (length/width/height), plus there should be a sand and gravel cushion of 100 - 150 mm under the stone. The stones are placed immediately in the finishing room, on mortar and with spacers;
Semi-rigid blind area with drainage.
- In a semi-rigid structure, it is very desirable to equip the bottom layer with rich clay. With good compaction, clay is a fairly dense material and must be immediately made with the designed slope;
- A waterproofing layer is installed on top. I do not recommend using polyethylene here, it is too thin. In an economical option, you can use roofing felt; if you have enough money, you can take a modern roll waterproofing material, for example, TechnoNIKOL. If you can’t cover it with one roll, then lay it overlapping and coat the joints with bitumen.
The waterproofing should extend onto the wall just above the top edge of the blind area. Ideally, it is better to place it under the final finishing of the base and do not forget about the damper layer between the foundation and the path;
Filling the path with sand.
- Waterproofing, no matter how good it is, is still not able to withstand large point loads, so a small layer of sand up to 50 mm is poured on top and leveled;
- Now you can fill in the crushed stone. In semi-rigid structures, a layer of crushed stone of 50–70 mm is sufficient;
- It is, of course, better to separate sand from crushed stone with geotextiles, but this is more a recommendation than a rule;
- On top, the crushed stone is covered with another similar layer of sand, about 50 mm thick. Please note that this layer of sand must be compacted especially well and leveled at an angle, since we will be laying paving slabs on it;
Laying rectangular tiles.
- The technology for laying tiles is not complicated. You will need a flat board about half a meter long and a rubber hammer. Insert the tile into place and tap it with a hammer. The next tile is laid side by side, but it will be slightly higher than the previous one. Therefore, you will need to place your plank on top of both tiles and tap them with a rubber hammer until the second tile is in place, the plank serving as a leveling pad;
- As in the first option, the gaps between the paving slabs will also need to be filled. They are filled using the technology already known to you in 2 stages, but cement is not used here, only clean, dry sand is used.
Window trim with slopes
Slope preparation
Primer of slopes. Photo No. 8.
Before finishing the window opening, it is worth checking the condition of the slopes. If you see cracks and chips, they should be repaired and plastered.
It is recommended to treat repaired slopes with a waterproofing penetrating primer. It will protect slopes from moisture, mold and harmful microorganisms.
Window trim for siding
Lathing with wooden slats. Photo No. 9.
Window trim for siding is an important element when covering a facade with siding panels. It needs to be arranged at the very beginning of work. For this, wooden slats or metal profiles are used.
The profiles are installed vertically in increments of 30–40 cm. The profiles are also mounted closely near window and door openings.
Exterior window siding
Low tide installation
Low tide on the window. Photo No. 10.
This element protects the window frame from rainwater. Mounted below on the outside of the window. It can be plastic or metal. Installed like this:
- To begin, measure two indicators: the width of the window opening and the width of the front part of the window strip. How to correctly measure the required distance at low tide:
- Using a tape measure, measure half of the casting and mark this location with a pencil.
- Let's say the width of the window opening is 90 cm, and the width of the strip is 3 cm. In this case, we measure 48 cm in each direction from the middle of the low tide and put the appropriate marks.
- Then cut off the excess parts of the flashing.
- Make cuts on the sides of the ebb and bend the side plates up.
- The area between the window frame and the ebb should be treated with silicone sealant.
- A low tide is installed in the opening. Using self-tapping screws, it should be attached to the window support profile. The side bends of the ebb should extend onto the slopes and sheathing. The bends are also attached to the sheathing with self-tapping screws. The tilt angle of the tide should be approximately 10°.
- All joints must be treated with sealant.
- The area under the ebb is sealed with mounting foam for sound and heat insulation. While the foam is drying, the ebb can be pressed down with a weight to prevent the expanding foam from lifting it up.
!
Expert advice.
Exterior finishing of windows with siding can be done without installing drip lining. Sometimes it is enough to cover a window with platbands or near-window strips.
- Installation of finishing strip. Needed for attaching window trim. The finishing strip is mounted along the inner edge of the window. In our case - on the sides and top. The strip should fit closely to the window profile.
- A window strip is built into the finishing strip. The other end of the plank is attached to the sheathing. There are holes along the edge for self-tapping screws. With their help, the bar is screwed to the frame. !
Expert advice.Do not tighten the screws too tightly. It is necessary to leave a gap of 1 mm to avoid deformation of the material when stretched or compressed.
- The side window strips should overlap the side bends of the ebb.
- The planks can be joined at an angle of 90°. To do this, you need to make cuts where the planks meet and bend the material inward. An alternative option is to join the planks at an angle of 45°.
- If the windows are of standard sizes, the seams can be sealed with silicone. It is better not to do this in large windows, as the profiles may swell under the influence of temperatures.
How to provide thermal protection for bathhouse walls - protective screen and cladding
A feature of modern sauna stoves is their heating temperature, which can reach 400 degrees.
An important indicator of the efficiency of the furnace is instant heating of the body and maximum heat transfer.
The entire heating process is accompanied by the release of infrared radiation, which is distributed on surfaces adjacent to the furnace. Under the influence of high temperatures, the wooden structure of the bathhouse can char or ignite.
This is why it is so important to ensure that wooden surfaces are reliably insulated from the heat of the stove. A protective screen and casing made of fire-resistant materials are suitable for this.
Preparing to install Docke trims
Before starting work, the openings are protected from moisture penetration: waterproofing of window and door openings can be made of aprons made of galvanized steel, aluminum foil or roofing felt (Fig. 22). Additionally, Stroymet specialists recommend the use of silicone sealant.
Rice. 22. Waterproofing of window and door openings: a - flush with the wall; b - protruding from the wall; 1 - sheathing; 2 - silicone sealant; 3 - lower apron made of roofing sheet; 4 - the same, lateral; 5 - the same, upper; 6 - aluminum tape or sealant; 7 - upper L-shaped apron made of roofing sheet; 8 - the same, side
Regardless of what apron material you use, their installation should begin from the bottom strip of the opening.
- Apply silicone sealant to the sheathing. Next, nail the bottom strip of the apron on top of it (fastening with nails along the upper edge of the strip will allow, if necessary, to bend the strip and place ordinary siding under it, thereby ensuring water drainage).
- Having installed the apron on the bottom strip of the opening, proceed to install the side strips. Fastening is done with nails at the same distance from the opening that was chosen when installing the lower apron.
- Complete the fastening of the top strip by installing the apron.
Important: All waterproofing elements must be installed on top of each other - this is the only way to ensure normal water flow. If the waterproofing is not mounted flush with the wall, but along the protrusion of the sheathing of the opening from the wall, you should use L-shaped aprons made of roofing sheet with a narrow edge extending over the entire thickness of the sheathing
The latter are fastened in compliance with the rule: the side aprons cover the bottom one, and the top one covers the side ones.
If the waterproofing is not mounted flush with the wall, but along the protrusion of the sheathing of the opening from the wall, you should use L-shaped aprons made of roofing sheet with a narrow edge extending over the entire thickness of the sheathing. The latter are fastened in compliance with the rule: the side aprons cover the lower one, and the upper one covers the side ones.
Important: Under no circumstances should the siding backing/profiles be attached directly to the window/door unit. In this case, when replacing a window or door, you will be forced to partially remove the siding.
How to protect the walls of a bathhouse from the heat of a stove - technologies and materials
When planning the construction of a bathhouse, it is important to remember to create safety indoors. First of all, this concerns fire safety. By melting the bathhouse, the stove can be heated to 300-400°C, which significantly exceeds the combustion temperature of the wood from which the bathhouse is most often built.
All the heat from the stove is released into the room, but the main heat is absorbed by nearby walls, which leads to their charring and fire. It is extremely important to avoid such consequences, so in this article we will tell you in detail how to insulate a stove in a bathhouse from the wall.
Features of installing siding around windows
Since the architecture of each house is individual, window openings can be completely different. The finishing of window slopes with siding and its features depend on the configuration of the window.
There are three main types of window arrangement relative to the walls:
- The windows are recessed into the wall by five to nineteen centimeters;
- The window opening is located on a wall without slopes;
- The window slopes are more than nineteen centimeters;
- Arched or lancet window openings.
Naturally, the installation of siding in each of these options will be different.
Slopes around window openings are less than nineteen centimeters
Since, according to European building codes, slopes are no more than nineteen centimeters, the window strip has a standard size - up to twenty-two centimeters.
To attach the window strip to the frame, a finishing profile is used, into which the window strip is inserted. Finishing a window with siding yourself using a window trim is not a complicated process at all.
If desired, the window strip can be replaced with cheaper fittings - a chamfer and a J-profile (as we can see, this fastener can be used in almost all window finishing options).
Slopes around windows are more than nineteen centimeters
But construction standards in Russia differ from European ones, so the slope around the window and doorway can be significantly greater than nineteen centimeters. In this case, finishing windows with siding involves the use of external corners, which are mounted around the perimeter of the window opening.
A universal J-bar is placed near the frame, and an outer corner is placed around the perimeter of the window opening. The slope is decorated with siding panels cut to size, which are inserted into the grooves of the fittings around the window opening.
Windows without slopes
The easiest option for installing panels yourself.
For finishing, you can choose a platband with a width of 6.2 centimeters, then the emphasis will be placed on the window openings in the design of the facade. First, the platband is installed, and the finishing panels are inserted into it.
If the design involves an inconspicuous window trim, then it is better to choose a narrow J-profile for attaching siding around the windows. When finishing window openings with siding is done independently, then it is quite possible to choose the option that suits you in terms of cost and decor.
Arched or lancet windows
Siding manufacturers recommend using a flexible J-profile for finishing arched windows, but it can be replaced with a standard one. When installing, you just need to cut it a little, placing it around the window opening, as shown in Figure 6.
On the Internet you can find many photos and videos with step-by-step instructions for installing siding around window and door openings
Therefore, let us pay attention to the most basic principles that should be followed when installing material around windows
Useful information is contained in the article.
Plastering
This is a classic and the most common design option for a doorway. This method probably originated back when the very first front door was installed. A slope finished with plaster will serve faithfully for many years without complaints. The material is not afraid of temperature changes, damage, and plaster will perfectly hide and fill all the unevenness of the end of the wall (no other material can compare with it in this regard). Using this material you can achieve a perfectly flat plane at the end of the wall.
Plastering slopes - a method proven over the years
You can paint the plaster for beauty, cover it with wallpaper, or put some kind of pattern on it. In general, there is a lot of scope for imagination here. The main disadvantage of this method is the appearance of a large amount of dirt during the work. Also, the disadvantages include high labor costs, and it will also take time for the material to dry. If you have no experience working with plaster, then it is recommended to carefully study this issue or even invite a specialist - working with the material is not easy for a beginner.
Advice! In order for the slopes to look finished, after plastering they need to be sanded and puttied.
Plastering slopes
Prices for popular types of plaster
Plaster
Rules that cannot be ignored
Siding installation rules
- You only need to purchase galvanized screws, as they do not rust from moisture.
- Screw the fasteners at right angles; any distortions reduce the strength of the structure.
- The holes for self-tapping screws have an oblong shape, ensuring the mobility of the fasteners when expanding. Do not tighten the screw completely, leave a gap of 1 mm.
- The gaps between the profiles allow the structure to expand without problems when heated.
Installing siding near window openings is a complex area of cladding; to know how to properly complete the finishing, you can watch the video tutorial.
Installation of Docke siding profiles near windows
The Docke window profile can be used to frame openings with slopes up to 200 mm deep (taking into account the thickness of the sheathing). This profile can be used to frame almost all windows and doors, if they were installed according to the standard.
The window siding profile is still the same platband, the only difference is that a vinyl slope is attached to the profile, which can be used to cover the slope of the wall near the window or door. The technology for installing near-window profiles is similar to the technology for installing platbands, but with a slight difference:
- the slope part of the near-window profile is cut differently than the casing;
- A finishing strip must be attached around the perimeter of the window, in which the slope part of the profile is then placed;
- special notches are made in the slope part, ensuring reliable fixation of the strip along the entire perimeter of the window.
The wall part of the near-window profile is trimmed according to the recommendations for trimming the casing. The process of trimming the slope part, as well as installing the profile, is carried out as follows: it is necessary to install the upper and lower strips, followed by two side ones (Fig. 24).
Trimming elements:
the vinyl shelf forming the slope in the upper plank is cut to the length of the upper slope of the opening, subtracting from the length of the element the amount of temperature gaps that should be made on both sides of the profile;
Important: The size of the gaps depends on the length of the inil profile. The gap will allow the plank to expand freely as the ambient temperature increases: the panel will not rest against the side slopes, and therefore the profile will not warp
When installing the panels, take into account the current air temperature: the lower it is, the larger the gaps should be left. And vice versa: installation of profiles in hot weather requires minimal gaps or, alternatively, they may not be made at all.
The marking of the lower profile is carried out similarly to the upper one, however, this time no cuts are made along it - the “excess” material is folded onto the slopes of the walls (and you can do the same with the upper profile - do not cut the material, but bend it onto the walls).
Installation of ebb tides is not necessary - it is replaced by the lower window strip.
Installation progress:
- Installation of side profiles. To do this, it is necessary to rest the top of the side slope against the upper slope (the lengthening of the side bar is practically not observed, so the elements can be mounted end-to-end). The temperature gap is left only between the lower edge of the side slope flange and the lower profile flange. Since the ends of the lower profile were bent to the wall, the gap at the junction of the slope shelves will be invisible.
- To install side slopes, first the left panel must be moved to the right towards the center of the opening (approximately 10...12 mm), then the right panel - similarly to the left. Thus, narrowing at low air temperatures, the upper slope will not fly out of the upper fastening unit.
When performing work on windows of standard sizes, Stroymet engineers recommend filling the seams with sealant. Silicone will allow the parts to be glued to expand when the ambient temperature changes. Often this reserve is sufficient. But on large windows, the seams should be left unchanged - this way the profiles will not swell during expansion caused by temperature changes.
Briefly about pricing
Not every owner wants to swing a shovel and pour concrete with their own hands; some prefer to pay the craftsmen and forget about the problem. Just for such people, I have compiled a small table with an indicative list of works and prices for these works from hired workers.
| The cost of work on arranging the blind area. | |
| Type of work | Price for invited workers |
| Dismantling the old structure, if any. | 65 – 75 rub/m² |
| Marking the path around the house. | Up to 500 rub. |
| Excavation of soil with a depth of up to 600 mm. | 300 - 350 rub/m² |
| Construction of a clay hydraulic lock. | 100 - 120 rub/m² |
| Waterproofing or geotextile flooring. | 40 - 50rub/m² |
| Arranging a layer of sand up to 50 mm thick with a tamper. | 80 - 100rub/m² |
| Backfilling and compaction of crushed stone or gravel up to 100 mm thick. | 80 - 100rub/m² |
| Installation of storm water inlet and installation of drains. | 250 - 300rub/m/p |
| Pipe laying. | 50 - 70 rub/m/p |
| Pouring imported, ready-made concrete. | 300 - 350 rub/m² |
| Mixing concrete by hand and pouring. | 650 - 700 rub/m² |
| Total estimated cost. | 1200 – 1500 rub/m² |
Path made of sea pebbles.
The simplest window finishing option
The materials you will need are platbands and universal Alta-Profile slopes. The procedure will be as follows:
- Installation of the corner slope element. One end of the element is inserted into the starting strip, the other is attached with self-tapping screws to the sheathing. Corner elements allow you to easily connect slopes and platbands without the need for trimming. Installation of the corner slope element. Photo No. 13.
- Installation of slope. 15 cm are sawn off from the universal slope along with mounting fasteners. Then it is connected to the corner element with the cut part. The other side is attached to the next slope - and so on until the entire perimeter is completely finished. Joining a universal slope with a corner element. Photo No. 14.
- After completing the installation of the slopes, the corner element of the platband is installed. It needs to be inserted into the mounting groove of the slope angle, and the other end attached to the sheathing with self-tapping screws. Installation of the corner element of the platband. Photo No. 15.
- Platband installation. On one side of the plank you need to saw off 6-8 cm along with the mounting fasteners. The sawn-off side of the casing should be fastened to the corner element. On the free side it joins with the next platband. This is how the perimeter is completely finished. Platband installation. Photo No. 16.
We tell you more about how to finish windows using Alta-Profile materials in the video:
Basic information about door installation and design
In general, finishing the front door includes three stages:
- threshold design;
- finishing of slopes;
- installation of platbands and additions.
Types of door frames
All this work is carried out after the installation of the door leaf itself. As for the threshold, it must be strong enough and resistant to various types of loads. It is usually made of wood, metal, concrete. These types of materials are much more stable than the now so common PVC and can last for many years until the next door replacement.
As for platbands and extensions, they are usually used to achieve neatness in the design of the doorway. Thus, they help to hide imperfections and irregularities when the physical parameters of the wall and the very door frame that is being installed do not match. Without them, the door will look crooked and sloppy. Quite often, these elements are made from MDF, and then you don’t have to think about leveling the slopes themselves with putty. The voids between the extensions and the wall are simply filled with polyurethane foam.
Accessories for interior doors
On a note! Platbands and extensions will also help protect the door from subsidence that may occur in the future.
The slopes are finished after the door is installed. This can be done in various ways:
- sheathing;
- finishing;
- plastering.
Finishing the entrance door slopes
The last option is considered the best, as it allows you to achieve ideal evenness of the end of the wall and seal the doorway. Also, if you use your imagination, you can create an interesting unique design. And excess dust will not accumulate on top of the finishing materials.
Find out how to insulate an iron entrance door from the inside with your own hands in a special article on our portal.
Prices for various types of door frames
Door frames
Installation of additional elements
General diagram of installation of the starting bar and external corner
First, install the starting strip - place it 4 cm above the level of the siding. Subsequent starting panels are mounted with a gap of 5 mm. These gaps are needed to avoid overlaps. An end strip is installed under the cornice.
To prevent precipitation in the form of rain and snow from entering the corner joints, a special sealant is used. This material is attached with a self-adhesive side to the sheathing, and is fixed on top with siding.
After installing the additional elements, you can begin. Installation of panels should begin from any corner of the building. The bottom row is attached with a lock to the previously installed starting bar - subsequent rows are attached to the previous ones in the same way, using lock connections. Do not forget to control the horizontality of the planks using a building level.
Equipment
Additional elements
Here are the parts included in the cladding kit:
- Narrow long panels are the main element from which the cladding is assembled.
- The corner is external, usually 3 m long.
- The corner is internal, has the same length.
- The starting plank, into the protrusion of which the lowest cladding panel is placed. Installed above the plinth and above window/door openings. Typically 3.8 m long.
- J-section plank. This part covers the ends of the panels if the cladding is open. For example, if the siding is not installed along the entire perimeter, or there is an extension adjacent to the house, which it was decided to leave unfinished. In addition, the J-plank is used as a frame for gable trim, and if desired, it can also be used as a finishing strip.
- Planks with T-shaped and H-shaped sections. They are used to design joints between siding panels - mainly when extending them along the length. The length of one part is 3 m.
- Near-window slats. They are used in cases where windows and doors are recessed into the wall. Length - 3 m.
- Platbands. They are used for finishing openings, the filling of which - a window or a door - is located in the plane of the outer surface of the wall.
- Window tides. Before purchasing, you should make sure that you have not already installed them: these parts are usually supplied complete with metal-plastic windows.
- Drain plate. An additional accessory designed for installation above a window.
- Wind board.
Sheet coverings
Such solutions include the familiar drywall of the appropriate variety, labeled as fire-resistant, as well as sheets made of a special material - mineralite. Both types of finishes will perform their function perfectly, but have one significant drawback - they do not look particularly beautiful. Therefore, such a design usually involves external decor.
It can be done in several ways. You can simply paint the surface with a special heat-resistant paint or line it with a material that is resistant to high temperatures. Most often, this is artificial or natural stone, porcelain stoneware, ceramic or terracotta tiles. An air gap between the fireproof sheet and the wall surface will increase the efficiency of the structure.
Structures recessed into the wall
Window strips are ideal for cases where the window is recessed into the wall, but not too deep. Thanks to the use of planks, slopes can be closed. After this, the near-window strip is placed in the hole of the finishing profile. When joining planks on elements located vertically and which are connected to the slope, special cutouts should be made. Be sure to cut and bend horizontal elements. After this, finishing the siding around the window can be considered complete. Various design solutions used when installing windows have their own installation nuances.
If the window is recessed deep enough into the wall, then there is no need to use near-window strips. For this type of construction, only small pieces of wall panels are used. When installing, use a corner. Installation can be done using a special ebb. Its edges must be cut and folded under the vertical elements. To increase the reliability of fastening, be sure to use sealant.
Installation of siding on windows is carried out in the following order:
- First of all, a J-profile is attached around the perimeter.
- After this, the pre-prepared panel elements are installed on the walls.
- At the end, corner profiles are installed.
When installing, you should follow rules similar to the general installation of siding panels. Each connection must have a gap of 0.5 cm
Arched windows
This type of structure looks elegant, but its finishing gives owners some difficulties. Installing siding on arched windows is complicated by the fact that there is a curved part at the top of the structure. Usually for finishing they take a J-profile, which itself is quite flexible. But usually its cost is much higher than that of a regular profile. Because of this, they often buy not the J-profile, but its cheaper analogue. To do this, you need to make several cuts in the standard profile, which will be made on the mounting part, and then bent to create the required radius of curvature.
Alternatively, you can replace the arched opening with a polygonal opening. The design of an arched window should be done using the same technology, but the profile cutting should be larger. The convenience of bending the J-profile will largely depend on the material of manufacture. If we are talking about metal, then it will yield much harder than the same plastic. Creating an arc requires a radius of curvature, and vinyl siding is ideal. To make it easier to create a bend, first warm the material well, but do not overuse it - plastic melts easily.
If you take into account all the recommendations and rules, you can finish the windows quite efficiently and quickly. This will make it possible to save energy and time. If the cladding material is installed correctly, the window will look very beautiful.
When it is necessary
When designing the space around a source of elevated temperature, you need to take some points into account. First of all, this concerns the distances at which it is necessary to place the firebox itself from the structures enclosing it. After all, different types of finishing have different properties and characteristics, which will reduce the required distance and increase the usable area of the room.
- If the distance between the brick stove and the wall is less than thirty-two centimeters, special design of the wooden walls will be required.
- It is recommended to leave at least a meter of free space from wooden surfaces before metal heaters.
- Lined fireboxes require a shorter distance - only seventy centimeters, which, however, is also a lot.
If the firebox is located further away, then you will only have to worry about protecting the floor. It is covered with refractory material directly under and near the heating device, in the area where the firebox door opens. Sometimes falling coals can cause a fire and the surface must be reliably protected.
External window trim with plastic
The use of sheet plastic allows finishing work to be carried out as quickly and accurately as possible. The panels have an aesthetic appearance, they are durable and practical.
They do not require additional finishing, since they are ideally combined with the material of the frames and form a harmonious and complete solution in tandem.
Advantages of PVC slopes:
- long service life;
- extensive color palette; low thermal conductivity;
- no condensation forms;
- resistance to moisture and mold formation.
Weaknesses of plastic:
- the need for replacement in case of damage - cannot be restored;
- low noise and heat insulating properties.
Types of siding for windows
There are two types of siding for framing windows: vinyl and metal.
Of the two, vinyl is the most popular. And this is due to a number of factors:
- Less weight
- Affordable price
- Does not allow moisture to pass through
- Easy to clean
- Durable when used correctly.
- Aesthetic and neat.
Whereas metal siding can boast a long service life.
Considering that it is installed on the outside of the wall, it is deliberately covered with a layer of plastic.
However, it is easy to create various kinds of reliefs on plastic. Including repeating the shape of the wood.
Tools that may be useful for window framing
- Screwdriver and attachments for self-tapping screws.
- Metal scissors.
- Knife for cutting vinyl siding. Basically, it doesn't cut. They draw a line along the siding, and then break off the outer piece.
- Hammer.
- Tape measure, rulers and corner ruler.
- Laser or water level.
- Chalk for marking.
It is better to purchase all profiles and fasteners immediately along with the rest of the siding.
Because then you may not guess with the color. If the windows stand out a little, it's not so bad. But it’s visible.
We create a drawing and mark the following points on it:
- Width under frame
- Slope width
- Window frame parameters
- External sides of slopes
After calculations, add another 15% of the length of all materials for cuts and bends.
Installation features
1. Self-tapping screws must be made of stainless steel or galvanized.
2. Self-tapping screws must be screwed in only at right angles.
3. When screwing in the screw, the cap does not need to be embedded in the material. Since this is an external design, there should be some play. Otherwise it will come off under the influence of the wind.
4. If you plan to install a flashing, it should bury all the screws with the side.
5. Slopes from 20 cm are formed with a j-profile, tiles and external corners at the edge of the recess.
6. In Europe, windows are recessed to a depth of 20 cm. For these, a special window strip is used, the edge of which is hidden by the finishing profile.
7. If the window is flush with the wall, it is decorated using siding, platband or j-profile.
8. When designing an arch, a j-profile is also used. Often in a plastic version - for smooth bending.
Preparing slopes for windows
If there are cracks or holes, they must be plastered. If this is not done, the finishing will then disappear.
You also need to coat them with a deep penetration primer so that they do not absorb moisture from the air.
Before installing the sheathing, you need to calculate where the batten will be. It can be located vertically or horizontally.
Depending on how the panels and profiles will be located on the slope.
1. Measure the bottom of the frame
2. Set aside a distance on the platband equal to its width. From it measure a distance equal to the bottom of the frame. And also another segment equal to the width of the casing.
3. Cut off 45 degree corners on both sides and cut off the front side.
4. The side panels go through the same procedure.
5. The top bar remains intact.
9. You can alternate platbands and j-profile.