When decorating the interior of a bathroom, you want to do everything as beautifully as possible. When installing plumbing fixtures, it is almost impossible to avoid the small gaps that remain between the fixture and the wall. Bathroom curbing is considered a quick way to seal and fill gaps. After installing the element, the bathroom will look complete and attractive. Curbs differ in the type of material and installation technology.
Bathroom curbing is a quick way to seal and fill existing gaps.
Design advantages
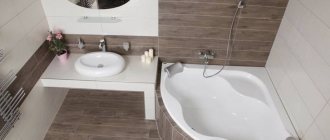
Such bathtubs are mounted in the corner of the bathroom with both sides close to the walls. The line of contact between the sides of the structure and the wall is reliably sealed to prevent water leakage. The standard kit includes a drain grate with a tee, an overflow grate, a support, a siphon and a mixer.
Thanks to its shape, a corner bathtub will look great in both small rooms and large areas, decorating the interior and optimizing the use of space.
A corner bathtub in a bathroom is not just an original design solution. Often this is simply a necessity given the given apartment layout. Among the advantages of this model are:
- high level of comfort when organizing hygiene procedures;
- ergonomic design;
- ensuring unobstructed access to equipment and accessories installed in the bathroom;
- original design;
- effective spatial zoning of the premises;
- the ability to install additional options, such as hydromassage systems, lighting, shelves, etc.;
- the presence of two options for installing a washing container - left-sided and right-sided with adjustments to the method of installing the mixer and drain.
Preparing the walls
The planned major renovation of the bathroom implies that it will be freed from various devices and equipment, after which it is possible to carry out step-by-step preparation of the surface for its further leveling. The first thing you need to check is the condition of the wall decoration in the bathroom. To do this, remove old tiles that may be on the walls. The easiest way to accomplish this task is to use a hammer drill, in which you can attach a chisel in a fixed position. After removing the tiles, if there were any, use a small hammer to tap the entire surface of the walls. If in some areas the sound is dull and cracks appear, this indicates that the plaster has already begun to peel off and requires removal.
Plaster should be removed in the same way as tiles. A hammer drill with a chisel will do the job perfectly. The first step is to create a small chip, which will serve as a starting point. If the plaster is in good condition, which was revealed by a ringing echo when tapping a hammer, then there is a need to determine the existing difference in surface level. An ordinary plumb line, a rule with a level, or a laser level will help with this. When using a plumb line, just select any point closer to the ceiling and place the thread parallel to the wall in the bathroom. If the gap is uniform, then the wall has a fairly smooth surface. The rule will need to be applied in several places, monitoring the position of the bubble or the gap between the wall and the rule. With a laser level everything is somewhat simpler. It is enough to project a line parallel to the wall and take measurements from it to the wall at various points.
Note! When laying regular tiles, a difference of 10 mm to the height of a standard wall is allowed, which is quite easily leveled with a layer of glue under the tile.
If the wall is at a suitable level but has finishing in the form of paint or similar material, then this will need to be removed. To do this, you can use a grinder with a grinding wheel or a special grinding machine with sandpaper. This is done in order to achieve good adhesion between the tile adhesive and the wall surface. Paint can be a problem in this regard, as the adhesive may peel off from the surface after drying. If there are large plaster deposits, they can be carefully corrected with a hammer drill.
Shapes and materials
When you come to any plumbing store, you are presented with a huge selection of corner baths. But which one should you choose? Let's look at the materials from which they are made.
Steel. Such corner baths are relatively cheaper than those made from other materials. Their service life is up to 15 years. Even though they don't sell very well right now, you can still find them and buy them.
Cast iron. They have proven themselves quite well. Their long service life (up to 20 years) speaks for itself. But the huge disadvantage of these baths is their high weight. Now they are slowly but surely starting to disappear from sales.
This is due to the complex technology of cast iron smelting. It is worth noting that even if you find such a bath, its cost will still be incredibly high.
The new materials have a big advantage over cast iron, so it's best to skip this option.
Acrylic. A large selection, low price and high-quality material are the main characteristics of corner bathtubs made of this material. Service life up to 15 years. An excellent choice for anyone who wants to place a bathtub made of this material in their bathroom.
But do not forget that acrylic needs to be used carefully (it reacts extremely poorly to high temperatures and chemical mixtures). As a last resort, you can send it for restoration.
If you don’t want to make a mistake with your choice, then buy an acrylic bathtub.
It is worth noting that the manufacturer, in the fight for the client, can greatly diversify the range of components for the bathtubs themselves. For example, he can add some items from this list:
- control panels;
- massage devices;
- possibility of changing the power of water jets;
- soft pillows at the head;
- sensors for measuring water temperature.
The manufacturer provides a huge number of different modifications that will make your corner bath not only a place for washing, but also a wonderful relaxing pastime. But it is worth understanding that for these components, the manufacturer can significantly raise the amount for corner baths.
Acrylic
The most common type of corner structures, due to reliability, high thermal insulation properties and affordability of the material. The surface of the bath is smooth and pleasant to the touch. The water does not rattle as it gets into it, and cools down slowly (in half an hour at 1C). Acrylic bathtubs are quite lightweight, so they can be used in old-type buildings with dilapidated floors. Their service life is 10-15 years.
Today you can find improved models of acrylic bowls based on quaril on sale.
Stone
Stone products mean bowls made of artificial stone. Unlike their natural stone counterpart, such devices are lighter and safer. They have antibacterial properties and do not have background radiation. They maintain water temperature well and are pleasant to use. Modern products made from stone chips are stronger than marble, while imitating the surface of natural stone as closely as possible. Among the advantages of such a product are the variety of shapes and colors, durability.
The disadvantages are heavy weight and high cost.
Metal
Metal bathtubs usually come in steel and cast iron options. Both models are gradually leaving the plumbing market. Iron bathtubs are durable, retain heat, but at the same time they rumble when water falls, and they are cold to the touch. The cast iron version is heavy and expensive. Their service life is on average 30 years.
Steel ones are lighter and cheaper, but less durable.
Plastic
Plastic structures can be used in small spaces, but only if the bowl is rarely used. Such limitations are associated with the low strength of the material and its tendency to deformation and cracking at subzero temperatures. In this regard, plastic bowls are installed extremely rarely in city apartments.
A corner bath can have different shapes, but all the diversity comes down to 2 types:
- symmetrical;
- asymmetrical.
The first has 2 identical sides, usually it is represented by a triangular or trapezoidal shape, as well as a quarter-circle design. This option is preferable for small spaces. An asymmetrical bathtub has different side sizes and usually means enough free space. It looks interesting, but it is not always possible to fit it into the standard bathrooms of typical apartment buildings. If the bathroom has a complex configuration (for example, niches), you can try to find a suitable model.
An asymmetrical bathtub can be right-sided or left-sided. This is due to the presence of shelves and recesses for more convenient placement in the bowl on one side or another. The corners of the bowl can be sharp or rounded. The second type is preferable due to its safety. Today, even miniature models can be equipped with a hydro- and aeromassage system, have a shower panel, a glass door or a vinyl curtain.
External corners
The most popular type. Used when facing external corners. The sizes on sale are mainly 7, 9, 11 mm (with a length of 2.5 m). One side is a groove for tiles, the other serves as decoration and protects the slabs from impacts and chips. The hidden part is perforated for better adhesion of the tile layout and ceramics. Decorative elements are produced from:
- plastic;
- aluminum;
- brass and other materials;
Decorating the end of the tiling near the window in the kitchen using a plastic layout.
Installation of corners
Tile profiles are installed when one of the two walls forming the outer corner is ready. Sometimes trims (layouts for tiles) are left until the end of the work. This happens under unforeseen circumstances: there are problems with delivery, there is a defect, etc. However, such a situation requires the tiler to have advanced qualifications and more serious calculations. The slightest inaccuracy can lead to refinishing or resignation to flaws.
When moving on to the next wall, a tile layout groove is placed on the back side of the finished wall. The product must match the size of the tile. The tiles will not fit into a corner of a smaller format, and a larger trim will force you to use more glue and will dangle.
To start laying the next wall, and the corner for the tiles does not slide, it is attached with tape or tile adhesive is used. The perforated side should be parallel to the tile to allow the perpendicular ceramic to lie tightly and evenly. Be sure to fill the joints with glue - voids deprive the structure of its functional meaning. Without a trained eye, it is better to spend time squeezing out excess mixture than to accept the hollowness. The video shows the installation of the layout using the example of a difficult place - slopes with a double outer corner: https://www.youtube.com/watch?v=b-9JPxPx2ks
Trimming corners
If the ceiling is suspended and rests on tiles, cut the layouts to match the tiles; do not leave yourself or others the need for further trimming. The installation of trims in the area of door and window openings (or in similar situations) deserves a separate discussion. To position the elements perpendicularly, you need to cut their edges at an angle of 45 degrees. Do this very carefully, otherwise there will be gaps or profiles for the tiles and will not lie without bends or burrs.
Trim at 45 degrees at the junction of 3 corners.
Corner repair
It happens that you no longer like the layout for the tiles, or maybe the profile for the ceramic tiles was damaged. In such cases, repairs are needed, but how to remove the trim, much less install a new one? This is a tedious task, but doable:
- Carefully, so as not to damage the tiles, cut off the old outer corner for the tiles;
- prepare a new one;
- trim the back of the trim;
- if necessary, level the area under the profile without touching the space under the tile;
- use liquid nails or silicone to glue the layout;
Types of corner bathtubs for washing
2021 ideas offer a wide range of options for corner bath placement in modern bathroom design. The dimensions must correspond to the area of the room so that when installed, the sides are completely adjacent to two or three walls of the niche.
Therefore, the shape of the bathtub is often selected not so much according to the taste preferences of the owners, but rather according to the parameters of the width and length of the walls. The depth for all is standard and practically no different from simple rectangular ones (about 600 mm).
According to the type of modifications, there are: adjacent, built-in (in a platform), Jacuzzi or combined. Non-standard designs are always more expensive, most often made of light acrylic, but they attract with their mobility, space saving and wide range.
The shapes are symmetrical triangular or semicircular, asymmetrical and 5-sided corner. They most often have an anatomical shape, additional armrests, headrests, handrails and shelves for cosmetics.
Jacuzzi
For some people, there's nothing better than soaking in a hot bath at the end of a long day to relieve stress and tension. In fact, many homeowners are remodeling their bathrooms with the idea of creating a modern home spa with a corner bathtub.
Obviously!
Choosing the right Jacuzzi comes down to finding a model of the required dimensions with all the possible and desired functions.
They are:
- air-jet;
- water jet;
- ultrasonic;
- combined.
The nozzles can be rotated in different directions to target different muscle groups in the body. The choice of water temperature varies depending on the health condition and the desired therapeutic result.
An innovative technology is chromotherapy, which is illumination with a different spectrum of colors for comprehensive healing and relaxation of the body.
Cold whirlpools (10 to 26 °C) are useful in the treatment of acute inflammation. Warm jets (26–34 °C) are used to relieve muscle pain and sprains.
Neutral (34–36 °C) are usually prescribed for the treatment of long-term non-healing wounds or for circulatory disorders, cardiac or neurological changes in muscle tone.
Hot streams (38-44°C) are useful for relieving pain, increasing soft tissue flexibility and treating chronic conditions such as arthritis.
As a rule, the temperature of the hydromassage should not exceed 47 °C due to the risk of burns. A standard Jacuzzi can be the same size as any corner bathtub 150x150 or 180x180 cm. For a small apartment, a mini version of 130x130 cm is ideal.
Combined with shower
This layout idea makes the most of a small bathroom space, making it a wonderful 2 in 1 corner bath. The modern design, combined with a shower stall or sink, leaves enough space for all the elements to fit into the small space.
A protective screen or sliding doors are located near the shower column and serve as aesthetic protection from splashes. For some brands, the door is located much lower than the side, which helps to avoid injury.
On the platform
One advantage is that built-in platform bathtubs come in a variety of intricate designs, with plenty of space on the sides (both on the edges and on the face) for a variety of toiletries. Most of them have backs and armrests for a comfortable rest.
Interesting!
The edges of the bathtub can coincide with the height of the platform or cover it from above. Special steps are convenient for people with disabilities who find it difficult to raise their legs high to step over the side.
An unusual appearance requires additional investments and more space, so this option is rarely used in apartments. In addition, the large weight of the structure requires the presence of a good reinforced concrete foundation, which is usually provided only on the first floor of buildings.
A corner bath will become the focal point of any modern bathroom. Before purchasing it, you can look at many photos of design ideas for 2020. It's not hard to find one that suits your personal taste preferences.
They are available in both classic and more minimalist styles. Traditional classic surrounds may include painted white beaded or dark wood panels.
Add to favorites Print version Share: Author: admin Published: 02/18/2020
Installation technology for a ceramic bath border
Ceramic borders consist of straight, corner and end elements. The number of straight elements is calculated based on the size of the bathtub/shower tray, corners and ends; standard placement requires two for a bathtub; for a shower tray, there can be one corner. Take the number of straight elements with a small margin - for trimming.
It is advisable to inspect all elements before installation. If there is a need (they are not joined accurately, there are differences in thickness, etc.), the back side can be slightly improved with a file. It is better not to use an angle grinder - the chance of doing more harm than correcting it is too great.
Layout options
Installation methods
The method of installing a ceramic border depends on the finish of the wall and the size of the gap. If it's tile, you can use waterproof adhesive. If the tiles are embossed or the wall is simply plastered, installation with adhesive does not provide the required level of tightness. In this case, install a ceramic bath border using a special tile adhesive for wet rooms. It is sold in bags in dry form; before use, a certain amount is mixed with water until smooth.
Colors can be different, but more often they use white - to match the color of the bath
Sequencing
The whole process consists of a sequence of steps:
- The surface is cleaned of deposits and dust. If there is mold, remove it, treat the wall with an antibacterial compound, and let it dry.
- If the gap between the bathtub and the wall exceeds half the width of the existing curb, it must first be sealed. It’s better to make formwork from below and fill it with cement mortar. The second way is to attach moisture-resistant gypsum board in two layers. If the shelf turns out to be large (more than 5 cm), it must be made with a slope. Maybe about 5%. This way you can use the shelf (put something on it) and the water will not stagnate on it. If necessary (if the border does not cover the entire wall), the tiles used to decorate the walls are first laid, and then the installation of the ceramic border for the bathtub continues.
- Start from one of the corners. Set the angle, then two adjacent straight segments. A layer of glue is applied to the back side of the border and leveled. It is installed in place, pressed, and leveled.
- Then continue laying to one side. End elements are installed on the sidewalls.
A ceramic baseboard for a bath can be like this
The process of installing a ceramic border for a bathroom is not much different from laying tiles. The actions are the same. It is necessary to align the elements in two planes - so that both the edges and the plane go smoothly and without differences.
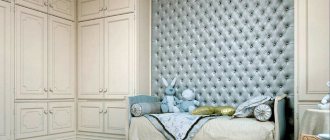
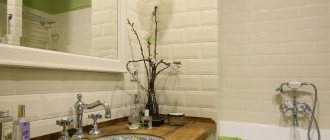
Design ideas
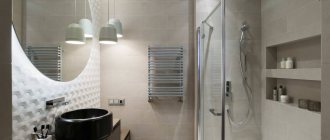
Corner baths can have different designs, fillings and designs. A small bathroom with a shower is very functional. The most practical way to protect furniture and finishes from water is to fence off the bathtub with glass doors or use curtains. Sometimes in the same room you can see both a bathtub and a free-standing shower stall.
The photo shows the interior of a bathroom in a classic style with a corner bowl combined with a shower stall.
The backlit model looks original and aesthetically pleasing, adding romantic notes to the setting. A bowl with many shelves serves as a functional piece of furniture, while a luxurious corner bathtub with glass looks modern and adds lightness to the interior.
The photo shows the interior of a bathroom, where everything is aimed at comfort and relaxation.
Particular attention should be paid to the corner bathtub on the podium: in a classic style, such a design looks majestic and monumental. Since a diamond-shaped or semicircular podium requires a lot of free space, the room must be spacious.
The photo shows a multi-level podium with a corner bath and shower.
Skirting boards for the bathroom, recommendations for selection
When carrying out renovation work in a small bathroom, the optimal solution is to install the bathtub on the floor close to one of the walls or in a corner. In any case, the junction of the wall surface and the side of the bowl will need to be carefully closed using a special device. Let's talk further about how to choose the most reliable and durable bath skirting board.
Characteristics
When renovating a bathroom, it is very important to take care of every little detail so that the interior is not only beautiful, but also highly functional. Thus, experienced specialists strongly recommend closing the gap that forms between the side of the bathtub and the wall to which it adjoins.
After all, after taking a shower, droplets of water condense on the surface of the tile, which gradually falls down the wall into a gap over the side of the bathroom onto the floor. This provokes rot, fungus and mold, which negatively affects the bowl and shortens its service life. Also, this phenomenon is a direct threat to the health of family members. Installing a plinth on the side of the bowl will help prevent this from happening. This is easy to do with the help of a special border, which helps seal the gap between the wall and the side of the bowl.
https://youtube.com/watch?v=RBLyQmudePI
Functions
In the bathroom, every little thing should be in its place. After all, sometimes even a tiny accessory is invaluable. This also applies to bathroom baseboards. Such a device performs a number of important functions:
- A ceramic bath skirting board mounted on the tile will reliably protect the joint from excess moisture. It is characterized by high rigidity, wear resistance, does not bend and has a long service life. But you cannot drop heavy objects on such an accessory, otherwise it may crack;
- technical borders have a seal, sealing the seam. They will become an obstacle to the development of fungus, rot and mold. This is an excellent solution if there are small children in the house, whose health must be taken care of with special care;
- flexible plastic plinth for masking and sealing the gap between the bathtub and the wall, PVC floor border and ceiling molding perform a decorative function. Such an element will not be conspicuous, violating the integrity of the room’s design. Quite the contrary, it will give the interior completeness, conciseness and attractiveness;
- a border installed on the floor in the bathroom allows you to hide the wires inside the product. The bathroom floor in this design looks complete and neat.
If your bathroom skirting board is of high quality, all of these features will last for the life of the border. A low-quality or too cheap option will eventually lose both its visual appeal and high functionality. This is why experts recommend refraining from purchasing borders of dubious origin.
Requirements for baseboards in the bathroom
To cope with the functions assigned to it, the baseboard in the bathroom must have the following characteristics:
- the tiled border must be 100% waterproof in order to reliably protect the joint from mold, rot, moisture and fungus;
- such products should have high resistance to the rotting process, which is provoked by water in the joint;
- Also, curbs for the bathroom must be resistant to corrosion processes, which often occur in the bathroom under the influence of high humidity;
- plastic plinth for floor tiles must demonstrate resistance to household chemicals, so it is very easy to clean it from dirt;
- Such products should have no risk of deformation during long-term use, but there are models that are shock-resistant. Therefore, before purchasing a product, you need to ask the seller about the features of its operation;
- simple installation technology. Most technical curbs have a seal and are easy to install, so they can be installed without problems even by a non-professional builder;
- easy care - this quality allows the product to retain its beauty and functionality for a long time;
- variety of design - thanks to this property, choosing the optimal model for any color scheme, bathroom interior design style is not at all difficult. The classic option is a white border, but you can choose other color models of similar devices. Please note that you should avoid purchasing a plastic version in white, as it may turn yellow unevenly over the years. And if you only need a bathroom border in white, it is better to choose alternative options to plastic.
Material
There are specific conditions in the bathroom: high humidity, droplets of water falling on the side of the bathroom, tiles, poor ventilation, and the like. All these factors have a negative impact on finishing materials, which must be taken into account when selecting them.
The most common options for bathroom skirting boards today are:
- made of plastic;
- ceramic baseboard for the bathroom;
- marble plinth;
- self-adhesive silicone border;
- made of acrylic.
Let's talk about them in more detail.
Acrylic baseboard
Ceramic baseboard
Marble plinth
Plastic skirting board
Self-adhesive skirting board
Plastic
It is a practical solution for the bathroom, because the advantages of PVC products are very diverse: plastic skirting boards are available in all kinds of designs, they are not at all afraid of moisture, and reliably seal the gap from moisture.
On the reverse side of the product there is an elastic band, which is responsible for the tight fit of the border to the side of the bowl. You can install it yourself before or after covering the walls with ceramic tiles. But experienced builders will tell you that the second option is more practical due to the long service life of ceramic tiles. Although, when installing a PVC skirting board after finishing the walls, dismantling it if necessary after the tiles will be problematic.
Ceramics
More expensive in cost than the plastic option. It is also more difficult to install at the junction between the bowl and the wall. But it lasts much longer than PVC, if you adhere to the condition that heavy objects are not regularly dropped on it. Since this can lead to the appearance of cracks and chips on the product, which will reduce sealing. The ceramic border has a very expensive look and is available in a variety of designs and sizes, which allows you to choose the best option for bathroom design in any style. Ceramics does not mold and does not scratch.
It is also worth noting that the ceramic border does not fade when exposed to sunlight, which means that it will not change its color during use.
Marble
It is even more durable than ceramic bath skirting boards. It has a luxurious and expensive look, but the cost of such products is several times higher than the price of PVC and ceramics. Note that a marble border will look as organic as possible in combination with a marble bowl.
This is interesting: Anti-leaking bath corner
Self-adhesive silicone
Self-adhesive silicone bath skirting board is made of polymers. It is distinguished by the simplest installation and low cost, but does an excellent job of sealing joints between a wall and a bowl. Such a border will extend the life of the bathroom, preserve the finish of the walls and floors and give the room a neat and tidy appearance.
To install it, you may only need one pair of hands and ten minutes of time. It is simple in design, often produced in classic colors. It is important to understand that such a cheap option only lasts 1-2 years; after this time, you will have to update the side of the bathroom.
Acrylic
Most suitable for an acrylic bathtub, in which case the marble option would be completely irrelevant. Acrylic plinth has properties similar to such a bowl: it does not deform over the years, does not react with other materials, and does not become moldy. Its installation on a bowl in a bathroom is not very complicated and is similar in technology to the installation of plastic products.
You should not experiment by choosing other options for an acrylic bowl, so as not to waste a lot of money. Make your choice consciously, which will allow you to avoid unreasonable costs and rot at the joint between the wall and the bowl.
Types of skirting boards
These types of similar products are also distinguished based on the location of their attachment.
| Product type | Installation specifics |
| floor plinth | attached to the floor to seal the seam between the base and the wall to prevent the risk of mold and mildew. It performs a decorative function, since in this element some wires and communications can be hidden on the floor. |
| ceiling molding | must be mounted under the ceiling on tiles, which allows you to give the bathroom interior laconicism, completeness and attractiveness. The ceiling molding can have different widths, colors, textures, patterns, so the ceiling looks very interesting. |
Floor plinth
Ceiling plinth
Both of these types are very relevant for the interior of the bathroom and give it greater coziness and comfort. In addition, the installation of such products is very simple and will not cause difficulties even for an inexperienced builder.
Interior features with a corner bath
Buying a bathtub and installing it is the easiest thing. The most difficult thing is to correctly design a corner container. What nuances should be taken into account when designing:
- It is important to respect the material of the product and the design of the walls. Soviet tiles or painted walls will look ridiculous against the backdrop of an expensive and beautiful bathtub.
- When designing, you should start from the shape and type of container.
- Use tiles to design walls and floors. Tiles on the walls can be replaced with beautiful and high-quality plastic panels. But there should be tiles on the floor.
- Sometimes moisture-resistant wood and laminate are used. This design looks very expensive and dignified.
- In small bathrooms, separate the bathtub with a mosaic tile surround.
Types of bath borders and their installation
All bathroom borders can be divided into two large categories, each of which has several subtypes:
- polymer and PVC: plastic (PVC) curbs for bathtubs;
- plastic corners;
- self-adhesive tape;
- foam or polyurethane (ceiling) borders.
Several profiles of plastic bath borders
- ceramic:
Products from the first group are more affordable in price, and they are also easier to install. Ceramic, marble or granite borders are more expensive and difficult to install, but they also look much more colorful. True, the design of the bathroom should also be appropriate.
These can be ceramic or marble
Style selection
To make the room attractive and comfortable, you should decide on the style direction. The design of a small bathroom with a corner bath can vary. It depends on the tastes of the owners and the dimensions of the room.
Minimalism is characterized by a small number of details. All cosmetics and detergent compositions are hidden in special storage systems that need to be provided indoors.
Japanese style is great for small spaces. The decoration may contain an unobtrusive pattern. High-tech assumes the presence of mirror and glass elements in the room, and the use of cold tones.
Art Nouveau is characterized by strict lines, the presence of functional furniture and modern devices. Glossy surfaces that reflect light will contribute to the visual expansion of space.
Finishing
Method nine: protecting corners
Corners are a big place for drywall finishing: they are very easy to damage when transporting furniture. To strengthen the corners, a reinforcing corner is used, which is placed under a layer of putty.
I finish the corners of plasterboard walls, niches and window openings in them a little differently - by gluing a plastic outer or universal corner on top of the plasterboard and putty. The glue used is silicone sealant, which I have already recommended for similar purposes. When finishing an external corner, you can safely apply it to the corner without fear of staining the walls; internal corners require the application of silicone to the surfaces of adjacent walls.
A ten-millimeter PVC corner was used as a edging for the skylight in the bathroom.
How to make sure that the corner does not peel off from the walls before the sealant sets?
- On the outer corners it can be secured with masking tape or thin nails. The holes from the nails will remain, but will not be noticeable, especially if they are covered with acrylic putty;
- In the inner corners, the corner has to be pressed with a board or batten, supporting them with any heavy object.
Internal corner finished with universal plastic corner.
Method ten: towel rack
Using a chrome pipe, a couple of flanges and two corners, you can assemble an elegant and convenient towel dryer. More parts will allow you to assemble a chrome shelving unit or shoe rack. Actually, everything is visible in the photograph: the design is so simple that it does not require any comments.
Towel dryer made of chrome pipe.
Furniture and accessories
You should not purchase bulky items for this room. It is better to order glass shelves or metal products. They will give the room a modern look and will not clutter up the space.
For large rooms, they buy plumbing fixtures and a set of simple and functional furniture. Convenient cabinets and shelves will help you keep your bathroom tidy.
You can choose original models that will fit perfectly into the environment.
A sufficient number of lighting devices should be provided. They are selected according to the size of the room. Spotlights are mounted in the ceiling.
Ceramic borders
It was quite difficult and diligent work: I had to cut small squares from the tiles, which were then used to form the slope from the wall to the bathtub. If the work was done conscientiously, the effect was absolutely decent. Now there is no such need.
In many construction stores, when you buy tiles for a toilet, they can immediately recommend favorable ceramic borders. But often they still have to be purchased separately. When choosing such a frame, you need to work hard so that the border matches the color of the tile itself.
In exceptional cases, you should choose a white border, then merging with the plumbing fixtures, it will not stand out from the uniform design.
In fact, all ceramic products are considered quite strong and hard. And therefore, of all the options that have been considered, ceramic borders will especially last a long time; they are virtually not subject to deformation and can be used without replacement for many years.
But you need to remember about the disadvantages of this option: it has poor resistance to mechanical damage, i.e. with a strong blow, such an object may prick.
In most cases, this kind of trouble occurs when installing ceramics, and already installed borders add to their own hardness the mechanical strength of the wall and bathtub and are virtually invulnerable.
Working with ceramic components requires specific skills, and therefore the best option is to entrust this process to specialists. If, for example, you personally agreed to take on this task, then it will be useful for you to read how to make a border in the bathroom from ceramic profiles (or baseboards).
Features of installation work
To work, you need to purchase the required number of blanks. Buy borders with a reserve (in case of damage), and also calculate how many corner-type elements you will need. You will also need specialized tile adhesive (it must be moisture resistant), sealant and grout. All work consists of several stages:
- Surface preparation. They must be very thoroughly cleaned and dried.
- Sealing the gap. If it is small, you can get by with silicone sealant. If, for example, the gap is large, it is sealed with foam for installation.
- Preparation of glue (according to the rules).
- Laying the border itself. How to glue a ceramic skirting board to a bathtub? Using a spatula, glue is applied to the back side of the parts, and they themselves lie close to each other so that there is no gap. Special corner components are placed in the corners. You need to give it a day to dry.
- Grout. The finished grout removes small gaps between the parts, and also between the wall and the baseboard.
Any of these types of borders has both its own advantages and disadvantages. When choosing an option for yourself, consider the entire interior of your bath. In any case, decorating your bathtub with a border will give it a complete and beautiful look.
How to post?
It is important to consider the location of the bath.
- In a small room, it is best to install a corner bath in the far corner, and the necessary toilet and sink along the longest wall.
- The asymmetrical model is installed, on the contrary, against the longest wall in order to maintain space in the center of the room.
- If your room is square in size, buy a symmetrical font and install it on either side, opposite the sink and toilet.
At what height should the tile border be placed?
In the kitchen I want to put washable wallpaper up to half the wall, and then lay tiles all the way to the floor. At what distance should the tile end, and at what height should the border be placed for it?
In the kitchen I want to put washable wallpaper up to half the wall, and then lay tiles all the way to the floor
The sequence of work is not entirely correct.
First the tiles are laid, then the border (frieze)
The installation height of the curb is individual; there are no rules, regulations, special recommendations, and so on.
You'll have to make a decision based on your taste.
If, for example, the tiles are dark, the wallpaper is light, you want to see the kitchen light, then there should be less tiles on the walls than wallpaper and vice versa.
Even the size of the tiles does not greatly affect the installation of borders. The tiles can be cut from below to give absolutely any height.
I advise you to stop here:
Typically, kitchens have cabinets, both wall cabinets and those that stand on the floor.
The border is beautiful and expensive, it is desirable that it be visible, so that it is not covered by wall cabinets or cabinets installed on the floor.
The height of the cabinet, from floor to edge, is usually 80, 85 cm, proceed from this.
Also keep in mind that the distance from the bottom cabinet to the wall cabinet is approximately 60 cm (there are other options, but on average, 60 cm).
These are the dimensions the curb should fall into (between 80 cm and 1.40 cm).
In general, it is best to pick up a tape measure and measure both the height of the cabinets and the level at which the wall cabinets will hang, because they are hung to suit the owner’s height, taking into account the fact that she can get an item from the top shelf without jumping.
For this reason, wall cabinets are mounted at different heights.
Also take into account the height dimensions of the tiles; perhaps there is no point in cutting the tiles, perhaps a whole one will be laid from the floor.
Source
Photo in a small room
A corner bathing bowl can also be placed in the interior of a compact, narrow bathroom. As you know, the fewer corners, the larger the room appears. It is worth choosing a product exactly according to the size of the bathroom so that the space remains ergonomic.
The photo shows a small bathroom in beige tones with a semicircular bowl and a shower protected by matte doors.
Designers recommend choosing suitable plumbing fixtures and furniture for a corner bath - rounded sinks and bedside tables, a wall-hung toilet with a hidden cistern. This will make the bathroom look more spacious. Also, do not store hygiene products in plain sight and neglect mirrors in the interior.
The photo shows a bathroom in light colors with green accents and a wave-shaped sink.
The freed up space can be put to good use: install a washing machine, hang a shelf for decoration, or place a laundry basket.
Rules for laying corners with tiles
If you decide to use tiles for wall cladding, you need to take into account all the details of construction work at the planning stage
In this case, special attention should be paid to how to lay out the corners with tiles so that the room looks beautiful. Naturally, before starting work you need to prepare the necessary materials and tools
It is better to think about laying tiles in the corners in advance
To do this you will need to purchase:
- ceramic tiles;
- special glue;
- crosses for joints between slabs;
- notched spatula;
- finishing profiles;
- tile cutter and building level.
You will need to count the number of whole tiles that will fit in the area from the first inner corner of the room to the other. It is necessary to take into account: the size of the tile joints (which ranges from 3 to 5 mm); the distance from the joints of adjacent walls, which is approximately 5 mm; choose the so-called “red” place in the room, which, as a rule, should be in plain sight (for example, opposite the entrance).
It is recommended to start cladding from the most visible place
Therefore, it is recommended to start facing work with it. The opposite place on the wall should be less noticeable
When laying tiles in a “dark” place, you need to pay attention to the fact that it is advisable to lay out material larger than half the size on it. If too thin strips are glued, the cladding will have a makeshift appearance.
Therefore, you need to perform all the calculations quite accurately in order to comply with the rules for laying the material on the surface and obtain the visual effect of the integrity of the facing wall. All this must be taken into account at the planning stage.
It must be borne in mind that before tiling begins, the walls must be as level as possible. The quality of the cladding and the appearance of the surface depend on this.
Laying tiles in corners correctly
Before laying tiles in the corners, we decide on the so-called “red” place of the room - usually it is immediately noticeable. You need to start working with corners from this place. When tiling corners, the material must be glued on two adjacent sides - strictly symmetrically, so this must be taken into account and the same tile trims must be used. For cutting, you need to use a special tile cutter, which is equipped with a template that takes into account the required cut size with a seam allowance for grouting.
Making an internal corner
First, glue (mastic) is applied to a wall with an area of about one square meter; you need to start from the floor. The glue is spread with a special spatula over the entire surface to obtain an even layer with equal grooves. The solution is then applied in the same way. Glue the first tile. Then glue the second one.
Constantly check that the cladding is correct
To ensure an even seam, we install special crosses at the joints of the surface. Having glued the first row of tiles, we check the levelness of the cladding with a building level. Next, we continue to lay out the surface in the same way. Having reached the next wall, mark the distance to it, cut off the tile if necessary and glue it.
When starting to lay the material of the adjacent wall, we glue the remaining trimmed part. If the material is made with a pattern or design, then we combine its parts. In this case, we glue the edge of one tile overlapping onto the surface of the other, leaving a gap of about 2 mm. The material laid out in this way creates a feeling of integrity of the tiled surface, as if it were curved. Next, we continue to glue the tiles to the required height level.
Covering the outer corner
Only solid material is used for cladding external corners. When laying, the position of adjacent tiles on both the right and left must be strictly symmetrical, and the laying is carried out overlapping the surface of the tile. In this case, the cladding will look beautiful if the ribs have a rounded or glazed appearance. If the surface has unattractive edges, you can use a special profile for finishing, applying it with cement mortar. Such surfaces will look great. That's the whole secret of laying tiles. Further laying of the coating is carried out according to the rules described above.
When facing external corners, do not forget to maintain symmetry
Summing up the laying of corners with tiles, we can highlight the following important points that are necessary to complete the work:
- calculation of the quantity of ceramic tiles;
- choosing the right “red” place;
- the order of laying facing tiles on the internal and external surfaces of the corner.
Video on how to decorate the outer corner of ceramic tiles:
All that remains is to purchase the necessary materials and tools and begin work.
repaireasily.ru