Plaster is a very important element when building a house or renovating. This mixture performs many important functions, for example:
- Thermal insulation. It closes microcracks through which cold air from the street passes.
- Improving the appearance of the wall. After plastering, the walls look smoother.
In general, this mixture has many more functions that can be listed for a very long time.
However, sometimes it happens that the plaster begins to collapse. This is a rather annoying problem. Fortunately, there are several methods to harden the surface.
How to strengthen plaster that is falling off walls
Plaster is a very important element when building a house or renovating. This mixture performs many important functions, for example:
- Thermal insulation. It closes microcracks through which cold air from the street passes.
- Improving the appearance of the wall. After plastering, the walls look smoother.
In general, this mixture has many more functions that can be listed for a very long time.
However, sometimes it happens that the plaster begins to collapse. This is a rather annoying problem. Fortunately, there are several methods to harden the surface.
Causes
First, you need to figure out the reasons why it crumbles. The reasons are errors when plastering the walls. Here are the most common ones:
- No primer. The presence of a primer is a prerequisite for plaster. Most people don't use primer because it prevents the wall from absorbing moisture. However, for such cases there is a special primer that improves adhesion and holds back salts. These salts come out of fresh concrete and over time reach the plaster, almost completely tearing it off.
- Violation of drying time. The plaster mixture dries from 7 to 28 days. Most people decide not to wait, but to apply the next coat ahead of time. Consequently, after some time it begins to fall off and crumble. The room where the mixture is drying should be well ventilated, this will speed up drying.
- Adding water to the mixture rather than slowly pouring the mixture into the water. Because of this, all sorts of lumps appear, which will greatly interfere with further work, since they are difficult to break. Consequently, the surface will be processed poorly, and this will provoke further destruction.
How to strengthen crumbling plaster
There are several ways to strengthen the surface:
- Use a deep penetration primer. A deep-penetrating primer designed for old and loose surfaces. Its particles penetrate deep into the plaster mixture and bind it. In addition, this material has an antiseptic effect. This method is the simplest and does not require much effort or money. Despite this, it is quite effective.
- This method is very radical. In most cases, plaster crumbles due to mistakes made during the work. In this case, you will have to completely tear it off and make a new one. It is best to leave this work to experienced craftsmen. Unlike the first method, when the material deteriorates due to age, nothing will help here as much as replacing the mixture.
Strengthening plasterboard partitions: effective techniques, nuances, recommendations from specialists
When carrying out construction and repair work, there is often a need to strengthen the plasterboard partition. This problem can be solved in several effective ways.
The option of using wide (100.0 mm) profiles is logical, however, the plasterboard structure turns out to be very massive. Let's consider this and alternative methods of strengthening that maintain an acceptable thickness of the partitions.
Impromptu techniques
A reinforced, rather thin plasterboard wall will result if all the vertical posts are made from a pair of profiles folded together. The resulting structure can withstand considerable weight without destruction.
How to strengthen crumbling plaster - 2 simple ways
Plaster – the coating itself is quite durable. But over time or if technology is violated, its strength may be compromised. In such cases, the plaster begins to crumble, peel off, and unpleasant cracks and other defects appear on it. Of course, every homeowner wants to stop this process of destruction.
There are two ways to do this, quite simple:
- use a strengthening special impregnating composition;
- secure the collapsing surface with a reinforcing mesh followed by putty.
Choose one or the other option depending on the situation.
Strengthening impregnation for the plaster layer
Today you can buy wonderful impregnations , which are called “strengthening”. Their main purpose, as you might guess, is precisely to strengthen various surfaces. Including plaster.
These products can be purchased in plastic containers of various sizes. Use is simple: the product is poured into a more suitable container, and then applied to the plaster with a brush, roller or spray.
It may seem that saturating the plaster layer with some substance is not a sufficient measure. However, surprisingly, such compositions cope very well with the task. Some types of strengthening impregnations are capable of penetrating a layer of plaster (and even concrete) by more than 1-1.5 meters. All along the way, they bind microparticles of material and close the pores. The plaster strengthened by impregnation stops crumbling, existing cracks do not expand, and new ones do not form.
Related article: Sealing the joint between the bathtub and the wall
All that remains is to eliminate visible damage to the surface. You can see how to do this here.
Tool
To repair plaster you will need:
- a hammer drill (for removing the plaster layer and making notches on the concrete base) or a chisel with a hammer;
- trowel or trowel (for applying and forming a new layer of plaster);
- metal brush (for cleaning the surface);
- grater or grater;
- spatulas;
- paint brush (for wetting with water);
- jointing (for clearing cracks, deepening masonry seams);
- plumb line or level;
- roller (for priming for large repair areas);
- solution container;
- sandpaper (or sander);
- construction cord;
- mixer;
- rule;
- masking tape;
- rags.
Strengthening the plaster layer with reinforcement
If the plaster are complex, that is, the coating is quite damaged, it makes sense to use a reinforcing mesh.
It can be plastic, but if the damage is great, it is better to use metal and, if possible, stainless steel. Rust can break through even a significant layer of plaster. After this, instead of the problem of a weakened coating that needs strengthening, another problem will appear.
The reinforcing mesh is attached to the surface using nails or dowels (if it is metal) or with a solution (for plastic). After this, another layer of plaster is applied to it, not too thick. The main thing is to close the reinforcing mesh.
The grid should be a monolith. That is, to strengthen the plaster, you need to choose a solid mesh. Large pieces of reinforcing mesh are tied together with strong steel wire. If this condition is not met, the strengthening will not be sufficient.
Actually, these two methods of strengthening plaster can solve almost all possible problems. Most often, it will be enough to apply a strengthening impregnation. In the same case, when the plaster is in very poor condition, you will have to use a mesh.
Necessary requirements when hanging kitchen cabinets on gypsum boards
Of course, the best option is to redesign and arrange the furniture so that there is no need to use plasterboard partitions, but this is not always possible, so there is nothing left to do but hang the kitchen cabinets on gypsum boards.
The main thing to remember when working with drywall:
- This is a fragile material and therefore will not be able to support the weight of the kitchen cabinet.
- It is impossible to attach any piece of furniture to it without preliminary accurate calculations.
- If it is possible to lay supporting structures for subsequent hanging of furniture at the installation stage, then this must be done.
- To avoid serious damage to the finishing material, when installing anchor fastenings, the holes in the drywall must be made larger than the diameter of the inserted bolts, since the gypsum board is not an element of the supporting structure in this case.
If the lugs for fastening the cabinet are at a greater distance from each other compared to the gap between the mortgages or frame elements, you need to rearrange the mounting fasteners on the furniture.
- Fasteners are screwed into the drywall after the finishing work has been completed so that they do not interfere with the finishing of the walls.
- You can find the location of the elements of the metal frame by using a magnet, which must be hung on a thread for this.
- Fastening elements must meet not only aesthetic requirements, but also fully satisfy the requirements of GOST.
Kitchen cabinets need to be hung level so that the load is distributed evenly.
- In order not to deform the sheet of drywall, fixation of screws and anchor bolts should be carried out without the use of additional force.
If all requirements are met and accurate calculations are made, almost any product can be hung on drywall.
Repair of plaster in separate places
Plaster is not an eternal thing. Owners of houses and apartments are faced with a problem when it begins to crack or fall off in places. What to do? We will look at the reasons for this phenomenon, as well as how to repair plaster walls in individual places and surface restoration technology.
Defects on the surface, causes and method of restoration There are a number of defects that are formed when the proportions of the components of the composition or the technology of its application are violated. The list is as follows:
- Formation of tubercles on the surface and swelling.
- Sedimentary cracks.
- Fresh plaster is peeling off the wall.
- Formation of cracks throughout the entire depth of the solution.
- Efflorescence, spots and stripes appear on the wall after the plaster layer has dried.
What is the reason for such defects? Bulges and bumps may appear if the limestone composition is unseasoned and has unslaked particles. How to repair lime plaster in this case? It is necessary to withstand the plaster until the lime is completely extinguished. The defects are exposed, abundantly moistened with water and filled with plaster mortar. All that remains is to wipe the surface.
Sedimentary cracks are formed when the composition is poorly mixed and when there is an excess of binder. Precise adherence to proportions and dosage in accordance with the packaging will help solve the problem. All that remains is to thoroughly mix the plaster and level the surface.
When the base has not been prepared, cleaned, rough, too dry and dusty, fresh plaster may flake off when applied. To solve this, you will need to pause work and start preparing the surface. The application technology is as follows: notches are made on the surface for better adhesion (or shingles are made), the wall is cleaned of dust and dirt. In addition, it is moistened with water. Then the mixture will not peel off, and repairs to the plaster and surfaces inside the building will not be needed for a long time.
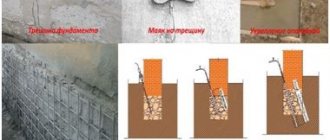
If the problem is cracks throughout the entire thickness of the plaster layer, then there is exactly one reason - there is no reinforcing mesh between the wall and the plaster. The base material is not rigid and is not reinforced in any way. The technology for applying the mixture is that the subsequent finishing layer should be less durable than the previous one, that is, it contains less binder. To prevent the intermediate layers from drying out, they must be moistened with water and reinforced with mesh.
The last defect is spots and stripes. They most often appear on walls from the outside. The cause may be a very damp or wet surface. Especially when the plaster is applied after rain. The solution is to treat the dried walls and waterproof them to prevent moisture from being drawn up from the ground. Local repairs of plastered walls are performed differently. The technology is simple, but requires careful consideration.
We strengthen plasterboard walls and prevent deformation
Drywall is a regular guest in modern renovations. This is an ideal material for leveling walls, assembling complex ceiling structures, installing partitions, niches and other decorative elements.
But despite the many advantages, plasterboard structures have a number of nuances that must be taken into account if you want to hang heavy objects on a wall made of this material: kitchen cabinets, paintings, water heaters, etc. This article will tell you about all these nuances.
Step-by-step instructions for eliminating defects
You can repair a wall with fallen pieces of plaster yourself. The work is not difficult. You just need to follow the instructions. Alternatively, you can completely remove the layer and apply a new one. But it is more profitable to plaster the damaged areas. It all starts with an inspection. It is important to identify areas that need repair. You will need a wooden mallet. You will have to lightly tap the wall. If a dull sound is heard, then the train has moved away.
Related article: Leveling bathroom walls under tiles
Then the sequence is as follows:
- After the inspection, you need to remove the old plaster. We do not touch the places where it holds well.
- Next, the seams are cleaned if it is brickwork. The surface is cleaned of debris and dust.
- A primer is applied to the wall. It is needed for better grip.
- After the surface has dried, the wall is slightly moistened and the solution is applied. If a large part of the wall has peeled off, you will have to use beacons and a rule. This is the only way the surface of the wall will be perfectly flat.
- For minor damage, the plaster is removed in the shape of a square or rectangle. The area is processed according to the previously described method, and the recess is filled with the prepared composition. It is important to adhere to the proportions so that the mixture has the correct consistency.
- Another restoration option is restoration with corks. In the right places, a hole is drilled to the base, primed, filled with mortar and plastered.
Note! For wooden walls, use limestone mortar. However, it is not suitable for wet surfaces. It is better to resort to a cement mixture. It is recommended to treat corners with gypsum plaster, as it sets faster.
Treating concrete walls for painting
We give as an example the most common base for paint - concrete. Its processing includes all the main stages of finishing and gives a comprehensive idea of the volume of work ahead. Let's look at the process step by step.
Stage 1. Leveling the walls
In front of you is a base that has been cleared of old plaster. If you cannot remove it in some places, tap it with a hammer. If the sound is dull, like beating a drum, a cavity has formed under the material. Break up the area to re-treat, otherwise over time the surface will become deformed and cracks will appear.
Assess the evenness of the walls. A visual inspection is not enough for this. The fastest way is to use a laser level. If this is not possible, you have two options
:
Walk along the wall with a rule or batten.
Hang plumb lines on threads along the edges of the wall. Stretch a horizontal thread between them, securing it so that you can move it freely up and down.
Both methods allow you to identify recesses and protruding places on the wall. Immediately mark them with a pencil or stick them on top with masking tape. You will plaster the holes, and the mounds need to be cut off with a hammer drill.
Now you need to choose the alignment method
. You have three alternatives:
Restoration work
Plaster repair also involves removing stains from the wall surface. They appear during operation and can be caused by grease, soot or rust. It also happens that the stains formed before the finishing work. In this case, you will have to solve this problem before you start gluing wallpaper or laying tiles. Restoration work is as follows:
- For greasy stains, use a two percent hydrochloric acid solution. The entire surface with stains is treated with the composition until they disappear.
- As for rust stains, copper sulfate or a two percent solution of hydrochloric acid will help to deal with it.
- If the stains are deeply ingrained into the plaster and cannot be cleaned, then you will need to seal the area with dye or white.
Advice! Whatever surface you're cleaning, it's important to clear it of dirt and dust first. Only after this other manipulations are performed.
The restoration of the surface under the tiles requires special attention. The procedure is as follows:
- using a rubber mallet, tap the surface of the wall. This is the only way to identify a peeled or poorly fixed area;
- When the area is found, you need to knock harder so that the tile falls off. If it is not removed in this way, then you will have to act radically - break it. The process requires accuracy: the tile is broken from the center so that the adjacent one is not damaged;
- If after removal there is a strong layer of plaster left, then it is not necessary to knock it down. The new tile should be glued more securely using a special glue;
- when the plaster falls off, the area is cleaned, primed and plastered again. After drying, a new tile is glued.
Which mounts to choose: tips
To hang a cabinet on a plasterboard wall, choose the following fasteners:
- Plastic dowels - “butterfly”. Withstands a load of 24 kg. Light objects such as shelves, small paintings, small cabinets are hung on it.
- Metal adjustable dowel “Molly”. The principle of operation of the fastener is the same as that of the “butterfly”. It can withstand a load of 35 kg.
- Metal anchor. This fastener is used for hanging heavy chandeliers and heavy objects. It can withstand loads of up to 50 kg. Therefore, hanging a cabinet on it will not be difficult.
- Dowel Driva. Made from plastic (hanging 25 kg) and metal (holding 30 kg).
- "Harmut Knauf" - this mount can withstand 55 kg. At the same time, the plasterboard surface will remain the same flat.
Choosing fasteners for hanging a cabinet is a responsible matter. Not only the weight of the furniture is important here, you need to consider what will be put in it, and what the weight will be if the cabinet is full.
Before hanging the cabinet on the gypsum plasterboard surface, it is necessary to make precise horizontal markings. The weight of the filled furniture should be taken into account. The use of mortgages is the best option. If rearranging or updating furniture is done after repairs, then you need to select fasteners taking into account their withstand load.
Removing cracks
Removing cracks on the surface is much easier. Repair of plaster walls in this case consists of two stages: surface preparation and plastering. To begin with, the wall with cracks is cleaned of old facing material and dirt. After this, a primer is applied to the surface. When it dries, you can start cleaning it to give the wall a smooth finish.
Next, the plaster is mixed and applied to the surface in a thin layer. The composition is leveled using a spatula. If there are large cracks, it is better to strengthen the structure with reinforcing mesh. With it, the plaster layer will be much stronger and will not crack.
Preparing for finishing and priming the surface
Preparatory work includes several stages:
- the wall is cleaned to a state in which the risk of violating the integrity of the leveling layer is minimized. This means that “boiling” old plaster and materials that can be easily separated from the base, dust, dirt, paint, etc. must be removed without fail. Usually, in search of weak points, the base is tapped with a hammer: where the plaster does not hold well, the sound will be louder. In some cases, local removal of unreliable sections of the old coating is allowed. In walls made of bricks or blocks, the seams are opened (cleaned to a depth of up to 10 mm), thereby reducing the thickness of the applied plaster and increasing adhesion due to the mesh structure of the base;
- the surface of the base is primed with a deeply penetrating compound. After it has completely dried, they begin subsequent work;
- carry out the installation of beacons that will serve as guides when leveling the plaster layer;
- depending on the type of base and the thickness of the leveling layer of plaster, use steel reinforcing mesh (mainly for walls that can shrink) or shingles (for wooden walls). These additional structures will help retain the solution and reduce the effect of shrinkage on the quality of the coating.
A solid foundation is the key to success
Before finishing, check the reliability of the old coating. In some cases, you will not have to completely remove the old layer, you will only need to repair it. How to clean plaster from a wall if the old one is cracked? Why can't you apply a new one right away? The base of the finish must be strong, otherwise the new coating will quickly fall off in pieces along with the old one.
Tap the surface of the masonry. If the sound is dull, it means that the layer is holding well and has not moved away from the brick wall. In places where the sound is loud, the finishing from the old masonry will have to be removed.
You will need the following tools to remove plaster:
- Wide spatula;
- An ax or any tool that has a V-shaped working surface;
- Hammer;
- Skins of different numbers;
- Spray bottle with water.
In addition to the tool, you need to buy materials:
We recommend a deep penetration acrylic or contact primer. Among the famous brands it is worth highlighting: Weber Veonit, Belinka, Lakra, Ceresit, Knauf. Price for 1 liter from 120 rub. The compositions have proven themselves to work well; user reviews of the coating are mostly positive.
Photos are enlarged, click!
Is it possible to apply primer to old paint?
Since ancient times, paint has been able to decorate and protect a surface. During operation, the old layer begins to peel off. But updating it is impossible without preparation. In this case, a paint primer will come to the rescue, making the paintwork durable and strong.
Many people planning to make repairs are interested in whether it is possible to apply a primer to oil-based or water-based paint. Before applying any materials, be sure to treat the old paint layer to prevent it from cracking and peeling.
If the paint peels off in chunks, experts recommend using a metal brush and cleaning the surface.
If the process is complex and the coating is thick, it is necessary to pre-prime the material by applying the primer once using a roller. Before painting, you need to dry the work surface.
Before painting metal surfaces, the surface should be pre-primed. This measure prevents cracking, swelling and loss of the attractive appearance of the coating. After a few weeks, whole chunks of paint begin to come off. Various types of plaster can also be applied to wood, chipboard, plywood, MDF, and concrete.
The application of primer compositions helps to increase the efficiency of repair work, the strength and durability of the layer. After plastering the surface, much less paint will be required than expected before painting.
Why do you need paint primers?
A primer over old paint makes the paint coat effective. The substance has a number of functions:
- Helps strengthen the base of the surface;
- Reduces the degree of moisture absorption by the surface;
- Helps reduce the amount of paint consumed;
- Increases coating adhesion;
- Protects wallpaper and other similar materials from stains;
- Helps protect the base from the negative effects of moisture, thereby preventing
- Rotting and rust does not form;
- Prevents the development of fungus.
It is necessary to apply plaster on a loose base. The use of the substance for treating walls in rooms with high humidity is indicated.
Six steps to the finish
Removal of plaster from the walls is carried out until the old finish leaves a layer that is firmly adhered to the masonry. All loose parts are removed. The work is painstaking and time-consuming, so we recommend being patient.
Below is a step-by-step instruction, following which a beginner can clean the walls of dilapidated finishes, and the video in the article will help you understand the work in more detail:
Before removing the old plaster, it is necessary to clean the surface of the old finishing coating. You can remove the paint using a wide spatula, after moistening the old composition with water. Since water is quickly absorbed and dries, the surface is constantly sprayed from a spray bottle. Readers ask how to remove plaster from a wall without dust or dirt. Use more water, so there will be less dust inside the room during work.
We take tools for removing plaster and walk along the masonry. Tap the brick surface with a hammer. In loose places, the plaster crumbles on its own; scrape off the remains with a spatula, after soaking them with water. In places where cracks form, tap more carefully. If the old layer is cracked, but the adhesion to the brick is tight, then widen the gap. To do this, tap its edges with a hammer and expand the hole with an ax.
If there are no cracks, but the layer of old finishing is too thick, then it is also better to remove it. A thick layer of old mortar will fall off due to moisture after you apply the new one.
- Third step.
Coat the cracks with two layers of primer and let them dry. We put new mortar inside and level it to the level of the wall. The remaining surfaces of the masonry are primed and covered with a thin layer of plaster.
After drying, we smooth the wall from minor defects using sandpaper. The sandpaper is taken first with large grains, gradually moving to the finest grains - polishing.
The finished walls are coated with two more layers of primer. The first layer must dry before applying the second. Each manufacturer's packaging indicates the primer consumption and drying time at different temperatures and humidity levels in the room.
We apply the finishing coat on top of the primer: paint, wallpaper.
We plaster ourselves
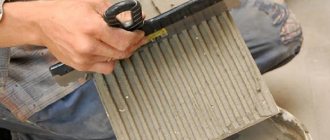
1. Apply the mixture. Now let's proceed directly to plastering the walls. To do this, you need to prepare the mixture according to the instructions. Please note that it should not be too liquid. In your left hand, hold a grater with a small amount of mixture. Using the end of a spatula, take a little bit of the solution and throw it onto the wall. The direction of movement is from bottom to top. Then smooth the layer using a grater in a circular motion. If you are plastering on beacons, level the mortar over the surface using a rule, lightly pressing it against the wall.
2. Set the layer thickness and number of layers. It is advisable to apply gypsum solutions in one layer. Cement - in three layers (preliminary, main and leveling). Thin-layer plastering is done only on smooth brickwork (5 mm and above) or concrete surface (up to 5 mm). It is not recommended to make an overly thin layer of plaster, because... it may crack later. And if it is too thick (more than 30 mm), it may slide off during operation.
3. Let the plaster dry. The setting of the solution depends on the composition, humidity and porosity of the surface, as well as on the thickness of the layers. Gypsum plaster hardens much faster. So, each subsequent layer with lime-gypsum mortar is applied through with cement mortar - through Walls plastered with cement mortar will dry completely only after approximately
4. Putty and sand. When the composition has dried, use a “grater” with sandpaper of different grain sizes to sand the wall. If necessary, putty with preliminary priming. And we polish again. This completes the alignment of the walls.