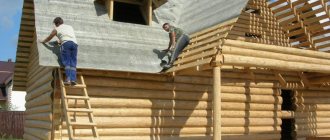
The advantages of the Russian stove can be listed for a long time: it warms, feeds, and provides a warm bed for sleeping. But in a small house there is not always enough space to accommodate a bulky structure. Master stove makers came up with a smaller copy - a mini Russian stove built with their own hands is not inferior in function to a full-fledged design.
For those wishing to try their hand at the stove business, we suggest considering one of the options for constructing a mini-stove with procedures and a description of the technologies. If you enlist the help of an experienced craftsman, you can independently build a beautiful, efficient, useful heating unit that will last for decades.
Where is it correct and safe to install?
The choice of installation location for a stationary stove is approached thoroughly, because such a building is not built for one year. For ease of use, summer fireplaces are located near the recreation area, near or inside the gazebo. It would be a good idea to have a supply of firewood nearby. A brick cooking stove mainly runs on solid fuel, which is a source of open fire. During operation, a high temperature is created, so fire safety measures are taken into account:
- It is worth placing the fireplace near buildings, retreating at least 1 meter. This also applies to fences and other wooden structures.
- The close proximity of green spaces is an undesirable neighborhood, since the heat of the fireplace will destroy trees and shrubs.
- If the location is chosen near the house, then the leeward side is preferable, which will eliminate smoke from residential buildings.
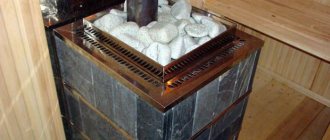
Fireclay brick or cellular concrete
To make a structure of this type, it is better to purchase aerated concrete or refractory brick. These materials are able to withstand high temperatures, do not burn out under constant heating, and retain heat inside the device for a long time.
The purchase of aerated concrete will significantly save financial costs. But after laying it, the stove must be lined so that the heat inside is retained as long as possible.
It should be noted that refractory bricks have a number of advantages:
- moisture resistance;
- there is no need to carry out facing work;
- long service life;
- external aesthetics.
But the cost of brickwork will be much more expensive than aerated concrete.
When designing a product, it can be supplemented with the functions of a smokehouse, barbecue, kebab maker, or a compact heating and cooking structure can be developed without any accessories.
Required Tools
The set of tools and materials necessary for the construction of stoves and barbecues is very simple and can be purchased at any construction stores. This:
- Aerated concrete blocks or refractory bricks are the main materials for building a stove at the dacha with your own hands, the consumption of which is calculated according to the drawing.
- Facing material.
- Clay and sand in the required proportion are required to prepare a solution for future masonry.
- Cement mixture for pouring the foundation for an outdoor stove.
- Doors for the vent and firebox.
- Construction tools for measurements - level, cord for marking.
- Tools for installation: shovel, spatula, trowel.
General Tips
Construction of a furnace is a labor-intensive process with many nuances. Here are the main ones:
- if the foundation is poured in excessively hot weather, then it must be moistened from time to time so that the screed does not crack;
- the first row is laid out dry, so it needs to be formed from even bricks that can be tightly fitted to one another;
- to achieve the desired plane surface of the brick, it can be trimmed with a grinder;
- hewn or chipped bricks cannot be placed with the damaged surface inside the furnace, since on this side the material is less refractory;
- Any cast iron elements cannot be installed flush with the masonry, so that it does not collapse; make a layer of mortar or clay.
If you follow these rules, they will help you create a durable structure that will last for many years.
Baking in a summer kitchen is not only convenient, but also delicious. With a barbecue you can easily cook meat over coals, and a cauldron will help you prepare wonderful soups or porridges over a live fire. And it always adds piquancy to any dish.
Style and design
It is better to equip the summer kitchen area with a barbecue and cooking stove in the country house taking into account the already established natural landscape. Even a beautiful hedge with trees nearby can be a great starting point for stylishly decorating a seating area.
A view of a river or pond also suggests an original plan in relation to the surrounding view. The main thing in the arrangement is that the design of the recreation area should be in harmony with the surrounding landscape and match the design style of the house. If there is no house structure yet, then the plan for the kebab shop site needs to be developed in the same style as the plan for the future house and surrounding areas.
In more difficult circumstances, when there is neither a house nor the beauty of the landscape around, there is only one way out - to choose the style direction for arranging the site and housing to your liking. Landscape designs of smooth, flowing lines using natural wood and stone, as well as the Art Nouveau style with the obligatory presence of forged elements are now popular.
Gazebos can be of different shapes - from round to polygonal options, and barbecues - cast iron, wrought iron, brick or metal. The main thing is to maintain the chosen style.
What materials are used?
The “baby” stove is made of a special type of bricks that are resistant to high temperatures. Characteristics of materials:
- Fireclay brick. An indispensable item for laying the combustion surface of the stove.
- Private. It is not suitable as a facing material, but most of the structure is laid out with this brick, so the consumption for it is maximum.
- Facing. Suitable for finishing the front part of the fireplace, you can choose your own color.
For installation, you need to purchase the appropriate oven elements, without which the structure will not function fully. In addition to bricks, the work also includes (approximate list of basic auxiliary materials):
- grate;
- combustion door;
- valve;
- blower door;
- burner stove (cast iron);
- clay solution.
Scope and production
To begin with, it is necessary to say that creating outdoor stoves for a summer residence is not as simple as it might seem at first glance. You must first choose a good order and select the refractory brick needed for the job.
Purpose
First of all, outdoor stoves in the country are made for outdoor cooking or for barbecuing, which is equipped with the structure.
Moreover, they are often installed in country gazebos or on the terrace.
Some site owners use similar products to kindle baths. In this case, the stove is located outside in the country house, adjacent to the wall, which distinguishes it from structures with an internal location. Typically, such systems are equipped with an additional tank for heating water.
It must be said that such products do not require the manufacture of complex chimneys. This is especially convenient if country houses made from block containers are used, since the design will not take up space inside the building.
Preparing the site
It is worth noting that to install such a structure, it is necessary to prepare a special place, similar to the one that is used if renting a diesel generator for a summer residence is used. Therefore, first a strong and reliable concrete base is created, even if the product is located on a terrace or gazebo.
It must be said that the distance from the structure to various buildings should be at least a meter. At the same time, experts recommend installing protective screens against exposure to high temperatures or accidental sparks. When making an outdoor stove for a summer residence with your own hands, it is worth thinking through all the fire safety systems in advance.
Special attention is paid to the roof or canopy, which simply needs to be installed above the product. It will protect not only the structure itself, but also the firewood, and if properly executed, even the people who will gather near it
Therefore, it is advisable to have a full-fledged project, not only for the construction of the stove itself for a summer cottage, but also other additional elements.
Manufacturing
If you are making an outdoor stove at your dacha with your own hands, then you should first choose the right project with the order
In this case, you should immediately pay attention to what size brick is used. The fact is that there are completely different materials that can be used for these purposes.
It is also very important to choose the right brick to create a firebox. Typically, refractory materials are used for these purposes, preferably ceramics.
However, recently, ready-made metal fireboxes have begun to appear on the markets, which can simply be lined with brick.
Special attention should be paid to the fact that a special mixture of clay is used to fix all materials in the oven. The fact is that cement cannot cope with such temperatures and quickly falls off.
Therefore, the installation instructions spend a lot of time describing the process of preparing the solution, although recently ready-made compositions for this type of work have begun to appear, the quality of which is even much higher than that of clay.
With such a placement of the stove, the chimney should be made at least 2.5 meters high. This way, combustion products will not interfere with your rest. At the same time, it is equipped with a special cap to prevent precipitation from getting inside.
Recommendations from the experts
Sometimes it is much easier to purchase a ready-made firebox, although its price can be quite high, than to make it yourself from brick. This will not only save time, but will also increase the service life of the entire structure.
- If the product has close contact with wooden materials, then they should be treated with a composition that prevents fire and additionally separated with asbestos. Taking this into account, many experts create the base for the stove so that it will rise above the floor.
- The firebox of such products must be tightly closed, and the chimney must be equipped with a damper. This is necessary so that the structure does not collect a lot of moisture in winter or autumn.
Stoves for Porfiryev baths
Good afternoon to regular visitors of our website and those who came here for the first time! In this article I will describe in detail the process of laying the Russian Porfiryev stove 5x4.5 bricks at the base with a lining of a refractory core and a vertical channel with a detailed video clip and 3D ordering. I will also conduct a detailed calculation of the costs of bricks and stove fittings. But before moving on to the description of the Porfiryev stove, it is necessary to understand the very concept of “Russian stove”, decide on their different types, determine their pros and cons, and based on these data, conduct a comparative analysis with the presented bottom heating stove.
Initially, Russian stoves had a simple design, did not have a heating element, were fired through the roof of the stove in their structure and the efficiency (25-30%) was close to that of classic English fireplaces. At the same time, of course, there were obvious advantages: firstly, the roof of the oven, similar to the tandoor, had a large heat capacity and made it possible to cook food in various modes with temperatures from 90 to 350 degrees. After closing the view, the heat of the stove remained in the room for a long time; also, due to the open type of firebox, a fast air flow was created which made it possible to effectively ventilate the room, although the heat “went into the chimney.” But still, their main drawback was the weak heating of the lower part of the furnace array and the room.
Over time, Russian stoves began to be built with a multi-channel side panel and a flood chamber according to the operating principle of “channel Swedes”, this made it possible to slightly increase the efficiency of the stove. However, it was still not possible to achieve uniform heating of the furnace mass. A further improvement was the change in the heating shield from multi-turn to single-turn with 2-3 down channels and 1 up.
Nowadays, stove makers are increasingly switching to the laying of modern models of Russian stoves, which have a predominantly bell type of combustion proposed by Podgorodnikov in his famous “Teplushka” stove. Such stoves have a very high efficiency; the stove has a stable draft; they do not smoke; they heat the entire stove array evenly; and they hardly accumulate soot. due to complete combustion of fuel. The closest competitor to Teplushki, in my opinion, is Russian stoves of the channel-bell type with bottom heating by Porfiryev Ya.G. Its stoves have characteristics comparable to those of Teplushka, but are much simpler in design. They have a simple and reliable design that allows masonry to be carried out even by a person who has no experience in laying stoves.
The Russian stove presented in the article is the most compact, consists of only 900 bricks and has a high heat capacity of 7.1 kW/hour with a double firebox and 5.8 kW/hour with a one-time firebox. The furnace firebox through the vault is used mainly only for cooking and has a heat transfer rate that is two times lower than through the firebox. At the same time, during the main combustion mode, through the flood chamber, flue gases flow through the furnace roof from 5 sides, maintaining a temperature of 80-90 degrees in it. The oven heats up evenly from bottom to top, while the temperature of the lower mass is 2-3 degrees higher than the upper one. To use the stove in the summer, a summer operation mode is provided. An exhaust chamber with a valve allows you to effectively get rid of steam when cooking on a cast iron stove. Below is information on the costs of laying a furnace.
Stove fittings and bricks:
- solid ceramic brick (250x120x65 mm) -800 pcs;
- fire-resistant brick ШБ5/ША5 (230х114х65 mm) -100 pcs;
- blower door DP-2 (250x140 mm) - 1 piece;
- cleaning door DP-1 (130x130 mm) - 8 pcs;
- grate RD-6 (380x250 mm) - 1 piece;
- combustion door DT-3 (250x210 mm) - 1 piece:
- two-burner stove P2-3 (710-410 mm) - 1 piece;
- smoke valve ZV-3 (240-13-450 mm) - 2 pcs.;
- smoke valve ZV-5 (240x260x455 mm) - 2 pcs.
When using Russian fittings and medium-quality bricks, the total cost of materials is about 22 thousand rubles.
Since in the video above I fully described the laying of each row of this furnace, here I will simply post 3D photographs of each row to make it more convenient to take the rows with you to the site.
The thickness of the seam on refractory bricks should be 2-5 mm.
7-12 rows of the Porfiryev Russian stove
Ceramic bricks are laid on a clay-sand mortar of 3-8 mm, depending on the geometry of the brick.
13-18 rows of the Porfiryev Russian stove
For even laying, it is recommended to use vertical cords, plumb lines and a horizontal level.
It is advisable to make the furnace roof from selected wedge bricks.
If this stove is not considered large enough for you or you want to heat a room much larger than 60 meters, I recommend you another Russian stove by Ya. G. Porfiryev 5.5x5.5 bricks with a power of 8.2 kW.
source
Sauna stove Porfiryeva K.Ya. refers to a closed type heater; during combustion, flue gases pass through a mass of stones or porcelain insulators, heats the water in the boiler and goes directly into the pipe. With all this, the efficiency of the furnace and its heat capacity strive to reach the maximum possible under these conditions due to a carefully thought-out design. Having a base size of 4x5 bricks, the stove heats brick and log baths with an area of 12 square meters. meters up to 100 degrees Celsius, which is practically unattainable with heaters of the “sink and wash” principle . The firebox of the stove is laid out with chamotte in the brick floor, then there is a thermal joint of 1-2 cm and another floor of facing brick, which in turn ensures the durability of the structure and the possibility of burning it with coal between the first and last laying of firewood.
In general, the masonry of the presented stove is of average complexity and does not require increased requirements for the stove maker. Complex elements include only the laying of the fireclay core of the firebox made of refractory bricks, and the observance of the expansion joint between it and the cladding.
To protect the furnace from high temperatures (more than 800), the interior of the firebox in the diagram, indicated by a dash, is laid out of refractory bricks. In this case, it is necessary to add sifted fireclay chips to the solution and maintain the thickness of the seam at 0.3-0.5 cm. The distance between the fireclay brick and the ceramic facing brick should be 1-2 cm, ideally lined with mineral insulation. The thickness of the seam for ceramic bricks should exceed 8-10 mm.
This stove design requires a separate foundation with waterproofing. For beauty, the outer part of the walls can be rubbed with ceramic bricks and clay mortar, achieving a uniform polished surface. To enhance traction, Porfiryev advises using a pipe laying in 2 bricks 260x260 mm; for my part, I consider this excessive and I am sure that a 13x26 mm pipe will be enough for the eyes. How to correctly lay an otter brick chimney, fluffing and calculating the position is described in detail in the article “ brick chimneys ”. We will also answer any questions you left in the comments below. Have an even seam and good traction!
Here is a normal person who made all the materials for the people in one place - without unnecessary dirt. thank you very much kind man
We are working for you, filling the site with useful information has just begun, I will soon begin posting detailed video tutorials on the laying of the main furnaces, I have already started filming.
Hello! I have long dreamed of my own GOOD bathhouse! With a GOOD stove and not with all sorts of “tin cans”, that’s why I want to build such a stove. Tell me, how many regular and fireclay bricks are needed? Is it possible to lay the bricks on fireproof glue, which is sold in stores? According to this drawing, what size should the water tank be and what kind of chimney should be made for this stove? Thanks in advance!
Hello, if you want a really good sauna stove, search on the Internet “Sauna heater by Evgeniy Kolchin”, it is several orders of magnitude superior to this outdated model.
Hello, Alexander. Have you yourself ever had to install a sauna stove like Evgeniy Kolchin’s or a similar torch type?
Hello, so far, our customers are financially different from the developed regions of Russia. Many times I offered customers this option for a sauna stove after calculating the total estimate for work and materials, but in the end everyone refused. The situation with expensive stoves is so bad that recently I have stopped offering such stoves.
Hello to you. As a specialist, please advise. My house is one and a half stories high. On the second floor in the summer of 2021 I made a Parfiryev stove 1800x640 with enhanced bottom heating. This stove heats 2 common rooms. pl. up to 40 sq.m. I am very pleased with the stove. Keeps warm for a day. On the first floor there is 1 living room, a kitchen with a dining room in one room, a bathroom and a corridor. The kitchen is in the middle, on one side there is a living room, on the other side there is an entrance hall and a bathroom. The house also has water heating, gravity-fed. There is also a pump for forced circulation. At the moment, we also heat the first floor with an ordinary stove, which is located between the kitchen and the living room and which is already cold 5 hours after heating; a water boiler is also built into the stove stove. The floors on the first floor are very cold. An ordinary screed with glued fiberboard. I want to insulate the floors and install a stove with a water boiler according to Parfiryev’s book to heat the first floor. But I also liked your biathlon stove. How do you think about integrating a heat exchanger into this oven? And how do you recommend heating the bathroom and hallway? Thanks in advance, with respect Morari Ivan, Moldova, Ocnita.
source
On our website we have published many orders of Russian stoves with different operating principles, but all of them have the location of the second firebox to the right of the stove, but often the location of the room allows for a design where the firebox is located to the left of the firebox. I will describe one of them with a bottom heating system authored by Porfiryev in detail in this article. In general, the stove has dimensions of 5.5x5.5 bricks, 8.2 kW of heat capacity with double combustion and is designed to heat a room of up to 70 square meters, has a cast-iron stove 400x700 mm.
The laying of the stove is most often carried out under plaster with further whitewashing for fire control. To lay a furnace without taking into account the foundation and pipes, you will need the following materials:
- Red brick - 1100 pcs;
- fireproof brick (fireclay) - 60 pcs;
- combustion door 250x250 mm - 1 piece;
- blower door 140x250 mm - 1 piece;
- smoke valve 250x250 mm - 4 pcs;
- grate 250x180-1 piece;
- cleaning doors 130x140 mm - 8 pcs. (can be replaced with brick if necessary)
- cast iron plate 400x700 mm - 1 piece;
- steel corner 5x50x950 mm - 2 pcs.
The masonry of the presented stove is quite complex and changing the size of the smoke channels on your own is highly undesirable, it is better to ask a question in the comments to be sure.
When performing work, use the presented order with clear bandaging of the seams; it is better to attach the stove fittings to galvanized wire.
Let me remind you that the seam thickness for ceramic bricks should be 5-8 mm, for refractory bricks 3-5 mm.
If you do not have 8 cleaning doors, they can be replaced with brick halves laid with a protrusion from the wall of 5-10 mm; if necessary, they can be cut out with a knife and the smoke channels can be cleaned, usually this is done once a year in the fall.
source
This stove has a 170 liter hot water tank. For enhanced heating of the bath and for laying stones, 6 pipes with a diameter of 50 mm and a length of 1050 mm are located above the firebox. The oven is designed to maintain a temperature of 45-50 degrees in a bathhouse with an area of up to 12 m2 during washing and up to 100 degrees and above when steaming. With one stove fire, 12-15 people can wash and steam in the bathhouse.
Source: “Kiln works” by Ya.G. Porfiryev.
- Sauna stoves (10)
- Subscriber questions (25)
- Closed section (3)
- Stovemaker tools (9)
- How to earn money for an apartment in 1 year (8)
- Fireplace stoves (10)
- Fireplaces (18)
- Boiler (12)
- Grills, barbecues (5)
- Furnace materials (14)
- News (48)
- Reviews (9)
- Stoves (70)
- Stove makers (8)
- Arrangements of stoves (51) baths (12)
- barbecue (2)
- fireplace stoves (5)
- boilers (2)
- heating and cooking (15)
- heating (13)
Receive a free introductory course on brick kiln laying to your email:
By clicking the “Get course” button, you agree to the terms of the privacy policy.
Receive two free videos by email on how to choose and light a fireplace correctly:
By clicking the "Get Video" button, you agree to the terms of the privacy policy.
Receive a free video course on decorating a fireplace with terracotta tiles to your email:
By clicking the "Get Course" button, you agree to the terms of the privacy policy.
source
The oven is designed to maintain a temperature of 45-50 degrees in a bathhouse with an area of up to 12 m2 during washing and up to 100 degrees and above when steaming. With one stove fire, 12-15 people can wash and steam in the bathhouse. The size of the oven is reduced due to the fact that the water tank is located outside the oven. The water in the tank is heated by a coil installed above the firebox, through which water circulates.
Source: “Kiln works” by Ya.G. Porfiryev.
- Sauna stoves (10)
- Subscriber questions (25)
- Closed section (3)
- Stovemaker tools (9)
- How to earn money for an apartment in 1 year (8)
- Fireplace stoves (10)
- Fireplaces (18)
- Boiler (12)
- Grills, barbecues (5)
- Furnace materials (14)
- News (48)
- Reviews (9)
- Stoves (70)
- Stove makers (8)
- Arrangements of stoves (51) baths (12)
- barbecue (2)
- fireplace stoves (5)
- boilers (2)
- heating and cooking (15)
- heating (13)
Receive a free introductory course on brick kiln laying to your email:
By clicking the “Get course” button, you agree to the terms of the privacy policy.
Receive two free videos by email on how to choose and light a fireplace correctly:
By clicking the "Get Video" button, you agree to the terms of the privacy policy.
Receive a free video course on decorating a fireplace with terracotta tiles to your email:
By clicking the "Get Course" button, you agree to the terms of the privacy policy.
source
This stove-heater was developed by Ya.G. Porfiryev and serves to heat water, heat the bath and produce steam. The oven dimensions are 1020x1290 mm at the base (4x5 bricks) and 2 m 10 cm in height. This is sufficient to maintain a temperature of 45-50ºC in a bathhouse with an area of up to 12 m2 during washing and up to 100ºC and higher when steaming. With one stove fire, 12-15 people can wash and steam in the bathhouse.
The capacity of the water boiler built into the furnace is 170-180 liters. To enhance heating of the bathhouse and for laying cobblestones, 6 pipes with a diameter of 50 mm and a length of 1050 mm are placed above the firebox of the stove. These pipes pass through the entire mass of the furnace, become very hot during the firing of the furnace, and transfer heat even after the end of the furnace, i.e. while washing people in the bathhouse. Above the cobblestones laid on top of the pipes there is a double door through which water is supplied to the cobblestones to generate steam.
Since the stove is a batch stove, washing in the bathhouse should begin no earlier than 30 minutes after the stove is fired and the smoke damper is completely closed. It is not recommended to add water to the tank after the stove has been heated, as this will lead to rapid cooling of the stove mass and the heated cobblestones.
When laying the stove, fire safety measures should be observed: the stove should be positioned so that its walls are 50 cm away from the wooden walls of the bathhouse. In this case, it becomes possible to inspect the stove before firing and, if necessary, repair it.
You can get an initial idea of how this stove-heater works if you open the 3D layout of this stove.
For more detailed information, watch the instructional video provided here.
Basic information on this sauna stove with a detailed description of each row is in the project.
To display the project in full screen mode, click on the icon
, located in the upper right corner of the project.
In the window that opens, you can familiarize yourself with the project and download it in PDF .
Using the link below, you can download the project in the form of ZIP archive containing PDF and DOC versions of the project.
Download the design of a stove-heater with a water boiler.
| Source | File format | Download |
| Y.Disk | zip(pdf,doc) | |
| DropBox | zip(pdf,doc) |
Also, when working with a project, you can use an electronic assembly made in the SolidWorks program. However, to do this you will have to download a special program SolidWorks eDrawings . But, as they say, this is not for everyone.
Download electronic assembly.
| Source | File Format | Download |
| Y.Disk | sldasm | |
| DropBox | sldasm |
If there are broken links, please report this in the comments.
source
Have a good time everyone. Dear stove makers, both beginners and professionals with extensive experience. It’s somehow not deserved and the designs of Porfiryev’s stoves are not mentioned at all on the forum, as if they never existed. Share your experience if anyone has ever built or used them. Express your opinion and comments. I'd really like to hear them.
Nobody built such stoves?!
How do they differ from ordinary “folk” stoves?
Porfiryev stoves are a two-tier hood. The essence is the same, that Kuznetsov’s is only simpler in design. More popularly. “Collecting” is easier and faster. I have already made dozens of different ones. They work great. Only Porfiryev does not provide for lining the firebox with fireclay. Fireclay is placed directly in the main body, tied in red. I'm lining the firebox. There is no “dry seam”, catalyst, etc. It’s just that not everyone can pay for Kuznetsov’s bells and whistles. They require fuss, which means money. There is a book by Ya.G. Porfiryev “Kiln works” reference manual. Moscow. Stroyizdat 1992 - 216 pages.
Porfiryev's book is well structured and illustrated, perhaps the best of the stove books I have seen. Designs with lower and upper cap. Or rather, the lower chamber is not a pure bell, I would call it a channel bell. The stoves are similar in meaning to Podgorodnikov and Kuznetsov, but simpler, maybe sometimes more “simple.” I use some of Porfiryev’s solutions in my projects. I have Porffiliev’s phone number and address, but for several years I have not known anything about him.
Mikhail Alekseevich! I agree with you about Parfiryev’s books - these are truly some of the best books about stoves. From here, can anyone tell me where they can be purchased now? I would really like to get Parfiryev’s coordinates. Sincerely! S. Seryogin.
Dear Colleagues! We have negotiated with Yakov Grigorievich and if everything goes well, he will come to our guild on April 29, 2006. Sincerely! S. I. Seryogin.
source
Heating and cooking stove 1020x770 Ya.G. Porfiryeva has a heat output of 3.5 kW (3000 kcal/h) with a one-time firebox per day and 4.1 kW (3500 kcal/h) with a two-time firebox. The stove allows you to heat a room up to 25 m2.
Like all the stoves of this author, the stove has two gas ducts - lower and upper. These flues work in exactly the same way as the hoods in a two-bell heating and cooking stove . The difference is that the base of the lower flue is located below the ash chamber. This allows you to best warm up the lower part of the stove and prevent the formation of a “hole” of cold air near the floor in the heated room.
This oven is lined with refractory bricks from rows 9 to 13. The use of this type of masonry involves using not only firewood as fuel, but also other types of fuel, such as peat, coal, etc. In the absence of refractory bricks, masonry can be done with ordinary ceramic bricks, but careful selection should be made. In this case, the stove must be heated only with wood.
In his designs, the author strives to achieve maximum simplicity when laying the stove. However, in some cases this affects the quality of ligation of seams in adjacent rows. Repeating this project, I tried to correct those places in the masonry where there were vertical untied seams running through two and sometimes three rows. Perhaps this complicates the design somewhat, but at the same time makes it more reliable.
In order to familiarize yourself with the order of the oven, click on the link below in the text.
More complete information can be obtained by watching the training video presented in the article.
Basic information containing a detailed description of each row of this furnace is in the project.
To display the project in full screen mode, click on the icon
, located in the upper right corner of the project.
In the window that opens, you can familiarize yourself with the project and download it in PDF .
Using the link below, you can download the project in the form of ZIP archive containing PDF and DOC versions of the project.
Download the project of a heating and cooking furnace 1020x770 Ya.G. Porfiryeva.
| Source | File format | Download |
| Y.Disk | zip(pdf,doc) | |
| DropBox | zip(pdf,doc) |
In the process of communicating with site visitors, the need was identified to have this project also in a mirror version, which was done by me.
Download the project of a heating and cooking furnace 1020x770 Ya.G. Porfiryeva ( mirror image ).
| Source | File format | Download |
| Y.Disk | zip(pdf,doc) | |
| DropBox | zip(pdf,doc) |
If there are broken links, please report this in the comments.
source
Porfiryev heating and cooking stove 3x4 bricks in size for heating a room up to 35 m2.
Alexander Alekseevich, tell me, does this project have a summer run?
There is a summer run. The valve is located inside the cooking chamber between rows 18 and 19. This is the author's arrangement of the valve. If anyone thinks that it will not be convenient to use it there, then it can be rotated 90 or 180 degrees clockwise.
Alexander Alekseevich, tell me, did you make such a stove? Is it possible to do without lining?
It is possible without lining. When laying a stove, you need to choose the best brick for the firebox. Without a lining, the stove will heat up faster, which is good for a summer house. If the house is a permanent residence, it is better to do the lining. If fireproof is not an option, then at least ceramic.
The oven is high - 36 rows. Is it possible to remove some rows if the ceilings do not allow it? If yes, which ones (at least 3, preferably 4)
I would refuse bottom heating under the ash pan. There are just 4 rows that can be removed.
I'm not an expert in furnaces. I’ve never used it before, but I think I’ll try it this summer. I chose this stove because of its simplicity of design. I’m planning a small house and now I’m “dancing” from the stove. But it seems to me that the bottom heating is a clear advantage of the stove and I don’t want to remove it. But is it possible to remove the top repeating rows - 27,28 and 31? And another question - in this furnace, fireclay bricks are placed on red ones. What mortar should be used for laying fireclay bricks on red and vice versa?
You can also remove these 3 rows. Now I mostly make stoves entirely from ceramic bricks, and line the firebox with fireclay on the edge. I had to repair stoves with fireclay laid flat, for example in this article I wrote https://sdelaipech.ru/?p=667 The first row of fireclay, which rests on the red laying on the GPS, and then on the heat-resistant glue.
Alexander, do you think untied rows are a big drawback of the project? In the image of the oven from the door side, 5 rows are not tied - from 29 to 33. In the project offered for download, it is slightly different - 3 rows from 31 to 33. And regarding the tying of external bricks with internal ones, what is your opinion - should not be tied? bandage, isn't there a big difference?
It is better to bandage everything around the perimeter. If it doesn’t work out in half a brick, then in a quarter. There is an error in the image. There should be no untied 5 rows. The project was made according to the procedures of Ya.G. Porfiryev from his book. I studied SketchUp and practiced using its stoves from the book. I didn’t notice much difference regarding the ligation of external bricks with internal ones. I dismantled stoves that had been in use for 15-20 years, where the cuts in the chimneys were made with bricks standing on the edge and everything was fine, they didn’t loosen and even the mortar didn’t crumble.
Alexander, everywhere it is said that you need to either make a lining with fireclay bricks or lay a whole row. And here in a row above the stove you get 2 fireclay bricks. It’s somehow not clear, what do you think?
source
A stove-heater of this type was first developed and built by Porfiryev. Its main purpose is to heat water, generate steam and heat the bath.
A stove-heater of this type was first developed and built by Porfiryev. Its main purpose is to heat water, generate steam and heat the bath.
This stove with a water boiler is perfect for a bathhouse whose size does not exceed 12 square meters. In such a room, the stove-heater is capable of maintaining a temperature of up to 100C in the steam room and up to 50C while washing. Practice has shown that at the same time, with one firebox, 10-15 people can comfortably wash in a bathhouse.
- the design of the furnace involves the installation of a water tank of 170-180 liters;
- to increase the heating capacity, it is recommended to make 6 pipes above the firebox. Their diameter is 5 cm, length is 1 m. They will also be needed for laying cobblestones;
- the total length of the pipes is quite large, they get very hot during heating, and then give off heat for a long time during washing in the bath;
- cobblestones are laid on top of the pipes;
- The design of the sauna stove includes a special door, which is needed to supply water and generate steam. It is located on top of the laid cobblestones;
- When placing the stove, fire safety measures must be taken into account. That is, the stove mass must retreat from the wooden walls of the bathhouse by at least 0.5 m. This gap will also allow for preventive inspection of the structure and repairs, if necessary.
The furnace designed by Porfiryev is a batch furnace. Based on this, you can wash in the bathhouse only after you have received no less than it has been fired. Be sure to close the smoke damper.
It is not recommended to add water to the tank when the stove is already heated. This may cause the structure mass and cobblestones to cool too quickly.
- red brick (excluding pipes) – 581 pcs;
- refractory brick brand ША-8 – 79 pcs;
- fire door 210 x 250 mm – 1 piece;
- blower door 140 x 250 mm – 1 piece;
- grate 300 x 250 mm – 2 pcs;
- water boiler 1020 x 770 x 250 mm – 1 piece;
- steel pipe 50 x 1050 mm – 6 pcs;
- basalt cardboard 5 mm – 1 m2;
- heater door 510 x 420 mm – 1 piece;
- steel strip 40 x 5 x 350 mm – 2 pcs;
- steel strip 40 x 5 x 650 mm – 2 pcs;
- steel strip 80 x 10 x 1200 mm – 2 pcs;
- stove chimney valve 322 x 454 mm – 1 piece;
- pre-furnace sheet 500 x 1000 mm – 1 pc.
author of the video Nikolay Zolotarev
source
Laying the outdoor stove structure
Like most other buildings erected with your own hands, laying a stove device in a dacha begins with preparing the foundation. It must have good strength to support the weight of the structure.
- The place for the foundation to be constructed is marked using a construction cord. Its dimensions should be 100 mm wider than the future masonry.
- A pit 500 mm deep is dug into which concrete will be poured, for the preparation of which grade 500 cement is mixed with sand in a ratio of 1:5.
- The pit is filled with crushed stone, which is compacted efficiently. Everything is filled with a solution of liquid consistency.
Pouring the foundation
The stove requires a solid foundation, since the total weight of the structure will be large - more than 750 kg. Before starting to lay the foundation, it is necessary to calculate that the dimensions of the foundation will be 100–150 mm larger than the dimensions of the building itself.
The foundation itself is poured like this:
- At the site of the future foundation, we dig a pit 40–50 cm deep.
- A sand substrate 10–20 cm thick is placed in the resulting recess. The substrate is well compacted until a dense structure is formed.
- We lay crushed stone on top of the sand base. The thickness of the crushed stone cushion should be at least 3 cm. But you can save on crushed stone if you first lay 2 cm of broken brick on the sand, and add crushed stone on top of the remaining 1 cm.
- After laying the crushed stone cushion, you can proceed to pouring the foundation. To do this, mix the cement mortar and pour it into the pit. The surface of the poured solution should completely cover the pit and extend to the floor level.
Now you need to let the base dry and harden.
Author's projects of outdoor stoves for dachas: photos and videos
Space saving: three-dimensional design of an island stoveSource www.proektkamin.com
Author's project of a stone barbecueSource masterstone.ru
Minion StoveSource glenoakspathology.com
Original project in oriental styleSource it.decorexpro.com
Barbecue in the style of Alexander GreeneSource masterstone.ru
Model in high-tech styleSource kuhnidizayn.ru
BBQ Station Source unidoski.ru
The model will fit perfectly into any landscape designSource m.yukle.mobi
A simple and original solutionSource bashny.net
Version 2.0Source tdmasterov.ru
Designer modelSource ebaumsworld.com
In the video you can see how to make an outdoor stove with your own hands:
About the safe location of the structure
To check the corners of the structure during work, use plumb lines made using nails nailed to the ceiling. This way you will be able to determine as accurately as possible how to position the pipe. after that, proceed to create an opening in the ceiling. It is important that the fire cutting parameter be taken into account. If you follow this safety parameter, the distance between the chimney and the wooden components will be at least 250 millimeters. Otherwise - if for some reason this is impossible to do - create a partition using several layers of burlap (the thickness should be 10-20 millimeters). Pre-soak the burlap with a clay-based solution. Place metal sheets on top of the material.
Note! You should never, under any circumstances, ignore fire safety requirements! Before starting the oven for the first time, make sure that its operation will not lead to unauthorized ignition. If you doubt your abilities, it is better to entrust the work to experienced specialists.
For added safety, securely fasten a sheet of steel below, in front of the combustion chamber. According to many years of experience, a small stove can heat the temperature in a room with a volume of 30 cubic meters to 20 degrees (if the temperature outside is about minus twenty), using only 11-12 kilograms of dry wood. Of course, the fact that the ceilings in this building are double, as well as the window frames, is also taken into account, and the walls are properly insulated. However, the results are truly impressive and they only apply to the first heating. In the future, to achieve a similar result, only 5 kilograms of the same fuel will be required.
Video - Firing a small stove
Now - directly to production!
Brick stove for home
Previously, we talked about how to build a brick stove for your home yourself; in addition to this article, we advise you to read this information and read about it here
Ordinary masonry of the stove
After preparing the base and familiarizing yourself with the drawings, you can move on
It is important to strictly follow the order indicating the correct position of the bricks and installation of stove fittings
With stove and bed
If you plan to bake a stove with your own hands, then the simple procedure looks like this:
- Make a continuous and even row.
- Lay out the internal compartments, design the cleaning channels and ash pan chamber.
- Place the door of the blower and cleaning chamber. Secure them with steel wire, placing the ends in the seams.
- Close the vault, block the entrances to the channels, form holes and decorate the ceiling of the bottom channel from the inside.
- Fix the grate in a large firebox. Carry out the internal masonry without mortar; it is better to use fireclay, cutting it in half in thickness. Place the door on the small firebox.
- Install the hot water tank.
- Place the grate on the small firebox and the door on the large firebox. Stretch the right wall with a strip of steel. There is no need for mortar behind a large firebox.
- Install and secure the small firebox door. Continue to output internal channels.
- This row is combined with the previous one.
- Lay out the bottom of the furnace, combine the combustion vaults. Bring the channel holes into the chamber and close the water heating tank.
- At the edge of the masonry, secure a 5x5 cm metal corner between the fireboxes. Cover the space of the large firebox behind the stove with a grate. There is no need to secure it.
- Form the chimney and the walls of the furnace. Install a damper on the left.
- Continue the algorithm.
- Form an entrance to the chimney. It will be opened by a valve (vertical). Remove the walls of the furnace and make a hole for the damper.
- Begin to narrow the masonry, blocking the roof of the chamber. Proceed with the removal of the chimney.
- Reinforce the walls with strips of metal.
- Secure the back wall with a strip of metal. Narrow the chamber vault further and prepare to lay the vault. Above the niche with the slab, lay a corner and a strip of metal - the basis for the masonry that creates the ceiling.
- Lay out the outer walls and roof of the furnace in the shape of a dome. You can install a template or weld an arch from strips of metal.
- Strengthen the wall above the entrance to the chamber with a strip of metal and surround the roof of the furnace with walls.
- Pour sand and compact it.
- Proceed to the base of the bed. Lay a sand embankment and narrow the slit in front.
- Narrow the overpipe and install a panel with a circular hole to change the direction of the smoke.
- Install the cleaning window door.
- Install the draft control valve.
- Continue to cover the space.
- Work according to the algorithm.
- Combine the overpipe and chimney on rows 27-29. Lay out the chimney before starting to form the groove. In the place where the chimney passes the attic floor, use cement mortar.
When the pipe is brought to the roof, make an otter - an extension above the roof in the form of an overlap. Close the gaps between the roof and the chimney with waterproofing.
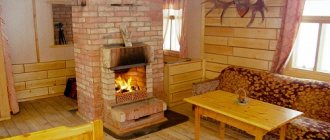
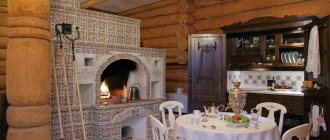
The Russian stove with a fireplace and a stove bench is multifunctional. It gives warmth, they cook food on it, and they rest on top. Any things will dry on it instantly.
With a stove for a cauldron
Both the components and the masonry resemble a Russian stove with a fireplace and a stove bench. Refusal of the latter is beneficial due to the reduction in dimensions and a stove on which a large cauldron will fit. The order is:
- Make a level and continuous base.
- Install an ash chamber.
- Secure the cleanout doors.
- Place the grate.
- Form a flood chamber.
- Start lining the firebox.
- Start building the walls.
- Align the corners.
- Align under.
- Form a hailo.
- Place the stove.
- Build a combustion chamber.
- Close the smoke duct.
- Form the roof of a large firebox.
- Build walls.
- Continue the previous row.
- Connect the walls with the arches.
- Continue the row.
- Insulate the furnace.
- Take care of the general overlap.
- Continue the algorithm.
- Set the valves.
- Install cleanout doors.
- Continue the previous row.
- Follow the algorithm.
- Close the channel.
- Form a chimney.
- Install the valves.
All that remains is to build the pipe to the ceiling. Cover it with 2x1.5 bricks. To insulate the ceiling, non-combustible material is used - metal, asbestos.
You can build a stove with a firebox and a stove bench. In this case, the length of the combustion chamber is increased or an extension is built, inside of which there will be smoke channels.
Are you planning to build a Russian stove for yourself?
Not really
Features of the “baby”
Already from the name of this model it is clear that its dimensions are more than just modest. For example, the base area is only 0.4 square meters. m. However, the ability of the “baby” to give off and retain heat is very impressive.
The structure is laid out from bricks, which are laid either flat or on an edge. Since its weight is light, there is no need to build a foundation for it. It can be erected directly on a floor made of thick boards fixed to joists.
Built with your own hands, such a stove will replace a potbelly stove. Moreover, the functionality of the “baby” is much more interesting and richer. For example, a hob is additionally installed on it, and if desired, it can be equipped with a fireplace portal, since it has a smoke tooth.
The stove is installed incredibly quickly. Moreover, if you start work in the morning, then in the evening it will be possible to carry out a test fire.
Required Tools
The set of tools and materials necessary for the construction of stoves and barbecues is very simple and can be purchased at any construction stores. This:
- Aerated concrete blocks or refractory bricks are the main materials for building a stove at the dacha with your own hands, the consumption of which is calculated according to the drawing.
- Facing material.
- Clay and sand in the required proportion are required to prepare a solution for future masonry.
- Cement mixture for pouring the foundation for an outdoor stove.
- Doors for the vent and firebox.
- Construction tools for measurements - level, cord for marking.
- Tools for installation: shovel, spatula, trowel.
https://youtube.com/watch?v=bGeFQgAnmn4
Heating and cooking stove "Malyutka"
For an insulated garden house, a small, compact, economical Malyutka stove with a height of no more than 2.2 m is convenient. If desired, the stove can be made higher by adding several rows between the 18th and 19th. The oven has a cooking chamber and two drying chambers. Due to its small size and mixed (flat and edge) masonry, only 250 bricks are required (up to the pipe).
The design of the stove is simple, and with little skill it is not difficult to build, but it requires a lot of shaped brick cutting.
The stove is placed on a solid foundation, which should be 5-10 cm larger than its size. In a pit dug to solid ground, broken bricks and rubble stone are poured and filled with cement in a ratio of 1:5 with cement grade M-400. The foundation should not reach the floor level by 1-2 rows.
First, the brick is selected dry in each row, then placed on a clay-sand mortar. The rows are counted on the right side, from the side of the valves. The width of the gas ducts along the walls is not less than 7.2 cm. It must be taken into account that the summer flue in the rear wall is always hot. Above its valve, the gas duct is made square, for which the bottom of the 24th row is cut off (see section B-B).
Choosing a place to erect a structure
When the question of what kind of structure it will be, for example, a Finnish outdoor stove or a Russian one, made of brick or metal, has been resolved, you can begin to choose the location for the work. If you have a ready-made cottage, installing a stove or barbecue for your dacha requires compliance with a number of rules and fire safety requirements:
- The structure is laid next to a recreation area, for example, near a veranda or terrace. If neither one nor the other is available on the site, then it is necessary to consider the option of building a canopy and installing benches. A universal outdoor stove will benefit from this.
- The size of the structure is determined by the owner of the house depending on financial capabilities and requests. However, if it’s just a brick grill, then you shouldn’t make it too big.
- To avoid the penetration of smoke into residential premises, an outdoor Russian stove or another variation of it should be built on the leeward side of the site, and places near bushes and branchy trees, the condition of which is negatively affected by high temperatures, should be avoided.
- Do-it-yourself outdoor stoves for summer cottages should not be placed close to buildings made of flammable materials.
- The area around the cooking stove at a distance of several meters is covered with tiles or filled with concrete.
- For convenience, it is recommended to make a path to residential buildings and install street lighting, which will allow lovers of evening and night recreation to comfortably get from the gazebo, where a simple outdoor stove for cooking or smoking is located, to the house.
Exploitation
The first test run can be done on the day the work is completed. You will not find such advice in any instructions for building a Russian stove. It's all about a simple scheme, since it does not contain elements containing thick layers of solution, which means it can harden solely through surface evaporation.
Although the design provides for the presence of cleaning doors, this fact should not be abused. You should choose only dry logs as fuel. The use of coniferous species should be abandoned. If the inner surface of the firebox was lined with ordinary brick, then burning coal is fraught with the detrimental effect of high temperatures on the condition of the masonry or the brick itself. That is why the advice given above was to use fireclay bricks.
The baby model has gained popularity and earned respect for its qualities. With a small space, it plays the role of a full-fledged source, capable of providing warmth and maintaining it for a certain time, and housewives appreciated the ability to cook food.
Preparation for construction
Brick selection
The materials used in the construction of the furnace must comply with fire safety requirements. For this reason, various materials are used for its individual elements, which are listed in the table:
| Furnace element | Material |
| Laying the stove and chimney | · clay brick |
| Under and arch (lining) | refractory brick refractory brick |
| Facing | · plaster · tiles · natural stone |
| Fireproof insulation | · clay brick · asbestos cardboard · asbestos-cement heat-insulating boards · mineral wool boards, etc. |
The composition of the masonry mortar is chosen differently for each type of brick.
| Type of brick | Solution |
| Clay brick | clay-sand |
| Refractory brick | refractory clay and sand |
| Fire brick | fire clay and fireclay powder |
For the chimney, a solution based on lime and cement or lime and sand is used.
You can mix the solutions yourself or use ready-made certified mixtures, which are now available on the market in a large assortment. The advantage of using ready-made mixtures for a non-professional is compliance with technologies and proportions during production and compliance of the solution with the required characteristics.
With the correct selection and use of materials, the design of the stove: firstly, will comply with fire safety standards, which is of great importance in the house, and secondly, the entire structure will be provided with sufficient strength and stability.
Subtleties of preparing masonry mortar
Unlike regular mortar, masonry mortar for furnace work is much more difficult to prepare. Of course, you can buy a ready-made mixture at a hardware store - you can find one if you look hard enough. But, if the goal is to make the stove yourself, we will also prepare the solution with our own hands.
Masonry mortars for stoves are selected depending on the brick used:
- If solid brick of grade M150 or more is used for masonry, a clay-sand mortar is used in a clay-to-sand ratio of approximately 1:2. It is also used for lining the stove with ceramic tiles.
- For laying refractory bricks, mortars based on refractory clay with the addition of sand are used.
- When using fireclay bricks, solutions of refractory (kaolin, bentonite) clay and fireclay powder are used in a ratio of approximately 1:3–4.
- Brick pipes in the attic space are laid using cement-sand mortar.
Clay is a soft, non-metallic rock, and, as everyone knows, it can be used to sculpt sculptures, dishes, produce tiles, etc. The difficulty lies in the optimal selection of raw materials - in nature, clay occurs in different forms, and can be “lean”, normal or “oily”. The skill of the stove maker lies in selecting the optimal ratio of clay and sand in order to obtain the ideal masonry mortar.
To check the quality of a clay solution, many methods have been used for a long time. The simplest of them is to “knead” clay dough, roll out a thin flagellum and try to bend it. The smaller the bending radius at which the flagellum begins to crack, the better the solution.
Another, very accurate way: roll the prepared “dough” into a ball and carefully squeeze it between two boards. When compressed by a third of its diameter, normal clay will begin to develop fine cracks.
If the ball crumbled even earlier, the solution is too “thin”. If cracks appear when a lump of clay is compressed by half its diameter, the solution is greasy. In any case, it is better to get a fattier solution than a lean one.
How to mix clay mortar
To lay a Russian stove you will need approximately 3.5 m3 of mortar. Accordingly, the required amount of ingredients is taken in the ratio specified above and diluted with water in an amount of 1/4 of the volume of clay taken. For example: 1.1 m3 of clay, 2.2 m3 of sand and 0.27 m3 of water.
An iron barrel or a tin-lined box is used as a container; the clay is soaked in water for a couple of days. After this, sand is added and the entire solution is mixed with feet (you will have to stock up on high boots) until the mixture becomes homogeneous.
Important: since the width of masonry joints is no more than 3 mm for fireclay bricks and 5 mm for regular bricks, all large lumps and pebbles must be removed from the mortar
How to fold a stove, fireplace. Other documents
Selection of oven
Where and how to place the stove? Selection of oven sizes. Method No. 1 Selection of oven sizes. Method No. 2 Selection of oven sizes. Method No. 3
Furnace structure
About what is not visible, but what needs to be understood Features of solid fuel combustion The main elements of heating stoves Furnace fireboxes - a general idea Firebox for firewood, coal, anthracite Firebox for peat, mine firebox Smoke generators Chimney
Construction of a furnace - general idea
Foundations for stoves Preparation and laying of stoves - general overview Arches and vaults in stoves Kiln tools, devices and products How to plaster a stove Tips for laying stoves; how to whiten a stove
Necessary materials
Materials for laying stoves (1) Materials for laying stoves (2) Auxiliary materials for laying stoves Properties of materials for stoves Clay mortar Four ways to check the quality of clay Lime mortar Cement mortar, heat-resistant concrete mixtures
Furnace set
Stove fittings (1) Stove fittings (2) Chimney sweepers and equipment for maintaining the stove or fireplace
About chimneys
Chimneys and ducts Draft force in the chimney Chimney structure Condensation
After laying
Testing and operation of the furnace External finishing of the furnace Repair of furnaces
Heating stoves
General overview Heating furnace No. 1 Heating furnace No. 2 Heating furnace No. 3 Heating furnace No. 4 Heating furnace No. 5 Heating furnace No. 6 Heating furnace No. 7 T-shaped heating furnace Double-bell furnace (large) Double-bell furnace (small) Small-sized heating furnace
Frame stoves
General overview Thin-walled frame furnace No. 8 Thin-walled frame furnace No. 9 Thin-walled frame furnace No. 10 Thin-walled frame furnace No. 11 Thin-walled frame furnace No. 12 Thin-walled frame furnace No. 13 Small-sized furnace No. 14 Thin-walled brick furnaces
Heating and cooking stoves
Heating and cooking furnace No. 15 Heating and cooking furnace No. 15 (option 2) Heating and cooking furnace No. 16 Thick-walled heating and cooking furnace Ш-5 Heating and cooking furnace No. 16 with a heating cabinet Heating and cooking furnace No. 17 (improved L.S. Borozdenko) Heating and cooking furnace No. 18 (designs by L. A. Korobanov and N. I. Samarin) Heating and cooking furnace No. 19 or “Shvedka” (designs by K. Ya. Buslaev) Thick-walled mini-oven Heating and cooking furnace ( designs by I.F. Volkov) Double-bell stove IP-1 (without oven) Double-bell stove IP-2 (with oven) Heating stove “Economka”
Kitchen stoves
General idea Simple kitchen stove Kitchen stove with oven Kitchen stove with trenches Kitchen stove with oven and hot water box
Various ovens
About stoves made of titanium About stoves made using barrels and more Multifunctional outdoor stove; stove for heating a greenhouse Stove with an open firebox Hearth with a table and spit A little about air heaters Home smokehouse
Heating shields
General overview Light-weight heating panel Thick-walled heating panel
Sauna stoves
Heater stoves for Russian baths. General presentation of the design of heater stoves for Russian baths. Heater stove designed by A. Suzdaltsev. Heater stove designed by A.F. Filichko. Sauna stoves
About fireplaces
Choosing a Fireplace Size Fireplace Placement Fireplace Foundation About Brick and Mortar Fireplace Firebox Choosing a Fireplace Pipe How to Increase Fireplace Efficiency About the Fireplace Tooth What kind of wood should you burn in your fireplace?
Laying (arrangement) of fireplaces
Simple fireplace Stove Swedish with a fireplace Stove-fireplace with a steel cap Stove with an attached English fireplace Mini-fireplace English-type fireplace Fireplace for a summer house Fireplace lined with brick Corner fireplace project Fireplace project with an open firebox
The principle of operation of the design
The operating principle of the Russian stove is very simple.
Even a person who does not understand stoves at all and has never encountered them can understand it. A Russian outdoor stove works as follows:
- First, the fuel begins the combustion process in the fuel chamber. Combustion occurs due to the presence of oxygen (air), which enters through a passage in the lower part of the furnace, also called the mouth. The smoke then moves towards the arch, and finally enters the chimney.
- The combustion time of the fuel depends on its humidity; the drier the logs, the faster the heating occurs. During this entire process, a fairly large amount of heat is released, which can be rationally used in several areas. Now we will describe them. Areas of use of the Russian stove
- The first and main application of the unit is cooking or heating food in it. To do this, people used a variety of dishes, usually made of cast iron. The design and simple operating principle of the oven made it possible to do anything with food: food was fried, boiled, simmered, stewed;
- Also, the Russian stove has long been used as a source for heating a room. It was installed in the center of the room and evenly heated the air;
- Few people know, however, that people washed themselves in a Russian oven! Its size allowed it.
Improved Russian stove Peasant Teplushka
There were many attempts to improve the Russian stove. In 1927, the People's Commissariat of Agriculture of the USSR even announced a competition for an improved Russian stove. The first prizes were taken by the furnace developed at the All-Union Thermal Engineering Institute named after. Dzerzhinsky, as well as a stove designed by Grum-Grzhimailo and Podgorodnikov, which served as the prototype of the “Peasant Teplushka” stove. Its significant advantage is that simultaneously with the heating of the cooking chamber, the lower part of the oven also heats up.
Rice. 4. Sections of the Teplushka stove.
The furnace is built using a ductless design. Outwardly, it is almost no different from an ordinary Russian one, with the exception that there is a firebox in one of the corners. Sections of the furnace are shown in Fig. 4. It is a chamber - a cap, limited at the top by the arch, and at the bottom by the bottom of the furnace. This hood is divided by the hearth into an upper cooking chamber (furnace) and a lower heating chamber. Under the stove it rests on free-standing brick pillars. A pipe begins from the bottom of the heating chamber, passes through the hearth and is equipped with a stove valve. Just like the Russian stove, Teplushka has a mouth, an over-pipe - a smoke collector above the mouth and a ventilation valve. Above the valves, two pipes are combined into one. In addition, there is a firebox located in one of the corners of the stove.
When the furnace is fired, the mouth of the furnace is closed with a damper. The ventilation valve is also closed. Firewood is burned in a firebox on a grate. Hot gases from the firebox are directed under the roof, wash it and, through holes located along the perimeter of the hearth, enter the lower heating chamber. When cooling, the gases sink to the bottom of the furnace, from where they are sucked out by the chimney. The stove can also be heated like an ordinary Russian one. It is advisable to do this in the warm season, when, for example, you plan to bake bread. In this case, you can admire the open fire through the mouth. When firing in Russian, the stove valve is closed and the ventilation valve is opened. Firewood is burned on a hearth.
Thus, while maintaining all the advantages of Russian stoves, Teplushka has a 2.5 times larger heating surface, heats up faster, since the firebox is equipped with a grate, and warms up the bottom of the room. In addition, the Teplushka cooking chamber cools down more slowly than that of a Russian stove, because the oven is also heated from below. With regular two-hour heating once a day, the temperature in the furnace does not fall below 90 degrees, which allows you to cook food for a long time after heating. Without exaggeration, we can say that today Teplushka is the best stove for rural life.
Step-by-step instructions for making a mini-oven
Taking into account the layout of the mini-oven for the dacha, let's get to work.
Masonry from 1 to 12 rows
The first row is laid out, and in the second it is necessary to provide space for the blower door. The rows must be coated with the solution. Before installing the blower door, it must be wrapped with asbestos, and the door will be secured with wire.
Next, a row is laid out using refractory bricks and a mixture of refractory clay.
During the laying of the row, a grate is installed. Starting from this row, right up to the masonry, it should be done with refractory bricks.
A firebox door should be installed in the row, with which the same work should be done as with the door for the blower (wrapped with asbestos, secured with wire).
We lay out the row according to the layout. Each layer must be coated with a solution. 8, 9, 10, 11 and rows are laid out in accordance with the layout.
Masonry from 13 to 24 rows
From the row we begin to form the combustion chamber and vertical channels. The main thing here is to carefully follow the procedures, otherwise you may violate the correctness of the design.
On the 15th row it is necessary to lay out a layer of clay-cement mortar. It will strengthen the bottom of the cleaning chamber, after which you can install the door itself.
Masonry from 25 to 35 rows
Further up to the row we lay the masonry in accordance with the instructions.
In the 25th row, the bottom surface of the second cleaning chamber should be sealed, also laying this row with clay-sand mortar, and then install the door.
Next, we lay the bricks in accordance with the order, forming a chimney channel.
In the 28th and 32nd rows, two valves should be installed, with the help of which the draft will be regulated.
Next we begin to raise the chimney pipe, as shown in the layout.
If everything is done correctly, after completing all the work you should end up with a compact model like this.
This model has the following dimensions: 51 cm width, 89 cm depth and 2.38 m height. Even beginners can make such a stove. In addition, if you do not have experience in the furnace business, then it is not recommended to make more complex models, since you can get confused in the procedures and damage the integrity of the structure, which will affect the quality of its operation and service life.
Small size and the ability to quickly and efficiently heat are the main reasons for the construction of small-sized brick stoves. These characteristics are achieved in a variety of ways, differing in masonry and design options.
What is this article about?
Bibliography
- Podgorodnikov I. S. Household stoves of the prof. system. V. E. Grum-Grzhimailo. M, 1929
- Teplushka-1. Russian oven system prof. V. E. Grum-Grzhimailo and engineer. Podgorodnikova M, 1936
- Podgorodnikov I.S. “Russian stove “Teplushka-2”, M., Ministry of Communal Economy of the RSFSR, 1946
- Podgorodnikov I.S. Russian stoves “Teplushka-2” and “Teplushka-4” 158 pp., M., Ministry of Communal Resources of the RSFSR, 1956
- Podgorodnikov I.S. Russian stoves “Teplushka-2” and “Teplushka-4” 2nd ed., 154 pp., M., Ministry of Communal Resources of the RSFSR, 1957
- Podgorodnikov I.S. Household stoves (Teplushka, "Dutch", "Swedish" type, kitchen hearth) 3rd ed., 223 pp., M., Ed. Ministry of Communal Resources of the RSFSR, 1960
- Podgorodnikov I.S. Household two-bell ovens 4th ed. reworked and additional 160 s.M., “Spike”, 1992
- Podgorodnikov I.S. How to fold a stove 5th ed. reworked and additional 190 pp. M., New Wave, 1998
- Podgorodnikov I.S. The oven is the head of everything, 6th ed. reworked and additional 190 pp. New Wave, 2001
- Podgorodnikova A. Kolpakovy hearth, “Rural Construction”, No. 9, p.50-52 1989
- Podgorodnikova A. Furnace “Two-tier hood”, “Rural Construction”, p.50-52 No. 10, 1989
- Podgorodnikova A. Improved Russian stove “Teplushka”, “Rural Construction”, No. 12, pp. 46-47, 1989
- Podgorodnikova A. Construction of the Teplushka 15 stove and its handling “Rural Construction”, No. 1, p. 50-52, 1990
- Podgorodnikova A. “Teplushka 15” size 154x141 cm, “Rural Construction”, No. 2, pp. 50-52, 1990
- Podgorodnikova A. Construction of the Teplushka 2 stove and its handling, Rural Construction, No. 4, pp. 50-53, 1990
- Podgorodnikova A. Construction of the Teplushka 4 stove and its handling, “Rural Construction”, No. 5, pp. 46-49 1990
- Podgorodnikova A. Construction of the Teplushka 4 furnace measuring 154x141 cm, engineering systems. Podgorodnikova, “Rural Construction”, No. 7, pp. 30-34, 1990
- Podgorodnikova A. Construction of the Teplushka 9 stove and its handling, Rural Construction, No. 8, pp. 33-35, 1990
- Podgorodnikov I. S. Long-burning furnaces, “Rural Construction”, No. 1, pp. 32-34, 1992
- Podgorodnikov I. S. Stove for a bath (development in 1932), “Rural Construction”, No. 1, p. 34, 1992
How long does it take to build a summer outdoor stove?
Brick ovens built for outdoor cooking come in a variety of designs, the construction of which can take varying amounts of time - from a week to several months. The first heating of the constructed stove is carried out only after the mortar in the masonry has completely dried, that is, no less than 4-5 days from the date of completion of construction.
The long-awaited spring is coming, the heating season is already ending. In the village, wood-burning stoves are increasingly being fired up every other summer, and then only to cook dinner. A little more and it will be completely impossible to use the stove in the house - it’s too hot. Many rural residents and summer residents transfer their economic and culinary activities to summer kitchens, and the most cunning and “advanced” ones go outside.
Features of the structure of the Malyutka stove
The baby has a long list of advantages, the main ones of which are: low cost of construction, simplicity of design, high heat transfer. The compact size will make it easy to find the location of the new stove without a major redevelopment of the house. A do-it-yourself brick stove can serve as a fireplace in a separate room where it is necessary to increase the level of comfort. Wood, coal and anthracite can be used as fuel. The device has excellent heat transfer, capable of heating a room of up to 35 square meters with just one firebox. meters or two adjacent rooms with a total area of up to 50 sq. meters. The stove can be heated even with low-quality wood left over from spring cleaning or gardening. Due to the simplicity of the design, such a stove can be easily built with your own hands and even modified depending on emerging needs. For example, it is possible to add a hood, oven and additional surfaces for cooking. A few cast-iron coverings, fire-resistant bricks, and you get not only an inexpensive form of heating, but also a cooking stove for your dacha. The baby heating and cooking stove has the following parameters:
- height – 210 cm;
- base – 63 X 50.5 cm;
- chimney cross-section dimensions – 130 X 130 mm;
- weight – 1260 kg.
Building an outdoor oven out of brick with your own hands
Stone is considered an excellent building material for barbecues - it is effective and very reliable, but its price is often too high. In addition, when working with rough stone, the process of building a barbecue will slow down several times, and even a professional will not be able to guarantee the high quality of the result. But brick suits all parameters: it is quite light, has good strength characteristics and is quite cheap. It is best to use red clay bricks that have been fired: such bricks become fireproof and are practically not afraid of exposure to high temperatures.
Advantages of the model
Each project option is created to perform specific tasks. It is pointless to compare all models with each other, since under some conditions those characteristics that are not considered fundamental under other conditions may be important. Therefore, it is customary to highlight the advantages of the presented model. Our little brick oven is not without such a list.
- In order to install a Russian stove, you will need to sacrifice a significant part of the usable area. The very purpose of the baby suggests that high performance is not expected from her. But the compactness is appreciated by the owners of small country houses.
- The absence of elements made of heat-resistant materials is noted as a positive point. But in this matter, the choice remains with the master, since some professional builders still advise covering the firebox area with fireclay bricks.
- The simplicity of the construction scheme makes it possible to obtain a finished device at relatively low costs within a short period of time.
- Even when the stove operates in normal mode, fuel savings are noted, which will eliminate the need to stock up huge volumes of firewood.
- Some experts claim that this model does not require a foundation. Theoretically, a durable floor covering can withstand the load from the weight of the structure, but if you care about reliability not for one year, but for decades, then you should think about the foundation. In non-residential premises, the baby can be erected on a foundation using a concrete slab.
Examples of simple stoves
Date: September 25, 2021
Types of designs that are used today
Gas, electric and solid fuel boilers are the main heating devices in country cottages and private houses. Some connoisseurs of everything ultra-modern use solar panels for these purposes. But still, a large percentage of residents of the private sector use an old Russian stove to heat their premises.
Until the 19th century, stoves in village huts and even in noble mansions were a box for burning fuel with a hob, a stove bench, and sometimes an oven. For owners of a modern home, overflowing with newfangled household appliances, a Russian stove in the interior is more of a decorative detail than a practical one. Today, the range of designs has expanded and is represented by such structures.
A large percentage of private sector residents use an ancient Russian stove to heat their premises.
Nowadays, the stove acts as a decorative element
- “Dutch” - intended exclusively for heating rooms, is a compact one- or two-tier vertical structure with a chimney. This type is rarely found in modern buildings due to its inexpediency (it is easier to heat apartments using a central heating system - pipes and radiators).
- A Russian stove in a stove bench is a mandatory attribute of a village hut in Rus'. The firebox located in the lower part of the structure heated its upper part, and in the middle there was a cast-iron hob. The chimney in such a system is duct.
- “Shvedka” is an improved and simplified version of the traditional Russian stove, which is characterized by high efficiency while saving fuel. The “Swedish” can be equipped with a hob, a stove bench, and a platform for drying food (berries, mushrooms).
Each type can be built from scratch or an outdated version can be reconstructed. In order for a Russian stove to perform its functions 100%, the structure must be positioned correctly.
You can equip a place for rest on the stove
A stove in the kitchen interior will create a cozy and warm atmosphere
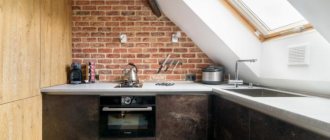
An imitation stove can be made using a modern fireplace
Photos
Fifth row. Heating chamber. Columns on which to rest under the stove. In the lower corner there is a transfer channel into the upper cap. The channel has two folds, 13 cm wide and 2 and 3 rows high. Right angles at gas turning points are rounded to reduce drag. A combustion door will be installed on this row. The grate is recessed by 2 rows relative to the combustion door in order to lower the heating zone as low as possible. Its front edge rests on a reinforcing rod 25 mm long, installed in the masonry with gaps. Three purges are visible located on the first row. The columns opposite the cleaning chambers are slightly chipped to make it easier to remove fly ash from the bottom of the heating chamber.
Tenth row. Preparing to lay the hearth. The under in Teplushki usually overlaps in three rows. First, the columns are connected (as in this row) and then two continuous rows of brick are laid. These three rows will also narrow the exit from the firebox (higho) into the furnace to a section of 25 by 38 cm. This is done to increase the area of the hearth, so that when firing in Russian style, firewood does not fall into the higho. There is a transfer channel in the lower right corner.
Eleventh row. The first continuous row of the hearth. The bricks in the front wall of the stove are shifted by 3 cm to form a decorative cornice. The combustion well is separated at its entire height from the outer red brick masonry by basalt cardboard.
Twelfth row. Under laid and sanded. In the front wall of the oven there is a decorative cornice with cut corners, protruding 6 cm. There are five holes around the perimeter of the hearth (one on the left, one on the back and three on the right) for the passage of gases from the furnace into the lower heating chamber.
Fifteenth row. Visible are the heels installed on the fourteenth row, holes for the passage of gases into the heating chamber. The mouth and hearth have been formed. The cheeks of the mouth are cut at an angle from the inside. This is done for the convenience of installing dishes in a small crucible. Fire-resistant bricks are placed behind and to the right of the heil (they do not support the heels), protecting the heels of the vault.
The same row, view from the other side.
The markings were circled for laying the ceiling arch of the pole window. The width of the opening to be covered is noted, the required rise of the arch (vault) is set, and the radius of the circle is selected using a rope. Then an inner circle is built and an outer one, 12 cm larger - the height of the brick. Next, the outer circle is divided into equal (preferably) shares, no more than 7 cm wide (brick thickness + seam). After this, radii are drawn to these points to control the laying of wedge bricks.
Laying the ceiling arch of the sixth window.
The arch is finished. The vault has been laid out. Above the ceiling of the hearth window, a smoke collector (overtube) of the furnace is formed. The overflow channel is visible at the top left; a small niche will be built on the right.
The vault is covered with a continuous row of bricks. This row is placed on the corners (shelf 40), and does not rest on the arch. There is a gap of 1.5-2 cm between the upper point of the arch and the corners. Traditionally, the ceiling of a Russian stove rests directly on the arch (and the filling of the side cavities), however, when heated, the arch expands and, accordingly, rises, which often (almost always) leads to cracking in the bed of a Russian stove. The expansion of the vault is noticeable to the eye if the stove is heated without the upper rows of the ceiling. Cracks (up to 1 mm) form in the longitudinal seams of the roof, closing when the furnace cools.
Six rows of top cap. The overpipe is gradually reduced to a section of 25 by 25 cm. A niche is built on its right. The furnace chimney pipe (13 by 25 cm) is separated in the hood; it has 2 covers, the same as in the lower chamber near the transfer channel. The stove chimney will initially be two-channel (the exhaust from the over-pipe and the pipe itself), on the second floor both channels will be combined into one, with a brick cross-section. This decision was caused by the need to move the pipe to the back of the stove to pass the rafters of the house.
The stove is ready, test firing “Russian style”.
The oven is in operating mode. The soot in the furnace burns out completely.
29.01.2011
Installation process
If you nevertheless decide to lay the furnace with your own hands, then familiarize yourself with the features and technology of carrying out the main work. This will help you complete the process correctly and avoid mistakes during installation. According to experts, many are able to complete all stages of construction without outside help.
Foundation and foundation
It is very important to take care of constructing a reliable foundation for a brick structure. It must withstand heavy loads and not sag under them
The lower part of the oven is reserved for baking and remains free. It is convenient to store household supplies and kitchen utensils there. Concrete slabs or steel beams in combination with brick are chosen as the floor for the oven.
Due to the high fire danger, the use of wooden supports is not recommended, but is not prohibited. If you still cannot replace such material with anything, do not forget about antiseptic wood treatment. Otherwise, the ceiling may be damaged by insects.
It is also necessary to pay attention to the seams and their correct processing. They should look neat after applying the cement mortar.
External walls are plastered with conventional mixtures intended for interior decoration.
Brick walls are laid parallel to each other in two rows on top of the foundation, observing the alignment. In the third row, a door for the blower is installed. Next, the masonry continues, and doors for cleaning the firebox are installed in the fifth row, and lining is also performed (internal lining made of refractory bricks). The next row will require installation of a grate.
In the seventh row we form blind channels, thanks to which we will get a warm place for the bed. Here we install the furnace door. Then you need to create channels (lowering and rising). Up to the eleventh row, the whole process is repeated, and only in this row the combustion door is closed and suction channels are formed (from the heil to the side channel, from the firebox to the riser and two transitions between the blind chambers).
Next, the suction channels are blocked and the formation of the caps (blind channels) is completed. In the thirteenth row, it is necessary to complete the lining and shut off the fuel chamber. The next layer of masonry consists of floors.
Starting from the sixteenth row, it is necessary to form a vertical channel (smoke) and a partition for protection from fire. This process lasts until the twenty-second row, in which the chimney valve is installed. Now all that remains is to lay out the chimney and you can move on to the decorative finishing, thanks to which the Russian stove with a warm stove bench, created by yourself, will organically fit into your interior.
About the heat exchanger
When building a brick stove with a water heating boiler with your own hands, you should take into account many factors and calculate the project as a whole. Any type of materials and structures have their advantages and disadvantages.
There are several ways to install a water register in a furnace:
- Inside the hearth;
- In the chimney;
- In the body of the stove, next to the hearth.
Depending on the location, choose the material for the heat exchanger and its shape:
- Copper - effective due to the high thermal conductivity of the metal, but due to the low melting point of copper, constant circulation of water in the system is necessary;
- Steel - heat-resistant steel with a wall thickness of 4-5 mm is used for boilers. For long service life of steel structures, it is not recommended to drain water from them.
- Stainless steel is expensive, but the most suitable material for a boiler. The only disadvantages include the complexity of manufacturing.
When choosing the type of material and installation location of the heat exchanger, it is worth remembering that by placing the water circuit in the fireplace, in the summer the entire system will heat up; to avoid this, you will have to remove separate batteries to remove excess heat.
When installing a heat exchanger in the chimney, additional dampers are added to the stove design, which do not heat the boiler during summer operation of the stove. It should be taken into account that the heat exchanger must be larger in volume than when built into the fireplace. In addition, the boiler should not reduce the throughput of the smoke channels.
Calculation of power and dimensions
For normal heating of the room, it is necessary to correctly calculate the register area and its power. For a brick kiln, an approximate calculation is sufficient; it is impossible to make an exact one, due to many factors and variables.
It is known from practice that heating 10 m2 of space requires 1-1.5 kW of energy. From one square meter of heat exchanger you can get 5-10 kW. To determine the register power more accurately, you need to consider:
- Location of the coil in the furnace;
- Type of fuel - wood, coal. When burned, wood produces less thermal energy.
- Approximate temperature in the hearth and location of the heat exchanger;
- Average water temperature throughout the entire circuit;
- The heat transfer coefficient of the material from which the coil is made.
As the fuel burns, the power of the heat exchanger will decrease, so it is better to increase the calculated coil area by 10-15%.
We will prepare everything you need
If you want to build a specific stove model, you will have to select the material for it and make the calculations yourself. As part of this publication, we decided to give as an example the construction of a universal oven made of refractory bricks with a barbecue, barbecue and grill. This stove will be stylized like a Russian one. What materials do we need for this?
- Fire-resistant brick – 750 pcs.
- Four hundredth cement - 12 bags of 25 kg each.
- Sifted sand – 18 bags of 50 kg each.
- Mixture for laying a brick oven - 26 bags of 25 kg each.
- Crushed stone, brick and concrete chips - 12 bags of 50 kg each.
- Cast iron blower doors - 3 pcs.
- Cast iron grates - 2 pcs.
- Cast iron stove valve - 1 pc.
- Fire doors - 2 pcs.
- Grill.
- Steel barbecue grill.
- Steel doors for cleaning - 2 pcs.
- Cast iron hob.
- Roll of roofing felt.
Important! You need to think in advance about the mortar on which you will lay the brick. We followed a simple and expensive path - we bought a ready-made mixture for masonry. But you can save money and prepare the solution yourself, but this is a long and labor-intensive process.
We've sorted out the materials. Please note that this is only a basic list; during the construction process, some other little things may be required, for example, steel wire to hold the blower doors, but you can easily figure these out yourself; we will not focus on these points. Now here is a list of tools we will need:
- Master OK;
- pick for splitting bricks;
- Bulgarian;
- trough;
- household concrete mixer;
- shovel, bucket;
- mallet;
- construction and laser level;
- tape measure and construction cord.
Nuances of furnace laying
An experienced stove maker, having thought carefully, can list thousands of nuances of laying a brick stove. Let's start with the fact that a brick oven can have dozens of designs, each of which has its own nuances. Preparation of the foundation has its own nuances; in general, each stage of the furnace construction work has a lot of features. We will not list all these features in one paragraph, but we will try to cover at least the main ones.
- If you have already built a garage, house or other outdoor buildings with your own hands from brick, remember that you need to lay the stove in a completely different way. The masonry method, foundation preparation, mortar and much more differ.
- The foundation of the furnace must be well prepared, its thickness should not be less than 0.5 meters.
- Between the foundation and the masonry it is necessary to lay a waterproofing material, ideally also thermal insulation.
- The base of the furnace is laid out from even, perfectly fitted bricks without mortar.
- All corners of the oven must be perfectly straight, use a building and laser level more often, and also level the bricks.
- Before laying, do not forget to wash the refractory bricks, and if you are laying ordinary red bricks with your own hands, then you also need to soak them for half a minute in a basin of water.
- If you decide to lay two different types of bricks in one dressing with your own hands, this may subsequently lead to the oven bursting due to the temperature difference.
- If you decide to lay a brick with your own hands on a clay mortar, then carefully select clay of normal fat content, with a minimal admixture of organic matter. It is best to ask an experienced stove maker to prepare the clay solution, since it is quite difficult to do it yourself.
- If you are laying sawn or chipped bricks, never place the sawn part inside the stove, as this part is much less durable.
Note! The blower door and other cast iron elements cannot be installed close to the brickwork. When heated, cast iron expands greatly, and it will simply tear apart the brickwork.