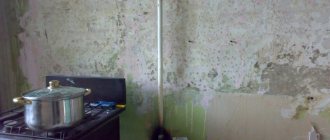
Modern apartments are equipped with various systems to improve living conditions. This can include gas, ventilation, water supply, sewerage, and also where to go from electricity. Modern people no longer want to see all these pipes and wires, so they try to hide them in the walls. If the electrical cable is small and it is not difficult to disguise it, then for pipes this can be a real challenge. How to groove a wall in the bathroom for pipes is discussed later in the article.
Strobe for water supply
Basic requirements for hidden communications
It should be noted right away that it is strictly prohibited to tap a load-bearing reinforced concrete wall in an apartment building. To be more precise, you can tap a concrete wall, but you cannot cut the reinforcement. Therefore, in stone buildings you can try to circumvent this law. If there are risers in the bathroom, they also cannot be walled up. It is allowed to make boxes and install inspection hatches at the joints.
Pipes laid in the wall must be solid, welded or brazed. If there is a mechanical connection, it must be accessible for inspection. Usually it is enough to install an inspection hatch.
Before you start gating, you need to make sure that there is no electrical wiring. Even if it is located nearby, it should be turned off. Metal, and especially plastic, expands when heated, and this must be taken into account when laying grooves. In addition, metal pipes should be insulated from walls, as they can create noise. Heating pipes are wrapped with heat insulator, this will prevent heat loss.
Advantages of types of grooves for pipe wiring
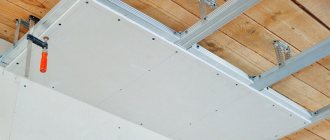
In order to increase living space and achieve a neat effect, it is necessary to hide as much as possible in the walls all communications laid inside the house or apartment. There are several ways to mask pipes:
- behind false walls, ceilings, floors.
- in decorative boxes.
When building a house or remodeling an apartment, you can initially lay pipes inside walls, partitions or in the floor without subsequent gating. In the case of finished buildings without communications laid inside, it is necessary to make special grooves. The process of making such grooves is called gating.
To simplify the process of slitting with your own hands, you need to study the following questions:
- In what areas are furrows allowed to be made?
- What are the features of gating in narrow spaces?
- What can be laid in the walls?
- What's the best way to do this kind of work?
Work plan for installing pipelines into walls
This plan is simple and includes several points:
- If necessary, you must obtain a work permit.
- A plan for the passage of the groove is drawn to scale, and some issues may arise that can be resolved at the project stage.
- Lines are drawn on the wall, and it is not the central line that is drawn, but the side lines along which the cut will pass; this will even more clearly show the whole picture of the upcoming work.
- The gating itself, the groove modification and the removal of debris are carried out.
- Laying thermal insulation, shock absorption and other available means, as well as the necessary connections of all fittings.
- Fastening to the wall using clamps, clamps or other means.
- Connecting pipes to the system followed by testing.
- Sealing grooves, plastering.
- Covering with cladding.
Advice. Connect the pipeline to the system only after it is completely installed. Otherwise, the whole house will know about the repairs by thunderous sounds traveling through the pipes.
What tools and materials will you need?
Thus, the prices for sealing grooves (and punching them) are relatively low. But doing this work yourself, of course, will cost even less. In concrete, foam blocks and bricks, grooves are most often sealed with cement. But if desired, you can use putty, rotband, etc. for this purpose. Sometimes the channels are closed with the help of alabaster. However, experienced craftsmen advise using this material only as a last resort. The fact is that alabaster, when dried, can significantly increase in volume. As a result, the canal walls can simply be destroyed.
Grooves for sockets in wood are usually corrected with a special mixture consisting of sawdust and PVA glue or paint.
The following tools are used when sealing a canal:
- putty knife;
- bucket and scoop;
- hammer drill
Grilling technology using various construction tools
Grooving is the cutting of solid material with an automatic tool. You can, however, do it the old-fashioned way, using a hammer and chisel, but this is time-consuming and labor-intensive, although these tools may also be needed. More modern ones include:
- perforator;
- grinder;
- wall chaser
Let's start with simple tools.
Hammer and chisel
It will be difficult to reach some places, for example, corners, with a grinder or wall chaser, and if you don’t have a hammer drill at hand, then the only salvation is a chisel. For a soft material such as aerated concrete, the steel grade of the chisel does not play a big role, as long as it is well sharpened.
But for hard materials, especially concrete, the steel must be of high quality and hardened. During sharpening, the metal loses its hardening, so it is better not to sharpen the chisel, but to pull it back on an anvil, after preheating it in a crucible. Immediately after pulling, immerse in cold water. The sting should not be made too sharp, because after the first good blow it will crumble.
Chisel for concrete
Attention. You can only work with such a tool wearing protective glasses and gloves.
If it is possible to swing well, then an iron rod is welded to the chisel - a handle 50–60 cm long. Then one holds the chisel by the handle, and the other hits with a sledgehammer - the work progresses significantly. The hardest thing is to get involved. To do this, you can first drill a hole of the required diameter in the farthest corner and then break off pieces from it. The width of the chisel should not be greater than the width of the groove.
Hammer
This device includes a drill and a jackhammer. Has three positions:
- drilling;
- drilling and chiselling;
- hollowing out.
They use the third position and work on the principle of a chisel with a hammer, with the only difference being that the blows occur automatically. It is much faster to work with it, but it is difficult to maintain the depth of the groove and especially its evenness in width. Large pieces often fly off, creating extra work to clean up and repair dents. This is what a small area of scoring with a hammer drill might look like:
Some aesthetics can be given to the groove if you first saw through the walls with a grinder, and then finish the work with a hammer drill.
After cutting the groove like this, it will be smoother
Bulgarian
This is the name of a circular saw, but instead of a dental disc, an abrasive wheel is used. Moreover, these circles are divided according to their composition into working with different materials. When purchasing a disk, you should make sure that it can work with the selected wall. This tool usually develops very high speeds, and the broken parts of the circle can easily cut the human body. For safety, the circles are protected by special covers, which are strictly prohibited from being removed.
Grinder with abrasive wheel
The work is done simply. After assembling and checking it, it turns on, and when maximum speed is reached, and this can be heard from the sound of the engine, the abrasive stone is brought to the line and pressed lightly.
Carefully. When cutting, the disk must rotate smoothly, without distortion, otherwise it may fly apart.
As the wheel wears out, the grinder will need to be brought closer and closer to the wall to get an even cut. Be sure to use gloves and safety glasses. If the diameter of the circle is small, it is better to replace it rather than try to work it out completely.
Types of treatment plant.
Method one. Simplest. An elementary pit without a bottom. (If wastewater allows.) To improve filtration, it is better to use a single-chamber or two-chamber septic tank and a filter well. A more expensive option is a biofilter that supplies air.
- Single-chamber septic tank = cesspool + drainage layer.
Gravel is placed at the bottom of the well. Thanks to this, liquid particles are purified. Over time, deposits will form, then the layer should be replaced.
- Two-chamber septic tank = storage tank + filter well + overflow pipe.
This is the most popular option because it requires the least amount of cash outlay. In addition, this type is the most effective.
A two-chamber septic tank is popular for the home, as it does not require large financial costs for its equipment.
Wall chaser
When working with an angle grinder, you have to go through the same groove twice: once along one edge, the other time in a different way. It is quite difficult to maintain the same distance between cuts, and the groove turns out crooked. The depth of the groove also changes. If you need a wide groove, then knocking it out after cutting the edges is quite difficult; it is much more convenient when there are several cuts. But running with an angle grinder in one place several times is very unproductive.
Wall chaser with vacuum cleaner
A wall chaser was invented specifically for obtaining grooves. Unlike a grinder, one or more circles can be inserted into it, and the distance between the circles is fixed by bushings. With one pass, several cuts are obtained at once, they run strictly parallel. In professional models, the wall chaser is paired with a construction vacuum cleaner, which protects the workplace from dust, creating comfortable conditions for workers. There are two disadvantages - the high price and heavy weight.
Making walls for pipes with your own hands
The general rules for obtaining grooves are quite simple:
- We clear the space for the future project, removing all interfering objects.
- If there are tiles in the bathroom where future grooves are located, they must be removed.
- Exactly according to the plan, we draw lines with a marker where the grooves will go, this will be their center.
- Focusing on these central lines, we designate the contours of the grooves, taking into account all tolerances.
- Using the available tool, we make a cut along the contour lines to the required depth.
- Using a chisel or hammer drill, remove the material from the groove. We also use them to clean up any imperfections.
- If necessary, insulation or soundproofing padding is installed.
- We install fasteners to hold the pipes.
- We lay, connect, secure and wrap the pipes with insulation.
- We check that the pipes do not touch the walls anywhere. If this happens, we place a shock-absorbing pad in this place, for example, rubber, mineral wool, foam rubber and the like.
- We plaster the channel.
- We make inspection windows in places where pipes are mechanically connected. There should be no plaster in this place, and it should be closed with an easily removable lid.
- At the final stage, we mask the groove with the same cladding that is located nearby.
Main line laying
Installation of the sewer pipeline is carried out in several stages:
- Cutting plastic sewer parts is carried out with a regular hacksaw (for metal) or special scissors.
- It is imperative to use a regular file to remove the chamfer at an angle of approximately 15º. A chamfer is required for:
- simplifying pipeline assembly;
- minimizing the risk of damage to the sealing ring when connecting pipes.
When installing a sewer line, cutting and reducing the length of pipeline fittings is strictly prohibited.
- Before directly assembling the pipeline, the entire distribution of sewer pipes is laid out on the floor according to the laying diagram. After checking the presence of all fittings and compliance with the required length of all pipe sections, you can begin assembling the products into a single system.
- To facilitate the connection of parts, it is necessary to lubricate the elements that will be mated with silicone sealant. Thanks to the use of sealant:
- The connection of pipeline parts is greatly simplified;
- rubber cuffs are retained;
- cuffs and pipes are prevented from sticking together.
- Due to temperature changes in the length of the pipe, it is necessary to provide a compensating gap in the straight section. To do this, at a straight joint, first push in the connecting parts until they stop, and then push the pipe out 1.0 cm.
Optimal slope
Sewerage is a non-pressure system in which wastewater moves by gravity. Therefore, the installation of sewer pipes in the bathroom, kitchen and other rooms is considered to be done correctly if the required slope of the system is maintained.
Many novice craftsmen make the big mistake of thinking that the greater the slope of the sewer pipe, the better. The fact is that not homogeneous wastewater flows through the pipes. It also contains kitchen waste in the form of grease and other impurities. Therefore, the speed of sewage transport is not the same.
If the slope is too large, water will be effectively removed from the system, and food debris and fats will settle on the insides of the pipes in the form of deposits. If the slope is chosen optimally, then the liquid medium will have time to move solid residues with it.
According to building codes and regulations, the slope (per meter) for products is considered optimal:
- up to 50.0 mm in diameter – 3.0 cm;
- up to 100.0 mm in diameter – 2.0 cm.
Pipe fastening procedure
Correct and reliable fastening of the pipeline is a very important step when installing a pipeline system. The pipes are fixed along the walls using special clamps. The distance between the clamps is usually chosen equal to 10 pipe diameters. Clamps are divided into:
- rigid with rubber seals;
- floating (without seal).
Features of laying pipes in grooves
When laying a pipeline in grooves before concreting them, it is necessary:
- Set the correct slope of the system.
- Provide temperature clearances.
- Ensure that the pipes are positioned without bending or internal stress.
- Avoid displacement of pipes when concreting them.
- Securely seal all gaps with special tape.
- Wrap pipes and fittings with any protective material (fiberglass, corrugated cardboard, etc.).
If you adhere to the basic rules for laying sewer pipelines set out in the article, you can independently install an effective sewer system for an apartment or private house in a short time with minimal resources.
In this article, we will look at the conditions that can be met to brick up a water pipe.
Nowadays, many people do so-called “European-quality renovation” in their bathrooms and kitchens, which implies aesthetic beauty in everything, and this is where the average person has to think about the technical characteristics in order to protect themselves from emergency situations for many years.
Grinding concrete walls in panel houses with a grinder
Once again, it should be recalled that grooves for pipes are quite deep, so it is prohibited to groove load-bearing walls. The partitions are laid according to the previous plan. However, there are also differences.
The edges of the grooves are cut, as usual, at right angles. Then, if the groove is not too wide, the grinder is turned at an angle so that starting from one edge, the cut reaches the bottom of the cut from the other edge. You will get a sawn triangle that will fall out on its own.
Do the same with the other side. Finally, use a chisel or hammer to remove a small area in the middle part of the groove. This method allows you to get smoother grooves and less work with a chisel if there is no hammer drill.
Cutting out furrows
Cutting grooves on the wall for grooves is not difficult, but it is a “dusty” task. For these purposes you can use:
- Grinder - working with it may take longer and the level of dust will be higher. This option is perfect for home craftsmen who do repairs “for themselves.” It is very important to purchase a high-quality diamond wheel, otherwise problems with concrete walls may occur.
- Wall chaser is a professional tool for wall grooves. It provides a channel that is even in depth and shape, and does not require significant effort on the part of the master. The average cost of a wall chaser on the market is 6,000 rubles, but it can be rented for 500 rubles/day.
Homemade wall chaser
Of all the tools listed, the wall chaser is the most preferred, but also the most expensive. If you have any DIY skills, you can turn an ordinary angle grinder into a wall chaser. To do this, you will need to make an additional attachment on the motor shaft of greater length and place a second disk on it. You can separate them with a washer or bushing. In this case, the load on the device will increase, you will need to ensure that it does not overheat.
Homemade wall chaser
Other craftsmen also attach a fitting and connect a vacuum cleaner to collect dust - why not a wall chaser? One such homemade product can be seen here:
Noise insulation.
The drainage system can once again distract with its sounds. Wastewater passes through the pipes, so there are not particularly pleasant noises.
There are several ways to prevent this from happening.
- Correct choice of fittings.
- Pipeline placement angle.
- Use of specialized clamps.
- Use of special pipes. Although this is a rather expensive solution, it is very effective.
- Some use mineral wool.
Tags:
- Repair in a private house
Rate the material: