Until recently, the load on the electrical network in residential premises was insignificant. Calculations and installation of networks were not given due attention. Electrical supply projects were carried out according to standard schemes. The emergence of modern high-power equipment causes the redevelopment of the entire residential electrical wiring network, recalculation of its power and replacement of electricians. To carry out design and installation work in a new formation, you need to know the modern principles of arranging a residential electrical network.
Home electrical planning
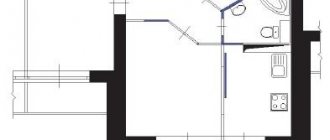
So that during the operation of electronic equipment and connecting it from various electrical points does not lead to constant reinstallation of network elements, so that you do not have to constantly ditch the walls of the apartment, experts recommend starting work on arranging the electrical network with drawing up a power supply diagram. An example of a wiring diagram and connection of electrical equipment can be seen in Figure 1.
Rice. 1. Example of an apartment power supply diagram
Such a drawing or diagram is formed in the “reverse order”: initially, all the lighting equipment and power equipment used are applied to the apartment plan; then, based on power calculations, the wiring diagram, wire cross-section, and protective devices are selected.
Power section
The power part of the electrical network includes powerful equipment used in the apartment: ovens, stoves, heating tanks, air conditioners. To connect them, separate powerful lines are allocated, protected by separate circuit breakers (RCDs). This design method will allow for safer operation of equipment in an apartment and more efficient repair work on electrical wiring networks.
Lighting part
The next block of the apartment's electrical circuit is the lighting part. There are two design options here:
- one group;
- several groups of lighting equipment.
The first type of scheme is used in small rooms equipped with a relatively small number of lighting devices. The second lighting chain method is more common. An example of such a connection is shown in Figure 2.
Rice. 2. Design diagram for several lighting groups in an apartment
If in a room, in addition to lighting elements, there is a need to use power supplies and transformers, it is also recommended to turn them on in a separate electrical circuit with a separate RCD.
Large home appliances
In any apartment, the place where a large number of household appliances are concentrated is the kitchen. Most of them continue to work when a person is not directly using them. This is a refrigerator, electric stove, bread maker, etc. To ensure correct operation of equipment and constant protection of the network from overloads and short circuits, when developing an apartment’s electrical network, experts recommend separating a separate line. Such connections are made by laying electrical wiring with a larger cross-section and installing a high-load RCD.
Bedroom
Next to the bed
A modern person needs an outlet near the bed. Charge your phone, e-book, work on your laptop - it will be inconvenient without an outlet nearby. A block of several sockets on the sides of the bed will save you from these inconveniences.
Photo: Instagram switchtowood
At functional areas
Further options depend on the furniture and areas that are provided in the bedroom. If this is a desktop, the rules will be the same as for the living room and children's room. If you want to hang a TV, also consider the recommendations listed above.
Design: Olga Shipkova
At the door
Here you need to place a switch - the average height is the same as in other rooms. There may be several switches, depending on the lighting plan of the room: spots, floor lamps, sconces. It would also be a good idea to provide an outlet for a vacuum cleaner.
Drawing up a wiring diagram
Electrical wiring in an apartment begins with drawing up a network wiring plan. Installing electrical wiring according to an existing design drawing is much simpler and more expedient for a number of advantages:
- the electrical network diagram will allow you to plan in advance the necessary equipment and facilities;
- the presence of a circuit will allow you to accurately determine the power of the input input;
- the drawing gives installation personnel an understanding of potentially fire-hazardous wiring components in order to take measures to redesign them or take additional safety measures;
- The diagram will allow installation to be carried out as planned, with verification of completion of the full cycle.
Examples of schemes for a one-room apartment
Electrical engineers believe that if the total load on the apartment’s electrical network does not exceed 25 A, then it is possible and even cost-effective to plan the network with one circuit per machine. This method is a typical standard scheme of the past, when lighting elements with power sockets were included in the circuit. Today, these techniques have been abandoned and installation is carried out along independent separate circuits. An example of wiring a one-room apartment is shown in Figure 3.
Rice. 3. Electrical supply diagram for a one-room apartment
The drawing shows the competent distribution of the network load of a one-room apartment into several separate circuits with their own RCDs. Such a system will ensure trouble-free operation of the wires and correct operation of the equipment without voltage drop.
For a two-room apartment
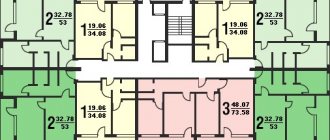
The difference between the drawing for the installation of supplies for a two-room apartment and a one-room apartment is in the larger number of circuits in terms of wiring. Some arrangements are possible here. Figure 4 shows an example of such a circuit.
Rice. 4. Electrical supply diagram for a two-room apartment
The example clearly shows several lighting circuits, as well as separately dedicated protected circuits for the kitchen, rooms and other powerful equipment.
For a three-room apartment
Figure 5 shows an example of a drawing, which is often used for apartments with three or more rooms, where a fairly large number of conductors will come out of one distribution board.
Figure 5. Example of a power supply diagram for a three-room apartment
The peculiarity of this option is that there are separate circuits enclosed in separate blocks with their own protection. In this example, there are 2 blocks (25 A and 40 A, respectively). This method allows you to separate zones of cable products, making the system more convenient and practical.
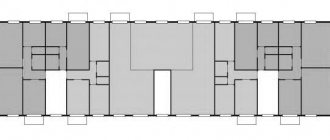
Features of the architecture of modern new buildings
In recent years, developers have given preference to monolithic frame architecture with an open plan. At the same time, in the marketing schemes of such projects, all opportunities to reduce the initial price of the object are actively used.
The lowest price category of new housing - and this is a fairly large class of apartments - is represented by new buildings without finishing, which means the absence of internal electrical wiring and, therefore, the absence of an electrical wiring project for the interior.
Despite the inconsistency with state requirements, which prohibit the commissioning of an electrical installation without electrical tests, the number of houses and apartments commissioned without electrical projects in Moscow is quite large.
All problems associated with the lack of an electrical design in a new building are transferred to the new owners, so professional development of electrical documentation today is one of the most popular services.
It must be said that this requirement is not unexpected. In advertising of a new building, as a rule, it is indicated that the low price of square meters in a new house is achieved by minimizing its cost and reducing the number of construction operations. At the same time, in most cases, the client can order the development of an electrical project and installation of the electrical network by the developer.
But in practice, the problem is realized only when, in order to connect the apartment to the power supply network, the management company requires the following actions:
- develop an electrical project (with the involvement of a licensed organization);
- conduct laboratory tests;
- obtain approval from Energosbyt.
If for ordinary new buildings this requirement can still be challenged, then for non-gasified houses, where three-phase equipment is often used in apartments, the answer to the question of whether an electrical wiring project is needed is obvious - it is absolutely necessary.
To be fair, we note that the listed requirements cannot be qualified as arbitrariness of construction companies, since the concept of “free layout” initially implies the ability to equip an apartment in accordance with the needs of the buyer.
This can be either a standard electrical project for an apartment in a new building, with a minimum set of elements, or a complex electrical complex, including control systems for heated floors, climate control systems and other household equipment.
Choice of installation method: open or hidden
After determining the layout of cable lines, the method of laying cables should be adopted. There are two ways to lay lines - hidden, open.
The first method is common when the finishing of premises is carried out with suspended structures and false panels (plasterboard, MDF). There is no need to make grooves (grooves) in the walls followed by putty. Hidden electrical wiring installed in an apartment has a number of significant advantages:
- maintaining the general appearance and integrity of the interior;
- less stringent requirements for cable installation conditions;
- increased tolerances to permitted currents.
It is not uncommon to see the option of open wiring. Wires are often placed in special plastic boxes attached to the decorative surfaces of the room. The open method of laying cables has the following advantages:
- possibility of installation after or during finishing work;
- faster installation;
- the ability to modernize the network by installing additional cables or dismantling them.
Currently, if the arrangement of the electrical network is an integral part of the general renovation of the premises, specialists often use a hidden method of laying conductors.
Types of electrical outlets - which ones to choose
You will find several types of sockets in stores, so it is worth knowing how they differ and which one to choose. Here is a list of the most important contacts you will need at home:
- Grounding (pin) sockets - used to connect higher power devices such as refrigerators, washing machines, TVs, computers, and power tools. However, more and more devices have plugs that require a pin, such as electric kettles, irons or coffee makers, so nowadays most outlets in the house must be grounded;
- Non-grounded sockets - these are no longer recommended nowadays, if only because most devices have plugs adapted to the contacts; however, it is worth having a few regular sockets at home, which are useful for connecting simple low-power devices, such as chargers;
- Sealed sockets (including those with a splash-proof damper) are special contacts for bathrooms, garages and basements, protected from water and moisture;
- External sockets - they are resistant to water, sunlight, frost and dust, so they are ideal, for example, for a terrace;
- Shutter Outlets - Recommended for children's rooms as infants cannot insert anything into the openings that could cause an electric shock or short circuit.
In addition to standard plug sockets, other types and types of sockets are used in homes, including the aforementioned USB sockets, TV sockets, telephone sockets, and fiber optic sockets.
Types and types of electrical outlets for home use
Tool you will need for the job
Electrical installation and repair is a complex, labor-intensive process performed by professional electricians. You can’t do this without a set of special equipment. In the work (for installation, replacement of old electrical wiring), the installation team uses the following set of professional tools and devices:
- angle grinder machine with cutting wheels for stone;
- bit;
- perforator;
- screwdrivers with handles made of insulating material;
- phase indicator (indicator);
- wire cutters;
- pliers;
- extension;
- knife;
- level;
- putty knife;
- portable lamp.
Electrical sockets - prices and installation costs
Unless it's a well-known brand, electrical outlets are inexpensive. The simplest option without grounding costs less than just 2-3 dollars, a socket with a pin will cost a dollar more. The most expensive are special antenna or computer sockets starting at $7. The simplest light switches (single and double) cost about 3-4 dollars.
As you can see, switches and sockets are inexpensive, but their installation will cost a pretty penny, especially if their installation requires wall slitting. The price of the service may be lower if it is performed by a team that installs all the electrical wiring in the house, i.e. within one comprehensive service.
Installation of socket boxes and wall grooves for hidden wiring
List of further works
After the wiring diagram has been sketched out, we begin to calculate the network parameters and install it.
Selecting a cable and calculating its cross-section
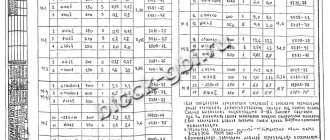
To accurately calculate the cable cross-section based on the power of consumers, use the following relationship: I=P/U, where P is the total power of all consumers in the circuit for which the cross-sectional area of the conductor cores is selected, and U is the voltage of the apartment network. Most often, the wiring circuits are arranged in such a way that the electric current load in them does not exceed 25 A. In this case, the following sections are used:
- wire VVG-3*2.5 – two-core power cable with a cross-section of one conductor of 2.5 mm2. This is the most used wire for organizing the electrical network in the apartment. They connect the distribution board with the distribution boxes of the premises;
- wire VVG-3*1.5 - two-core power cable with a cross-section of one conductor of 1.5 mm2. Such conductors are used for installation from distribution boxes to sockets, automatic switches in the panel;
- wire VVG-3*4 – three-core power cable with a conductor cross-section of 4 mm2. Such conductors are separated into separate circuits for connecting powerful apartment consumers (furnace, heating tank, etc.).
Marking sockets and switches
The placement of sockets and switches in the apartment should ensure ease of use and cover the needs of residents in connecting equipment. A typical example of the layout of electrical equipment (connection points) is presented in Figure 6.
An example of placing connection points in an apartment
When marking the locations of sockets and switches, the following requirements of modern standards must be observed:
- sockets and switches are located to the left of the doors;
- switches are mounted at a height of 0.9 m from the floor;
- in living rooms, sockets are located at a height of 0.4 m from the floor, in the kitchen - 0.95 -1.15 m, in the bathroom the use of sockets is prohibited.
Wall chipping
After marking the locations of distribution boxes, sockets, switches, and installation points for lamps, they begin to arrange grooves (grooves) along the walls and on the ceiling for laying out the wiring. It is worth remembering that gating should be done in horizontal and vertical planes along straight lines. This will make it possible to more accurately determine the location of the wire in the future. The grooves are made using a grinder or a hammer drill. The depth of the groove must be at least 20 mm, and the width must be sufficient for laying all cables planned for laying in this location.
Cabling
The principles of laying cables for hidden and open wiring are the same. Installation starts from the connection points and leads to the distribution panel. Next, the line is inserted into the shield and moved to another circuit. If necessary, identification tags are hung on the end sections of the wiring for quick reference. After installation is completed, the cables are covered with boxes or putty in the wall.
Installation of socket boxes and junction boxes
The laid wiring is brought to the mounted junction boxes and electrical outlets, inserted into them, and the ends are driven out with a small margin. All wiring branches are arranged in boxes. The connection of the conductors of aluminum or copper wiring must be reliable. For connection, it is advisable to use special devices, as shown in Figure 7.
Connecting conductors in a junction box
Immediately before connecting the wires, they ring and make sure that the installation work is carried out correctly at this stage.
Installation and assembly of electrical panel
When all the cables of all electrical circuits are laid to the installation site of the electrical panel, they begin to organize the apartment's distribution panel. This part of the electrical network is characterized by a large number of conductors and protective devices, so it is very important to make all connections correctly. For the shield, you always choose mounting boxes with a certain supply of seats. This will allow you to upgrade the system or eliminate its malfunction in the future.
An example of an electrical panel diagram for a standard apartment is shown in Figure 8.
Figure 8. Example of electrical panel diagram
In the figure, the positions indicate: 1 - introductory machine; 2 - electric meter; 3 - zero bus; 4 — protective grounding bus; 5–9 — automatic machines; 10 - separate automatic switch for lighting
Installation of sockets and switches
Sockets and light switches are installed in pre-installed boxes with wire ends removed. The process is not difficult and will require a minimum set of tools: pliers, wire cutters, and a screwdriver. This is the final stage of installation work on the apartment’s electrical network.
Checking the quality of work
The quality of the work performed is checked by turning on the wiring circuits and checking the presence of voltage and the correct phase distribution in the network. This procedure is carried out using voltage indicators. Incorrect installation can also immediately show a disconnected circuit breaker against short circuits.
Children's room
At the door
At the entrance to the room, a switch is traditionally placed. Typically, the toggle switch is installed at a height of 75-90 cm from the floor, so that each family member is comfortable. It is also important to ensure that the switch is not blocking a cabinet or an open door - place it on the same side as the handle.
Photo: sdelano.ru
An outlet should also be located next to the switch. You will need it for a vacuum cleaner, heater or humidifier. Recommended placement parameters: height about 30 cm and distance from the door 10 cm. If the child is small and begins to walk, provide plugs or covers for sockets.
At the berth
Near the bed you will need an outlet for a night light, a musical pendant for the crib or another device (for example, a humidifier). Don't forget about protection; this place will become the most accessible for the child as soon as he begins to stand up independently in the crib.
For an adult child, sockets are also useful opposite the bed for the TV. Sometimes they can be interestingly used in the interior if you haven’t bought a TV yet.
At the desktop
The student’s room should have a desk—sockets are also needed there. At least for a lamp and a computer. Where to place it - above the countertop or below - is a controversial issue. Some people find it inconvenient to constantly crawl under the table to connect the device. Others don't like the look of wires. Choose after weighing the pros and cons.
- Apartment
Replacing wiring in a panel house: how to do it right
Typical frequently asked questions from readers
What kind of circuit breaker should be installed in the apartment if the electrical switchboard is rated at 25 A?
If a 25A circuit breaker is already installed in the entrance (in the electrical switchboard), then it makes no sense to install more than this rated current in the apartment.
It is more advisable to install circuit breakers with a lower rated current - 16 or 20A. If you connect a large number of powerful electrical appliances in your apartment that can simultaneously be included in the electrical circuit, and their load significantly exceeds or approaches the rated current of 16 - 20 A, you can use the same 25 A, but with greater sensitivity than set in entrance. For example, if there is C25 in the entrance, you can put B25 in the apartment.
How many sockets do you need for your home?
The number of sockets in the house and in individual rooms must be adapted to the needs, i.e. the number of devices that will be connected to them. According to experts, their minimum number should be as follows:
- In the kitchen there are 5 sockets with protective contact, including an appropriate number of high-current sockets for devices such as a refrigerator, stove, dishwasher;
- In the bathroom there are 3 sockets, including two regular and one high-current for connecting a washing machine;
- In the rooms - 1 socket for every 5 m2 (more should be planned in the place where RTV devices are connected, for example, TV, home theater, etc.);
- In the living room there is 1 socket every 2-3 meters for connecting a vacuum cleaner and other electrical appliances (floor lamps, floor lamps, etc.).
Important! It is worth remembering that the number of sockets depends on the number of circuits. According to the regulations, one circuit must have a maximum of 10 sockets or 20 lighting points.
How to install electrical outlets yourself
Connecting sockets is not difficult, so many people prefer to do all the work themselves. This can only be done correctly if you know how to connect them. Remember that any connection error can be dangerous for a person.
So how do you connect electrical outlets? Here's a quick guide :
- turn off the electricity in the building;
- make a hole in the wall where the outlet should be (be careful not to damage the internal installation);
- insert the electrical box and connect the cables to it;
- connect the cables to the socket (yellow wire to the contact, black phase wire to the L plug, blue neutral wire to the N terminal);
- secure the socket cover to the wall using a screwdriver;
- turn on the power and check the operation of the contact, for example, with a screwdriver with a voltage sensor.
According to international standards, each wire connected to an outlet must have a specific color. Zero - blue wire, phase - red or brown