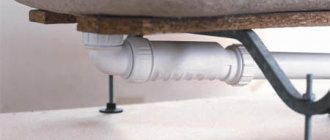
Hello! The store clerk was absolutely right. In your case, having an emergency drain is simply necessary. The system is installed directly into the floor, which allows water that appears in the event of an accident or other unforeseen situation to go into the sewer. In addition, it is necessary to properly waterproof the floor, which will guarantee that there is no possibility of flooding your neighbors. By the way, the cost of installing an emergency drain cannot be compared with the amount that all neighbors below will have to pay in the event of an accident and water leak.
What is an emergency drain? This is a device built into the floor called a ladder. There are two main types of equipment - with a water seal and with a dry seal.
There are many variations of emergency drains, so choosing the right one will not be difficult.
Water seal system
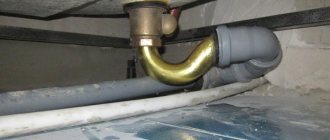
A fairly simple product, which is a plastic tube that bends at a certain angle. After installation and spillage, water accumulates in the bend, which plays the role of a water seal. It does not let the unpleasant smell from the sewer into the apartment.
The main problem with the device is the possible drying out of the water in the seal, which will lead to its failure and the appearance of sewer odors in the room. Drying out of the water seal most often occurs in the case of infrequent use of the system, excessively high room temperature, design errors, and others. However, you need to understand that solving the problem is very simple: you just need to spill water on the drain.
Types of mechanism and materials for its manufacture
The bathroom systems we are interested in can be semi-automatic or automatic. The first type of drain has a small cable. It serves as a connector between the drain plug and the overflow device. Semi-automatic draining is used simply. When you need to open its hole, pull the cable and thereby lift the plug. Water from the font rushes into the sewer pipes.
A semi-automatic drain is inexpensive, looks quite attractive in appearance, and even a child can operate it correctly without any extra effort. The only disadvantage of this design is that the cable that lifts the plug may break with frequent use. However, this problem is inherent exclusively to inexpensive mechanisms. Automatic draining is structurally more complex. It functions differently. To lift the cork, you need to press on it. And the automation itself will open the entrance to the drain hole! The mechanism that provides this opportunity is mounted in the plug itself. The disadvantage of the system is the need to bend down to the bottom of the bath to press the lid.
Semi-automatic drain
Recently, another type of automatic drainage with a special filling device has been actively used. Its installation is recommended for hot tubs without a mixer. This mechanism connects the water supply pipe to the overflow. This allows you to draw water into the bathtub using an overflow device. Drain-overflow systems are made of metal and chrome-plated brass, as well as polyethylene and various types of polypropylene. Metal products are short-lived in use. Now they are practically not used.
The most expensive is the brass siphon. He looks great. It is used when they want to create a special interior in the bathroom. But according to some indicators (in particular, the level of resistance to mechanical loads), brass products are inferior to cheaper and at the same time more resistant polypropylene and plastic structures.
Dry seal device
It does not have the disadvantages of equipment with a water seal due to the fact that it is equipped with a special mechanism, which, subject to gravitational influence, tends to constantly occupy a position that blocks the sewer pipe. If water gets inside the drain, it will lower the valve down and easily enter the pipeline.
There are several variations of devices that differ in the principle of operation of the locking mechanism: membrane, float, pendulum and using the molecular memory of the material. In any case, dry seal equipment works very efficiently. An additional advantage of such a drain is the possibility of equipping it with a check valve, which will not allow waste water to return back into the room.
Some useful installation tips
Before assembling and installing the drainage device, you need to check the level of the bathtub, the diameter and position of the drain pipe. Then you should read the instructions to take into account all possible nuances.
When installing the device on an old metal or modern acrylic bathtub, check the drain holes. If any roughness is found on them, they are eliminated using emery cloth.
If the drain is rough, it is impossible to ensure that the siphon fits tightly to it. Before final tightening of the device, you should check the correct assembly; gaskets require special attention. They often move, so it is better to apply a special sealant to them.
The correct slope of the pipe also ensures normal operation of the drain. The drain pipe must be directed directly to the collector. If the siphon is equipped with several inlets for branching the drain into the collector, but they are not intended to be used, they should be plugged with a special nut.
When purchasing a siphon, its important characteristic is the quality of the material, and if it is plastic, then the main thing here is the wall thickness and processing technology. The denser the walls of the drain device, the better it will resist loads
The presence of cracks, even disguised ones, is unacceptable on a cast iron drain. If such defects are found, it must be replaced. The surface of the brass siphon must be absolutely smooth, otherwise it will have to be cleaned frequently.
To avoid leaks, seals on the drain are changed on average once every six months, and those installed between the pipes - every 3 months. To prevent scale deposits on the walls, every few months it is advisable to rinse the device with hot water with an additive in the form of citric acid.
If chemical cleaners are not contraindicated for the material, then you can use “Mr. Muscle”, “Ruff”, “Phlox” and the like.
Gangway selection
How to choose an emergency drain? Everything is very simple. When selecting a device, it is important to determine its design features and dimensions. The latter assumes the height of the ladder, which determines the amount by which the floor level will have to be raised when installing the equipment, given that the device will need to be mounted in a small recess in the floor covering. Device sizes vary. Standard drain drains are available with a height of about 12 cm, but if desired, you can find ultra-thin models whose height is only 6 cm.
The diagram shows a properly installed drain with a dry shutter, covered with a decorative grille
Features of a semi-automatic siphon
Semi-automatic design
The most practical systems are considered to be semi-automatic. Their design is distinguished by the presence of a control unit on the outside of the overflow grille. The device is designed to adjust the tension of a special cable. One edge is connected to the block, and the other to the drain plug using a rod on the collar, while the plug is firmly connected to the system as a single mechanism.
The control unit is always located on the back side of the hole and is presented in different design forms:
- handle with pad;
- button;
- swivel ring.
To open the drain at the bottom of the bowl, you do not need to immerse your hand in the water; you just need to turn the ring or handle on the end side of the bathtub. She will tighten (to close the drain) or loosen (to drain water) the corresponding cable, lifting the plug.
The disadvantage of a semi-automatic system is the likelihood of the cable chafing and the bolt mechanism jamming, but this is directly related to the quality of the design. To protect yourself from such problems, it is recommended to choose equipment from trusted manufacturers that guarantee reliability and durability.
Emergency drain installation
How to properly install a drain? Here, too, everything is quite simple. The equipment is installed before the flooring is laid, but after the work on waterproofing the room is completed. We perform the following operations:
- We mark the location of the drain on the floor. Taking into account the height of the floor covering, we determine the height of the ladder position. We mark the resulting height on the part and cut off its excess part.
- We assemble the ladder. To do this, put an o-ring on the groove and put the device in place. Cover its upper part with plastic film and carefully secure it. This is necessary to protect the drain when pouring the screed.
- We carry out preparatory work before pouring the screed. We set the beacons so that a slope is formed directed towards the drain. Its value should be at least 1 cm per meter of surface.
- We fill the inclined screed and wait for it to dry completely.
- We are finishing the installation of the ladder. We remove the protective film, install the siphon glass and put a special sealing ring on it. Take the lid, put it in place and turn it clockwise until it stops.
- We lay the flooring.
- We place a decorative lattice on top of the ladder.
The emergency drain is ready for use. Please note that the system will perform its functions flawlessly under one important condition: the bathroom must be properly waterproofed. This means that the floor in the room is a multi-layer system consisting of a rough concrete screed covered with waterproofing extending onto the walls, and a main screed. The finishing floor covering is laid on top. Only such a system will provide a guarantee against possible flooding of neighbors below.
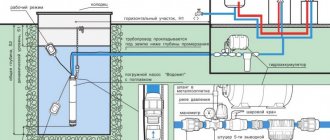
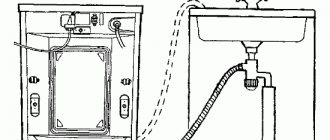
How to connect a bathtub to the water supply
After installing the sewer connection, the mixer is installed. With its help, the bath will be connected to the water supply. Water outlets are holes in the wall to which outlets from the central riser are connected.
Mixer design
- FUM tape is wound around the eccentrics. Afterwards, they are screwed into the socket with neat, smooth movements. The inside of the “boots” is not sealed - there will be a gasket that will do an excellent job of protecting against leaks. Only after this are glasses or reflectors installed on the open parts of the eccentrics;
- The mixer kit comes with special gaskets. They are attached to the protrusions of the eccentrics and the crane itself is mounted on top of them;
- A shower hose is connected to the mixer. Its fastenings are also sealed using rubber gaskets, and the threads are sealed with FUM tape. If desired, you can immediately install a holder for a shower “rain”;
- Then his work is checked. Be sure to inspect the eccentrics - nothing should drip from them. If water leaks from the connections, the parts of the structure need to be pressed more tightly.
The best way to check is to turn on the water and run half a bath. With such pressure, all weak connections will immediately show themselves. Detected leaky fasteners are tightened and treated with sealants.
Installation features
Actually, most of the information has already been told, all that remains is to assemble the purchased components in accordance with the design idea.
Pipes are assembled from the riser (inlet pipe) towards the consumer. In other words, the pipes that are closest to the drainage point into the common house riser are installed first.
At each connection, the pipe should fit into the socket of the previous one by approximately 50 mm. If the cuff in the socket is too tight and you cannot insert the outlet, then you need to lubricate the cuff with liquid soap or detergent - things will go much easier.
Plastic pipes are cut using any available means: a grinder, a hacksaw. You can even do the cutting with a regular wood hacksaw. The main thing is to clean the cut edge from all kinds of burrs - burrs inside the pipe will cause blockage, and burrs on the outside will prevent the parts from being assembled properly.
Some craftsmen practice applying silicone to the cuffs of assembled parts - supposedly the joint becomes even more airtight. I would like to note that the collar joints that any sewer plastic pipe is equipped with do an excellent job without silicone
. Therefore, it is still recommended to refrain from amateur activities.
In some situations, it is necessary to secure two parts together so that during operation one does not come out of the other. This should absolutely not be done using self-tapping screws, which some craftsmen screw into the end of the socket. The sharp tip of the screw sticking out inside the pipe will collect hair and cause a blockage. If for some reason the assembled unit experiences mechanical stress to “undocking”, both parts need to be secured using brackets or other fastening techniques.
To form and control the required pipe slopes, it is very convenient to use a laser level. Having built a horizontal beam slightly higher than the horizontal beam, you can control the slope by placing a tape measure on the controlled areas and comparing the distances from the pipe to the beam.
That's basically all. We have covered the main points of installing a sewer system in a bathroom, and perhaps I will add something over time.
Rate this publication:
- Currently 4.78
Rating: 4.8 (63 votes)
Classification
According to the material:
- Plastic. Plastic ladder is the most common type of product. Plastic parts are resistant to aggressive environments, are easy to clean, decorate, are lightweight and have a long service life. Plastic sewer products are intended for installation in residential premises.
- Cast iron. Suitable for rooms with harsh operating conditions. They have the greatest throughput feature. Installed in swimming pools and bathrooms.
- Made from stainless steel. Often used in medical, health, and public institutions where high hygienic standards are required.
By installation type:
- Vertical. The vertical product increases the throughput, but requires special conditions for installation.
- Horizontal. It is universal, does not require special conditions for installation, but at the same time the throughput is reduced.
How to assemble and install?
Each type of drain-overflow system has its own installation details. Here are only general recommendations and tips for installing a bathtub trim yourself.
A short installation instruction is as follows:
- choose a siphon of such a design that when installed, the distance between its base and the floor is 15 cm;
- you need to connect the hole of the tee to the grate blocking the drain;
- when connecting, you need to fix the gasket-seal;
- using a nut, the siphon itself is installed to the outlet from the tee;
- a side pipe is attached to one of the branches of the tee;
- the end of the siphon is immersed in the sewer;
- Every part of the structure is compacted.
At the final stage, you need to close the drain hole and fill the bath with water. Then, when water flows through the drain pipe, carefully inspect the entire structure for holes. You can place a dry cloth or paper on the surface under the system. Drops on it will immediately show the result.
The control module (programmer) is faulty
In modern washing machines, special boards are installed, they are called modules. They are usually located at the front of the unit. This board can be called the brain of the washing machine; it carries out various programmed commands, and the spin program is no exception, in which a signal is sent to the pump so that the drain works.
Although the parts of such a board are protected from moisture and are not subject to corrosion, there is a possibility that some kind of microcircuit, for example a diode or resistor, may burn out, or the firmware may also come loose. Repairing such a board is quite labor-intensive, and therefore it is easier to replace it entirely. It is better to leave it to specialists to replace or repair the module.
Gorenje washing machine does not drain water - reasons
Many users of GORENJE washing machines have a problem when the unit flatly refuses to drain the water after washing. The problem is common, as this mainly happens due to improper operation of the washing machine. There can be quite a large number of possible reasons.
Let's look at the main ones:
The first step is to inspect the drain hose. It could become clogged or bent, which, in fact, led to the inability to drain the water. If the hose is bent, it is enough to simply return it to its original condition. If clogged, you should thoroughly clean the inside. The problem can be completely solved on its own, since this does not require special technical knowledge or experience in repairs. A more serious problem could be the filter, which could also be clogged. It is worth noting that all washing machines (except for the oldest models) have a special filter that is constantly in contact with water. Accordingly, he collects all objects that could be in the water. For example, it could be coins, paper, buttons and other small debris. Of course, if a lot of objects have accumulated in the drain filter, then the water begins to slowly drain. And over time, the drainage stops completely.
Each GORENJE washing machine comes with a user manual that describes the operating rules. Use it and find a page that explains the filter cleaning process in detail. This problem can also be resolved independently. However, in addition to the drain filter, the pipe may also become clogged. It is better to entrust the cleaning of the pipe to highly qualified craftsmen, as this is a more complex job.
And another common malfunction due to which water does not drain is the failure of the drain pump (in other words, the pump). If you hear loud noises when you try to drain, then most likely the problem lies with the pump. It is recommended to entrust this problem to professionals. Call the service center where GORENJE washing machines are repaired and tell the technician about the problem. The center's specialists will diagnose and fix the problem. It is worth saying that today almost all breakdowns can be repaired at home, provided you have the required parts and experience. In especially difficult situations, the broken part is removed from the washing machine and taken to a service center for repair (electronic board or unit motor).
Related articles: Why the Gorenje washing machine does not drain the water Why the Gorenje washing machine does not heat Why the Gorenje washing machine does not spin the drum
IS YOUR WASHING MACHINE BROKEN? CONTACT US - WE'LL FIX IT TODAY
8(499) 408-75-84, 8(926) 803-79-54
WATCH THE VIDEO ON REPLACING THE PUMP IN A WASHING MACHINE
| Replacing the hatch lock in a Gorenje washing machine with your own hands | Self-replacement of the hatch cuff in the Gorenge washing machine | Replacing glass in the hatch of a Gorenge washing machine video |
| How to replace the drain hose of a Gorenje washing machine. We repair it ourselves | Self-replacement of the pump in the Gorenge washing machine | Self-replacement of the heating element in the Gorenge washing machine video |
| Replacing bearings in a Gorenje washing machine. Video instruction | Replacing the hatch handle in a washing machine; Video instruction | How to replace brushes on the motor in a GORENJE washing machine. |
READ MORE: Do-it-yourself boiler connection: diagram
Product selection criteria
Before purchasing ladders in a specialized store, you need to know the criteria for selecting a product.
- Size. The size is determined by the average volume of waste. Consult with the seller, provide the necessary information about the future use of the ladder. Often, medium-sized drains are selected for domestic purposes (for example, in a bathroom).
- Material. The selection of material depends on the initial needs and purposes of operation. For domestic purposes, it is recommended to select plastic and stainless steel; for more serious structures (for example, public swimming pools) - cast iron.
- Equipment. Pay special attention to the built-in siphon, bushing section, throughput, and maximum load on the drain. It is welcome to have instructions for installation and operation of the finished product. Check the quality, integrity of the packaging, and any damage to the product before paying for your purchase.
- Drainage diameter. The recommended diameter for residential buildings is 50 mm, for public places - 100 mm.
For more information, contact your hardware store sales consultant. You will be provided with a free consultation taking into account your individual requirements and wishes for the finished product.
Output 1
If the sewer hose is within your sight and easy access, proceed in this way to drain the water from the washing machine if it breaks:
- Prepare a large bucket if the equipment is located far from a bathtub or sink.
- Unplug the equipment.
- Unscrew the connection point of the sewer hose to the machine.
- Direct the hose directly into the bathtub, sink, or bucket.
- If possible, tilt the machine slightly towards the drain after a few minutes to remove all the water from the tank.
- Open the drum door and remove items.
What does the error mean?
The appearance of error E7 on the Gorenje display always indicates problems with the drainage system. In simple words, the machine cannot pump water out of the tank: the drainage is too slow, and within the measured time the liquid level does not fall below o. First, the washer tries to repeat the reset, but after the second unsuccessful attempt it cancels the cycle, stops responding to user commands and displays a warning code. The Gorenje washing machine has difficulty draining for several reasons:
- the drain filter is clogged;
- the pump is faulty, clogged or has lost connection with the control board;
- the pressure switch has failed;
- the control board is broken.
Error E7 indicates problems with the drain, filter, pump, pressure switch or electronic unit.
The symptoms of each listed failure are almost identical, so without diagnostics the cause of the failure cannot be determined. You will have to check each possible problem one by one, starting with the simplest one, the filter, and ending with the most complex one - the control board. We will consider in detail what exactly to do and in what sequence.
Device
The sewer drain consists of the following elements:
- The body is in the form of an oblong tube with an extension at the top. Performs the function of water drainage.
- Grille (the so-called front panel). Acts as a filter. The grate is the only element of the ladder that can be decorated. There are round/square/rectangular front panels.
- Siphon. Prevents the possibility of developing unfavorable odors. There are several types of siphons: with mechanical/dry/hydraulic seal. The most common is the water seal (it is made of durable materials such as steel or enameled aluminum to increase its service life).
- Seal and clamping elements.
Above is the main structure of the product. Various modifications and improvements to the design by various manufacturers are possible. For additional information, ask the store staff.
Let's check the pump
Fault code E7 also appears if there is a problem with the pump. The pump itself rarely gets clogged; more often it fails due to natural wear and tear or power failure. To make a “diagnosis”, it is necessary to dismantle the device and inspect it. The procedure is as follows:
- disconnect Gorenje from communications;
- drain the water from the drum and powder receptacle if the machine is left with a full tank;
- lower the equipment to the floor, carefully placing it on the back wall;
- find the pump fixed on the cochlea;
- disconnect the connected wiring from the pump;
- establish contact between the device and a pre-prepared conductor with a plug for direct connection to the electrical network;
- check the reliability of the connection to avoid current leakage;
- plug the plug into the socket and evaluate the behavior of the device.
READ MORE: TOP 16: Best wired headphones - Rating of 2021 wired headphones