It is recommended to install the split system before the painters level and paint the walls. In a large apartment or house, you may need several indoor units and one external unit, which is connected to the fan coil units by routes of pipes and wires. These communications are connected into one bundle and sealed simultaneously. After a fresh renovation, you will again have to chisel plaster, brick or concrete to hide the air conditioner route along the ceiling or walls. These are additional costs, dirt in the room and inconvenience. In addition, electrical wires are already installed in the walls and there is a risk of damaging them if you do not use special equipment that searches for wiring.
What is an air conditioner route?
Each split system consists of at least two modules, external and internal.
The number of internal modules is determined by the power of the equipment and depends on the area of the room. All modules are connected to each other by a system of pipelines that ensure the movement of refrigerant and drainage of condensate.
The piping system connecting the indoor module to the outdoor unit, as well as the cable supply line, is called the air conditioner route
In addition to the piping, all modules are connected by a cable that provides power and control. It is this cable and pipeline connecting all the modules that is called the air conditioner route.
Advantages
These structures completely or partially cover the outdoor unit. They have different designs of horizontal, vertical aluminum slats or perforations. Through holes on the surface provide air access to the equipment. The manufacturer offers perforation patterns to choose from, including custom patterns developed at the customer’s request.
The appearance of the building is transformed: the external blocks are covered with protective and decorative elements that can be erected in niches or connected to each other. Baskets, boxes, screens organically fit into the design of the house and complement it favorably. You can choose a shade that best matches the color of the facade - then the external blocks do not stand out at all against the background of the wall. Another option is contrasting colors. If the facade has a restrained color scheme, protective elements can act as bright accents. Two-color models are available to order.
Korbas products are certified: the products have passed the appropriate tests. They do not interfere with the performance of the air conditioner and do not lose their aesthetics over time. Specially designed mounting brackets are suitable for mounting structures on any façade.
Requirements and standards
Typically, air conditioner units are connected to each other by a copper pipe. Installation of equipment should be carried out only after carefully determining its location, since moving the device even a few centimeters will then be impossible.
The external unit should be positioned in such a way that it can be easily accessed in the event of a breakdown. If this is not possible from the apartment, then industrial climbers must reach the block. When laying a pipe, you must take into account that it should not pass at an acute angle, as it may bend, which will interfere with normal operation.
Attention! In order for the new equipment in the apartment to look aesthetically pleasing, it should be installed in such a way that you can hang curtains or stick baguettes on top. To do this, certain distances from the walls and ceiling are provided.
Vacuuming
Why carry out this procedure? During installation, air entered the system and also contained argon residues. This mixture must be removed, otherwise it will significantly reduce the operating life of the equipment. Naturally, it is better if you have special equipment. But, as a last resort, you can do without it.
If there is a vacuum pump
If you have a vacuum pump, everything is somewhat simpler. It usually comes with two pressure gauges (low and high pressure), which can be used to track the pressure drop in the system, that is, to identify leaks. The vacuum pump is connected to the output on the external block with a spool (filling port), and turns on for 15-20 minutes. During this time, it removes remaining air and nitrogen from the system.
Connection diagram of the vacuum pump to the air conditioner
After this time, the pump is turned off, but not disconnected, but left connected for another 20-30 minutes. All this time you need to monitor the readings of the pressure gauges. If they have changed, there is a leaky connection in the system. Most likely, this is the place where the copper pipes are connected and they need to be re-sealed. If the pressure gauge readings are stable, without turning off the pump, fully open the valve located below. Freon begins to leave the unit, filling the system (noise is heard). We put on gloves and quickly unscrew the vacuum pump hose (freon can damage the skin). After disconnecting the equipment, open the valve on the route at the top (outlets of smaller diameter). Now the installation of the air conditioner with your own hands is completed. You can turn it on.
Without vacuum pump
With a route length of up to 5 meters, the installation of the air conditioner can be carried out without a vacuum pump. To clean the equipment you will have to release a certain amount of freon, but there is no other way. The procedure is as follows:
- We unscrew all three plugs (two on the lower port, one on the upper).
- We will work with the output of the lower port (it is perpendicular to the side wall of the split). There is a connector for a hex key, we select it according to size, but don’t do anything yet.
- Insert the key and turn it 90° counterclockwise for a second or less. At this time, freon begins to leave the unit. It mixes with air and the remaining argon that is now in the system, creating excess pressure.
- On the same port there is an output with a spool. Press the spool valve for a short time (fractions of a second) (not with your fingers, but with something quite long so that your hands are further away). The mixture of gases hisses out, taking with it air and argon. Part of the mixture should remain inside so that air does not enter there again.
- We repeat everything again: open the freon supply with a hexagon, then release the mixture of gases. If the track is 4 meters long, that's it. If -3 meters, you can repeat it again.
- We screw a plug onto the filling outlet (which has a spool).
- We use hexagons to open the valves on the lower and upper ports, releasing freon into the system.
And in this case, do-it-yourself air conditioner installation is completed and the equipment is ready for use. But in this case, the tightness of the system has not been checked in any way and the freon can slowly evaporate, and there is still some amount of air and argon left in the system. In general, the solution is not ideal.
Methods for laying a route for an air conditioner
Before you start chipping a wall for an air conditioner, you should understand what methods of work exist. It is important to remember that the system may fail over time and therefore require repair. A route that is not covered by a wall is easier to manipulate in this way. The second method involves completely decorating the route, but this may complicate subsequent performance testing and repairs.
Horizontal fines in a panel house, brick or monolithic.
The load-bearing concrete walls of panel and monolithic houses contain vertical reinforcement that carries the main load. This reinforcement is placed at a distance of 20-30 mm. from the surface of the wall (this is called a protective layer of concrete).
If you make horizontal cuts in a concrete wall with a depth of more than 30 mm, then the vertical reinforcement will be guaranteed to be cut and the load-bearing capacity of the wall will be impaired. There is no reinforcement in a brick house, but installing fines in it is also prohibited, because its implementation significantly reduces the load-bearing capacity. Therefore, horizontal grooves in a load-bearing wall are prohibited. Only non-load-bearing walls made of bricks, foam blocks, etc. can be pierced for utility lines.
Fine with cutting of working reinforcement.
Highway calculations and layout
Different air conditioners dictate their own conditions for choosing the parameters of the main line. It can have a certain length. For domestic systems, the maximum length reaches 20 m. If this value is increased, you may experience a decrease in performance levels. Before you start gating to lay the route for the air conditioner, you should consider some recommendations. So, if you have conventional equipment, then a height distance of 12 m must be maintained between the units. When installing the indoor unit, you should step back about 10 cm from the ceiling surface, which will ensure normal air circulation.
When an air conditioner is installed before finishing the ceiling decoration, you need to take into account how much the covering will fall in order to correctly determine the location of the unit. Even if the room has a fairly impressive area, it is recommended to install only one device in it. Installation of equipment is also accompanied by the correct arrangement of furniture. If there are tall cabinets in the room, they can become an obstacle to air flow, which will lead to a decrease in the efficiency of the equipment and excessive energy consumption.
Choosing a location for the indoor unit
A rather important aspect when installing a split system is the choice of location for the indoor unit, which is also influenced by several really important indicators:
Avoid direct air flow towards a person
Many people know that a directed stream of air, and especially the cold that hits a person, will not bring anything good with it, because you can simply be blown away, and the affected part of the body will give you unpleasant sensations and discomfort for several days, and to the point that you may even catch a cold. This means that the location of the indoor unit should be selected so that the direct stream emanating from it passes where you are least likely to be. If, due to the design of the room, you cannot do this, then you should immediately adjust the guide blades from your location.
Can install wall-mounted indoor unit above headboard
For the bedroom, this solution will greatly solve the problem described above, since if you do not turn on the swing mode, namely the passage of a stream of air from bottom to top, then the likelihood that you will find yourself in its path is zero. And installing an air conditioner opposite the bed will be very dangerous for your health, as noted above.
Leave the optimal amount of space between the unit and the ceiling
When installing an indoor unit, it is also important to remember not to mount it right up to the ceiling, leaving a sufficient margin in the distance; 10 centimeters are considered the optimal indicator, but if the design or layout somehow prevents you from doing this, then do not install the unit with a distance less than that. than 3 cm from the ceiling. Otherwise, look for another place
In addition, no less important basics, which everyone should certainly know, is that in no case should you install the indoor unit where the blown air will be accompanied by one or another obstacle that disrupts the circulation of the air flow, and that the distance between the blocks should be as small as possible, since a large length of the route can affect an increase in the cost of installation and a decrease in the efficiency of the split system.
How the installation of the groove begins
Of course, it is better to carry out the gating process during repairs or before they begin. In principle, everything can be done after putting the apartment in order, but this will require additional expenses and dirt will appear again. First you need to decide on the scope of work. If it is a split system, then the gating process will not take up a very large area. If the owner decides to install fan coil units, then this is a completely different job. It has long been known that the more successfully the installation is carried out, the better the split system operates. Therefore, calling specialists is always economically justified. They follow a certain algorithm of actions.
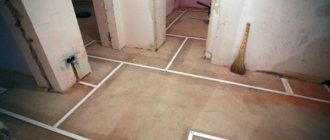
- 1. First, the grooves are marked in compliance with the required angle for the operation of the pipelines.
Photo 1. Grooving markings
- 1. Gating is carried out and communications are laid.
- 2. The drainage pipe is taken out into the street or installed into the sewer.
- 3. A separate electrical cable is supplied from the panel to the air conditioner.
- 4. The hole for connecting the external and internal modules with a pipeline is punched.
We recommend reading: Ventilation control cabinet: possibilities for supply and exhaust operation, main functions and types
It is worth considering that laying lines using grooves is an expensive process, but aesthetic and reliable.
Standard equipment
After purchasing an air conditioner, the consumer receives:
- 2 blocks – indoor and outdoor;
- Filters;
- Remote control (batteries not included);
- Copper tube (the availability of such a part depends on the manufacturer, since not everyone includes it in the kit);
- Drainage pump (in expensive models);
- Warranty card and registration certificate.
The absence of elements necessary for installation of a split system is explained by the fact that the conditions for installation are different and differ significantly. It is impossible to provide for the length of the cable, drainage pipe, the entire route, as well as the installation location and method of fastening.
Some companies additionally equip systems with devices for operation in winter. This:
- Oil heater. It prevents the liquid from thickening and thereby ensures reliable lubrication of the engine. Otherwise, oil will not flow into the compressor and it will run dry. This situation leads to rapid wear of split systems and a decrease in the efficiency of equipment.
- Heater for drainage tube. It heats up the condensate, preventing it from freezing and blocking the hose.
- Regulating device for controlling condensate pressure. With its help, the operation of the fan is controlled and the outdoor unit is not covered with a crust of ice.
A winter kit is purchased if you plan to use the equipment all year round.
The process of laying a route for an air conditioner
The mechanism for laying the route for a split system involves the use of copper pipes with their direct installation. Laying the route requires the use of special instructions in order for the operation of the air conditioner to be successful in the future. When creating a route on paper, you immediately need to calculate the maximum length of the highway. Often, owners want to install an air conditioner in a place they like, but technologically, due to length restrictions, this is impossible to do.
Installation of the route is best done using a decorative box in which you can hide all the air conditioner pipelines. This method makes it easier to find problems in the highways than to disassemble the wall and look for them there. Typically, both installation methods have significant pros and cons. For each individual installation, you need to weigh all the advantages and disadvantages of such techniques.
What key actions need to be taken when laying a route?
- 1. Carefully select the installation points of the device, since it will be impossible to move it even a couple of centimeters.
- 2. The external unit must be located in such a way that industrial climbers can easily reach it in the event of a breakdown.
- 3. Separate recommendation for old houses. The air conditioner is a powerful device. Therefore, for safety reasons, it is better to replace the wiring to withstand the load and prevent fire.
Is it necessary to obtain the consent of other residents?
It is worth paying attention to the fact that the installation of equipment falls under the clauses of the Civil Code and the Housing Code, which state that any change to the facade of a residential building must be agreed upon with all its residents. It is recommended to carry out this procedure, since in the event of any violations, the court usually takes into account the lack of consent of other residents as a basis for requiring the dismantling of the air conditioner
Typically, civil rights violations can be expressed as follows:
- The device makes loud noise and vibrates during operation, which disturbs other people.
- The equipment is installed in such a way that it extends into the area of neighboring windows and partially blocks the view from the window for other residents, drops from the air conditioner constantly fall into the window in large quantities, the drainage system is installed in such a way that condensation flows out of it onto the windows of neighboring apartments, which leads to danger gradual destruction of the walls.
- Other violations that in any way infringe on civil rights, violate fire safety regulations, create a risk of short circuits, or other problems.
Thus, it is better to coordinate the installation of the air conditioner with other residents, so as not to be faced with a sudden summons to court.
Gating algorithm
Let's look at the instructions that professionals use in the process of chiselling a wall for an air conditioner. The main thing in such actions is to follow the necessary steps consistently.
There are several methods of gating, depending on drainage.
First way. Pipelines (freon and drainage) are located together. In this case, the slope of the groove will be about three degrees, so that the condensate does not stagnate.
Second way. The drainage is installed in a different location. No tilt required. The stroba is made traditionally. It is possible to extend the pipeline under the ceiling.
Third way. A pump is installed, which will be responsible for removing the liquid.
Now the main recommendations.
- 1. When marking a recess, there is no need to make a sharp turn. This will cause the pipe to bend and cause abnormal operation.
- 2. It is also necessary to avoid sharp angles. Normal circulation is disrupted.
- 3. Be sure to use a wall chaser. Using a grinder or chisel can lead to significant damage to the wall.
Fine for wiring.
Theoretically, horizontal grooves for electrical wiring can be less than 30mm deep. and they can be performed without cutting the working reinforcement. However, in fact it is very difficult to make such a filigree fine. Firstly, the reinforcement may be a little closer to the surface. Secondly, the fine must be cut very carefully so as not to touch the reinforcement. Builders can easily make mistakes, and then you will have to answer.
It is better to carry out all communications in non-load-bearing walls, in wall boxes, a layer of plaster, and so on. Load-bearing walls are not intended for this.
The process of rolling out pipes and laying them in a groove
Clear and competent actions will ensure not only a long life of the system, but will also make it possible not to redo such difficult work.
- 1. The preliminary stage consists of rolling out the pipes into a continuous line.
- 2. You cannot step on it - the material is very soft and can be damaged.
- 3. Be sure to put insulation on the pipeline.
- 4. When both blocks are connected, the cable must be hidden in a special corrugation.
- 5. The entire route is mounted in a prepared groove and secured with dowels and a product such as mounting tape.
From the side of the façade there should not be any visible elements protruding from the groove. This will lead to problems during plastering.
Decoration
White conditioner has been a tradition for many years. Manufacturers continue to base their range on this color, but in the interior it becomes an obstacle. A simple and reliable option is decoration. Its use does not require professional skills, since a person chooses decor based on his own wishes. An interesting way was to use living indoor plants. Their branches and leaves are located on the top of the indoor unit, successfully hiding it. This is allowed by design, so the functionality is preserved.
Bright decor and simple techniques will make the air conditioner an attractive part of the interior. It will no longer be “conspicuous”, becoming just one of the details of the space. After which the room will turn into a whole picture, intriguing with its own beauty
Accordingly, a person will not have to give up comfortable coolness, so important on hot summer days
Rolling out pipes and laying them in grooves
The pipes must lie without creases or sharp corners.
Before installation, the pipes are rolled out into a straight line. At this moment it is important not to step accidentally, because copper is a soft material and easily wrinkles. Insulation is put on both pipes, the diameter of which depends on the power of the equipment.
A corrugation is put on the interconnect cable, and all parts are assembled and rewound with tape. Near the indoor unit you need to leave a pipe reserve of 50 cm. Near the external unit 1 - 1.5 meters.
Next, the route is laid in the groove and secured using mounting tape and dowels. It is important that the beam does not protrude beyond the wall - this will create problems when plastering.
Pressure testing of the route
Pressure testing is necessary for safety reasons. If workers damage the line, the pressurized system makes a loud sound. At this stage, you can restore the track without breaking the equipment. You can also install a pressure gauge to measure pressure.
We recommend reading: Repair of heating radiators in an apartment and cast iron radiators, what to do in case of a leak or fistula in a pipe
Cleaning the air conditioner route
Moisture should not get into copper pipes, as this disrupts the chemical properties of freon, which causes the formation of caustic compounds. The liquid can damage the parts of the air conditioner from the inside, and it will quickly fail. For cleaning, special equipment is used to remove moist air, after which the ends of the pipes are tightly closed with plugs.
Closing the groove
After completing all the work, you can cover the grooves with a building mixture. If communications were laid along the ceiling, you can continue the repairs and seal the ceiling with plasterboard. After caulking, it is advisable to take a photograph of the location of the main, indicating the distances from the walls and the floor, so that in case of damage, disassembling the wall is minimal.
When the final repair is completed, all that remains is to call the experts, or install the external and internal equipment yourself, then connect it and check the correct operation.
In reputable companies, the price of work includes the removal of debris after laying the highway. For this purpose, installers have vacuum cleaners with special dust bags. At the same time, you can sign a service agreement for your system so as not to clean the external unit, risking your life. Construction climbing services are very expensive, and complete cleaning must be carried out at least once a year if the air conditioner is located in a place free of dust and poplar fluff.
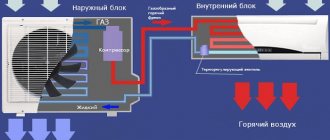
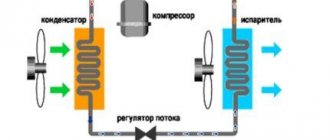
The principle of operation of the split system
First, let's find out how a household split system works - this will make it easier to understand why installation nuances are important.
As you know, a home air conditioner of a traditional design consists of two blocks: one of them is installed in the room, the second is fixed outside, on the outside of the wall, in the attic or in any other place.
A line is laid between the indoor and outdoor modules through which the refrigerant circulates. This is a closed system of copper tubes filled with freon
The process of cooling the air in the room occurs due to the continuous movement of freon and its transition from a gaseous state to a liquid state, and then vice versa. When the refrigerant is in the gaseous state, it absorbs heat, and in the liquid phase, it releases.
The condensation process, that is, the transition to a liquid aggregate state, occurs at high temperature and pressure, and boiling, at which the gas evaporates, is characterized by low values.
Diagram showing the circulation of refrigerant in a closed circuit between two modules: the evaporator is located in the body of the wall-mounted unit, and the condenser is located inside the outdoor unit
The heat transfer process occurs as follows. The compressor sucks steam from the evaporator (zone 1-1), compresses it and sends it to the condenser (zone 2-2). In this case, the refrigerant is compressed to 20-25 atm, and its temperature rises to +90 °C. Cooling and condensation occurs there.
From the air conditioner (3), the refrigerant, already in a liquid state, returns through the flow regulator under low pressure conditions to the evaporator (4). The internal air heats the liquid, boiling and turning into steam. And so the process repeats endlessly.
The transition of the refrigerant from one state of aggregation to another occurs both in heat exchangers and in pipes
In order for the process to start and finish on time, a certain length of the line is necessary - which is why it is important to take into account the length requirements established by the equipment developers. We’ve figured out the structure and operating principle of a typical air conditioner, and now let’s move on to the rules and regulations for installing its units
Possible problems and creases along the air conditioner route
Problems when installing equipment most often arise due to the fault of the owners of the premises, who, without knowing the nuances, require actions not recommended by the manufacturer:
- They ask to place the indoor unit above the radiator. The air conditioner will wear out and the compressor will quickly break down, replacing which costs half of the entire equipment.
- Place furniture in the path of air masses. Cold air will return to the air conditioner faster, the sensor will turn off the system, and the room will be hot.
- When installing an external unit on a balcony or loggia, it is stipulated that they will not be glassed for air access. If you glaze the balcony in the future, the compressor will overheat and you will have to replace the parts with new ones.
Installer problems:
- Kinks and bends of copper pipes with a diameter of less than 10 cm create problems with the circulation and pumping of freon, which increases the load on the compressor.
- Poor quality fastening of the external device. It threatens the collapse of equipment and injuries - the vibrations of the unit indicate that it needs to be better secured.
- Incorrectly selected wall for mounting external equipment. Fastening is carried out only on supporting structures.
To independently carry out such work, you need specialist advice or a detailed study of the instructions, the availability of tools and special devices, without which it is impossible to carry out the installation efficiently.
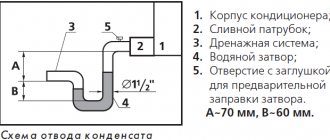
Drainage
Please note that the drainage hose must be located below the freon line.
Attach the indoor unit to the mounting plate. Attach the indoor unit to the mounting plate. Attach the indoor unit to the mounting plate.
Connect the air conditioner drain hoses.
For extensions, many use a regular metal-plastic pipe d-16mm. The factory drain tube is flared and metal-plastic is inserted into it, sealing the connection at the top with electrical tape.
However, over time, a fungus may form inside the metal-plastic material, which will not allow the water to drain away quickly enough.
Therefore, other installers use only corrugated pipes as drainage.
In addition, it is the corrugated drainage that allows you to connect directly to the bath without additional connections.
Construction of an air conditioner route
The first stage of work on installing the route to connect the split system with the external unit is the marking of the groove. It can be performed in various ways.
At the stage of marking the grooves, you need to take into account the location of other communications in order to avoid their damage
When marking, it is necessary to take into account the location of other communications in order to avoid their possible intersection or damage.
The procedure for gating
The method of marking the grooves depends on the characteristics of the drainage system and the location of the condensate drain:
- If the drainage and freon pipes are located parallel, the recess should be made with a slope of at least 3 degrees to prevent stagnation of condensate.
- If the drainage pipe is located separately with condensate drainage into the sewer system, then a slope is required only for drainage. The refrigerant line can be positioned without slopes and placed either on the wall or on the ceiling.
- If it is not possible to move condensate by gravity, it is necessary to install additional pumping equipment.
After drilling a hole in the wall to connect the route to the already installed outdoor unit, you can begin marking the route, moving from the hole in the wall to the lower corner of the unit located indoors. When making turns, avoid sharp bends. It is best to keep the slope constant throughout the entire length of the highway.
To ensure an even groove in the wall, it is better to cut the edges using an angle grinder before starting the groove. After this, you can perform gating using a hammer drill.
When punching walls with a hammer drill, it is almost impossible to get smooth edges; it is better to first cut them with a grinder. An ideal option if you don’t have a wall chaser is to use an attachment on an angle grinder
We recommend reading: Ventilation installation: the main stages of installing the system in a room, how to do it yourself
Usually it is enough to make a groove 6 cm deep. If necessary, you can reduce the depth by half, but at the same time expand the groove to 8 cm. In this case, communications will be laid in the furrow not in depth, but in width.
Calculation of required materials
For household appliances with a power of up to 3 kW, depending on the model, copper pipes are used to install the air conditioner route with a diameter of 1/4 or 3/8 inch, which corresponds to 6 and 10 mm.
When calculating the length of the tube, you should take into account the distance under the indoor block of about half a meter, the thickness of the walls, the length of the groove, the distance from the outside of the wall to the block taps. It is also better to make the length of the pipe at least half a meter on the outside to ensure a smooth bend.
The size of the electrical cable is calculated in a similar way. The only difference is that the length under the internal block is about 1.2 m, and the length outside is 0.2-0.3 m longer than the tubes. It would not be superfluous to provide for laying an additional cable that can be used to connect additional sensors.
For the installation of a drainage line, it is preferable to use a corrugated hose with a diameter of 16 mm. Calculating the length is similar to calculating the length of the pipeline, taking into account the length under the indoor unit is about 0.5 m, the length outside is about 1.2 m.
Features of route installation
It is best to start laying the route from the edge that faces the street. We form a bundle from tubes and electrical cables, put flex on it and wrap it with tape for the part of the length that will pass through the wall. This is necessary to prevent damage to the insulation.
Before dragging the tubes and cables outside, you need to form a bundle out of them, put on the flex and wrap it with tape in order to avoid damage to the insulation
After this, the harness must be pulled through the wall, taking into account the length of the outer part, calculated earlier.
Next, all materials must be placed in the groove, observing the following rules:
- The drainage hose should be located at an angle along the entire length of the route;
- The drainage should be located to the left of the tubes at the outlet of the groove when connected to the indoor unit;
- Copper tubes with a diameter of up to 10 mm can be carefully bent by hand. For larger diameter pipes, a pipe bender must be used.
- The route laid in the groove must be secured using mounting tape and secured with dowels. It is necessary to ensure that communications do not protrude beyond the groove, as this can cause difficulties during finishing work.
- To check the route, it is advisable to perform pressure testing of the system - pumping nitrogen from a cylinder under pressure. This will help check the integrity of the system and the tightness of the installation.
After pressure testing, you need to remove any remaining liquid from the system and you can connect the units and charge the refrigerant.
To carry out pressure testing, you need to pump nitrogen into the system and leave it for 30 minutes. Then you can drain the nitrogen and dry the system
After checking the operation of the system, you can begin to close the groove with a building mixture.
After pressure testing, or even better, after filling with refrigerant and checking the operation of the air conditioner, you can close the gate with a building mixture
The building mixture must be selected depending on the material from which the walls are made. Cement-based mixtures are ideal for brick and concrete walls. The following article will familiarize you with choosing the optimal time for installing an air conditioner, which we advise all potential buyers of equipment to read.
Our company is pleased to offer you a unique one.
What is included in the price of the service:
— Visit of a specialist — Drilling a 45 mm hole in a wall up to 80 cm thick — Assembling and laying a route for an air conditioner up to 5 m.p. in the groove*
- Materials used:
- Copper pipe 1/2 - 5m
- Copper pipe 1/4 - 5m
- Insulation for pipes fleх-10m
- Electrical cable 5x1.5 - 5 m
- Drainage hose - 5m.
*Wall chiselling is not included in the cost of the service and is calculated separately.
Suitable for air conditioner 12-18 models:
Power: 3.0-5.0 kW. Area: 30-50 m2.
Laying a route for an air conditioner (laying freon routes) is carried out during repair and finishing work indoors, as well as during the renovation and finishing of an apartment. The service we offer for laying a route for an air conditioner is carried out taking into account all the necessary requirements.
This approach will avoid visible communications leading to the indoor unit of the air conditioner. Any smallest details are agreed upon with the Customer. All work is carried out according to a proven plan and in strict sequence. To lay freon routes in the wall, grooves are made with further sealing of the grooves by builders.
IMPORTANT!
When laying routes for air conditioning, the quality of the materials used is very important. Because
our company provides a COMPLEX guarantee for air conditioners and installation work; we are primarily interested in the quality of work, and accordingly we use only the highest quality materials and components.
The copper pipe we use is of the highest quality and guarantees the absence of microcracks and creases at bends and in places of rolling. All materials used have certificates of conformity.
The procedure for laying a route for an air conditioner:
- Decide on the location of indoor and outdoor units.
- Draw and execute grooves.1
- Lay freon routes. Hang street block.2
- Complete repair and finishing work indoors.3
- Install the air conditioner. PNR (incl. vacuum)4
1The cost of gating work is not included in the standard installation and is paid additionally. You can do them either yourself or with our installation service. For prices for gating work, see the Additional work and materials page. In order to draw grooves, you can use the service of calling an engineer.
2At your request, the air conditioner can be purchased both at the first and at the second stage of the work. Its cost is paid accordingly at the time of purchase.
3There is no time limit for completing work on site.
4The period for completing the second stage of installation and commissioning work is, as a rule, 2-3 working days from the date of your application for installation of indoor and outdoor (if not installed previously) air conditioning units.
Are there air conditioners in which the filter is impregnated with vitamin C, what is this done for?
Yes, there are, for example Ballu BSG-07HN1 Vision. This is done to saturate the indoor air with vitamin C, which has a beneficial effect on the immune system and reduces the risk of viral diseases. Can it cause harm? Extremely rare, but maybe. There is an allergy to vitamin C. It is not life-threatening, but no one needs itching and rash either. If such an exotic syndrome has been discovered in your family, then when buying an air conditioner, avoid models with such filters. If the symptoms appeared after installing the unit, there’s nothing to worry about either, just install a filter without vitamin C.
Stained glass film
Stained glass film is made translucent, so it only partially protects from curious neighbors and passersby - it does not allow you to see what exactly is happening or is in your apartment. But people moving around the rooms appear to the eye as blurry silhouettes.
Please note: stained glass film is used only if the distance between your window and the intended “spectators” is at least 3–5 meters. The fact is that, coming close to the glass, a person can easily see everything that interests him
| Advantages | Flaws |
| • Beauty - such a film will become part of the interior and can serve as a separate accent in it. • Variety of colors - There are hundreds of films on sale with patterns in different styles and with a rich range of colors. • Low price and long service life - these parameters for stained glass film are the same as for mirror film. | • Does not block ultraviolet and infrared radiation. • Half transparent. • Does not fully imitate stained glass - from a close distance it is clearly visible that this is a drawing, not a pattern made of colored glass. |
The stained glass film is fixed to the glass with water and is easily removed without leaving marks.