Any self-respecting man, or even your teenage son, will be able to understand how to assemble a sink siphon on his own. After all, this requires only a minimum of effort, a few simple skills, one screwdriver and maximum desire.
What every housewife knows about this device is that it can become clogged and need to be cleaned, or it can leak and then may need to be replaced with a new one. If there is a man in the house, there is no problem. Otherwise, you will have to turn to the paid services of a specialist.
Purpose of the siphon
Whether you live in a private house or in an apartment, if your home has a sink, washbasin, bathtub or shower, then there are siphons there. You can do without this plumbing device only in the case of an outdoor washbasin.
Siphon
A siphon is a curved section of pipe through which waste water is drained from a sink/bathtub/shower tray into the sewer system. Connecting a sink to a sewer is impossible without this plumbing fixture. After all, it is what retains unpleasant odors coming from the sewer pipe and prevents the growth of bacteria thanks to the water seal that it forms.
It is also necessary to connect a siphon to the sewer to catch coarse debris that, for whatever reason, ends up in the drain. It is important to immediately note that the plumbing device in question is not capable of fully protecting the sewer system from clogging. It is necessary to periodically use additional chemicals intended for drain cleaning.
Installation of corner structure
These models are ideal for small bathrooms. Their installation is not difficult. If the washbasin is installed on a corner cabinet, then first install the cabinet, then install the sink on it.
With the standard hanging version (without stand), the height is initially determined and marked. Then we lean the device and mark the mounting points with a pencil. We double-check the marked dimensions with a tape measure. Drill holes according to the markings and insert plastic plugs. We lean the bowl and tighten the dowels. We assemble and connect the mixer and siphon.
Types of siphons
Before we begin to analyze the question of how to properly connect a siphon to a sink or other plumbing fixture, let’s look at what types of siphons exist. After all, having decided to purchase this product, you will first of all think about its variety, which is necessary specifically in your case. For greater clarity, consider the following images.
Types of siphons
As can be seen from the above pictures, the most functional and easy to install today is the bottle siphon. We will stop there.
Assembling siphons under the sink for the kitchen Ani plast and Ani grotto
Siphons of domestic production of the Ani Plast and Ani Grot brands belong to the class of inexpensive but high-quality plumbing products. Thanks to their attractive appearance, excellent performance characteristics, high quality manufacturing and low cost, they are widely used in the Russian market.
Video - Sequence of actions when assembling a siphon of the “Ani Grot” brand
Domestic manufacturers of drainage fittings offer consumers various models of siphons. Their assembly and installation is carried out according to the general principle:
- When purchasing, the product contents are checked;
- According to the diagram attached to the instructions, the device is assembled;
- installation begins by connecting the siphon inlet pipe to the sink;
- then the main block is assembled;
- the drain pipe is connected to the sewer system;
- At the final stage, the tightness of the connections is checked.
Video - Assembling a siphon for the Ani Plast sink
In conclusion, we note that a properly assembled siphon will work flawlessly for a long time. The service life of a plumbing fixture increases if the operating rules are followed, regular cleaning of contaminants and timely replacement of worn gaskets.
We recommend that you pay attention to the article - How to embed a sink into a countertop, which describes in detail how to install a sink with your own hands.
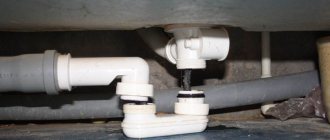
Basic equipment of a bottle siphon
To answer the question of how to install a bottle siphon on a sink, you must first consider what parts it consists of. The main components of a bottle siphon for a sink or bath are:
- protective grille;
- set of rubber gaskets;
- conical rubber cuffs;
- inlet or outlet pipe;
- connecting screw;
- coupling nut;
- bottom;
- connecting nut for sewer pipe;
- drain pipe.
Basic equipment
Various modifications of bottle siphons
Depending on your device model, it may have additional parts such as:
- several inlet pipes;
- overflow pipe;
- auto drain valve.
If you will have a washing machine next to the sink on which you are installing the siphon, you should consider purchasing a model with a special additional inlet pipe. It is much easier and more convenient to connect household appliances to the sewer through a siphon, rather than directly.
The overflow pipe is installed on a sink, the design of which initially includes an overflow hole. To avoid flooding in the kitchen, manufacturers of bathroom and kitchen sinks have recently begun to equip them with an overflow hole, and manufacturers of siphons have begun to equip their products with an overflow pipe.
Siphon with overflow
Auto-draining is a very convenient feature of modern models. When there is a need to fill the sink with water, just simply press to close the valve on the drain. Then, when you no longer need the water in the sink, the valve opens and the drainage continues as usual.
Auto drain
The image below shows one of the modifications of the bottle siphon. In general, they all have a similar device, but which modification of the siphon for the bathroom sink to choose is up to you to decide based on your specific conditions.
Siphon with stopper
There are also models of siphons for double sinks. The convenience of this model is that you do not have to install the sink siphon twice. And this will significantly save your time and effort. But not only. The model with two inlet pipes is more compact, which is important for productive use of the space under the sink. By installing 2 separate siphons on a double-bowl sink, you create a web of pipes and hoses under the sink. This will not only prevent you from placing a trash can there, for example, but will also make the sewer unit difficult to maintain.
Siphon for double sink
Features of installing a drain with overflow
Information about drain collection is included in the instructions that came with the siphon. To work you will need:
- flat screwdriver;
- insulating tape;
- siphon;
- bucket;
- sealant;
- adjustable wrench;
- a napkin made of paper or fabric.
When choosing a sealant, preference is given to products based on rubber or silicone. The products must be suitable for connecting plumbing parts.
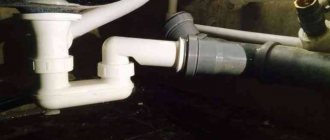
System assembly
First, connect the drain to the sink. The structure is placed under it and the dimensions are first checked for compliance. Next, unscrew the plug from the bottom of the device and inspect it for damage, thereby checking the reliability of the structure.
Before assembly, inspect the threads on the body. If there are burrs on it, they are carefully cut off. If this deficiency is not corrected, damage to the O-ring may occur during installation. Before installation, check all threaded connections, nuts, joints and gaskets.
To assemble the device flask, you will need:
Siphon assembly process
- put the gasket on the threads of the upper section of the structure;
- screw the bottom of the siphon;
- place a rubber seal of the appropriate diameter on the drain tube and put on 2 tension nuts;
- insert the drain pipe into the hole at the bottom of the siphon, push it to the desired height and tighten the nut loosely;
- install a gasket in the cover of the device and screw the drain to the body.
The rubber seal placed in the groove is coated with a small amount of sealant. To ensure reliability, the substance is lubricated with the lower thread of the plug, which is screwed into the body. To tightly connect the parts, a winding is used to remove the element when necessary. Before collection, the length of the tube is selected, the height of which is determined by the depth of the shell.
The main pipe is connected to a tube with clamps. Subsequently, the part is mounted to the sink, placing a gasket between the elements. The area between the pipe and the overflow with outlet is secured with a nut. It is recommended to tighten plastic parts by hand to avoid breakage.
Installation of the structure
First you need to turn off the water, connect the protective grille and the sink drain hole, placing a rubber seal no more than 5 mm thick between them. If the grille dimensions are larger than the hole, use a sealant rather than a gasket. A rubber seal is placed on one edge of the outlet pipe, and a chamfer is removed from the other edge, improving the fit of the pipe into the siphon.
To connect the sink and the pipe, you will need a screw with a diameter of 6 mm. The part is inserted into the protective grille and tightened. Then the drainage pipe is connected to the outlet pipe. In this case, it is necessary to monitor the connection points. For reliable sealing, you can use plumbing tape.
Installation diagram of a siphon to a two-section sink
The assembled siphon must be connected to the outlet pipe, which was previously connected to the drain. After this, a connection is made between the sewer and the drain. Before installing the cuff into the pipe, a layer of sealant is applied to it and the outlet end of the outlet pipe is placed in the part. For connection, a rigid assembly is used, connecting the sewer outlet and the pipe with a conical gasket and a nut.
If corrugated hose is used, the length of the soft hose should be such that it does not sag during use. If the dimensions of the outlet and the sewer pipe do not match, a plastic adapter will be required. You can prevent smell from entering your apartment by using a rubber cuff, which is placed in the socket.
Summarize
Assembling a siphon for a sink, washbasin, shower cabin or bathtub does not take much time and does not require special skills. However, there are a number of nuances that you should be aware of and take into account so that you do not have to do double work by redoing something. You need to take everything into account so that you don’t soon need to replace a completely new device with a more functional model, because you forgot to take into account that you will place a washing machine nearby and it will also need to be connected to the sewer through a siphon.
If you are new to plumbing and are installing a siphon for the first time, the manufacturer’s instructions for the product may be incomprehensible in some ways. Having only a schematic description of the assembly and installation sequence of the device, it does not contain important information and tips that will help you avoid mistakes and protect your kitchen from sewer leaks.
How to connect a bathtub to the sewer
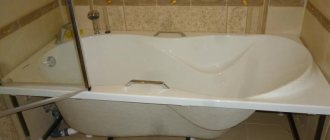
After the bathtub has been purchased and delivered to the bathroom intended for it, it must be installed correctly, taking into account the configuration of the room, existing pipes, utilities and design decisions of the owners.
Scheme of connecting the toilet to the sewer.
Having decided on its general location, which will subsequently determine the connection of water and sewerage pipes, it is necessary to adjust its stability, height and slope. Bathtubs can be installed on legs, stands or other supports. Moreover, they must withstand a mechanical load of at least 100 kg applied to the long side of the bath anywhere vertically downward, and be stable.
In addition, the height of the bath should be at least 145 mm from the floor to the bowl outlet. This is done so that the necessary height difference can be created in the area between the drain hole and the connection point to the sewer. If there is no height difference or it is insufficient, the water from the bowl will come out poorly and possibly stagnate. In addition, the resulting space between the floor and the bottom of the bowl will allow for relatively free access to the drain for possible revision or replacement of the siphon.
After installing the bathtub on the above supports or supports, make test measurements of the resulting heights: a) from the clean floor to the outlet, b) from the clean floor to the top of the side of the bowl at four points in its corners. The latest data should not differ from each other by more than 4 mm. Next, set the slope of the bottom of the bath towards the outlet through which the bath is connected to the sewer. This slope is set at the rate of 2 cm per 1 m of bathtub length. After the work on its installation and adjustment is completed and the bowl is finally fixed vertically and horizontally, you can begin connecting its drain to the sewer.